Understanding “Waiting Room” settings
You probably already know that the Waiting Room feature is a great way to control access to your meetings and prevent disruptions by unwanted guests. However, you may not be familiar with all the ways you can tailor the settings to fit your meeting needs.
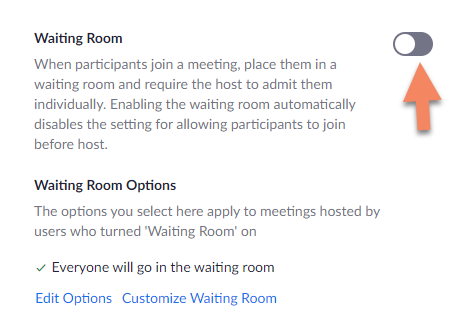
In order to use the Waiting Room, you’ll first need to enable the feature on your account page at vcu.zoom.us. Go to “Settings > Meeting > Security” to see two areas of interest: first is the “Waiting Room” option, with a slider control. With this turned ON, a waiting room will be assigned to all your meetings by default; anything you schedule will have a meeting room in force.
If you want the freedom to decide which meetings do or do not have a waiting room, leave the above setting disabled. Then, when you’re scheduling your meetings, check the “waiting room” box in your meeting settings if you want to apply it to only that meeting.
Whether you apply waiting rooms universally or on a case-by-case basis , you can use the “Waiting Room Options” area to establish the rules for who’s sent to the waiting room and who isn’t. You can choose to send “everyone” there, regardless of their affiliation, or you can choose to send only non-VCU users, allowing anyone with a VCU Zoom account to bypass the waiting room and go straight into the meeting.

You can also “whitelist” other domains to bypass the waiting room, for example guests with “@vcuhealth.org” addresses.
The advantage of limiting the waiting room to only non-VCU persons is that it helps to “weed out” unwanted guests who may try to “Zoombomb” your meeting; as the host, it’ll be up to you to decide which of those persons you wish to admit. But if your aim is to keep all your students waiting until you’re ready for them, you’ll want to use the “Everyone” option so they’re included, too.
Also, note there’s the option to allow guests who were invited by you in the course of the meeting to bypass the waiting room. This could cut down on distractions for you while you host the meeting, since it’s safe to assume you’re okay with someone entering if you just now invited them. But if you want control over what they see and hear — for example, if you’re part of a search committee and you’ve invited one or more job candidates to join for an interview — you may want to leave this box unchecked, and admit them only when you’re ready.
Recently, Zoom has added the “customize waiting room” option, which lets you add a logo, meeting description or other messaging for your guests to see while they’re waiting. This can provide a more professional look for your event.

Waiting Room, along with passcodes, is an important tool to keep your meetings safe and secure, and knowing the in’s and out’s of your available settings can make for more efficient Zooming.
Categories features, security