Canvas: Differentiation Tags

Differentiated instruction is a teaching method that adjusts instruction to fit the needs of all students through a variation of content, process, product or learning environment. This instructional technique applies to classroom instruction and online learning alike. This post will describe how you can use differentiation tags in Canvas to make assignments or modules available to specific students for differentiated content.
Differentiation Example
A graduate nursing professor had an assignment about Diagnosis-Related Groups (DRGs). They had four variations of DRGs that they wished to have randomly distributed to students. One way to accomplish this is through the use of differentiation tags.
The instructions below apply to this example, but the principle can be applied to any example when you want to select a subset of students to an assignment or module content. Only the students with that tag will be able to view it or complete it.
Setting Up the Assignments
Create four different assignments for the “DRG Deep Dive” with each assignment focused on a different DRG category. Once the four assignments are created, set up the tag set and the tags.
Setting Up the Tag Set and Tags
Differentiation tags are managed through the Canvas People menu. You first need to decide if you are using a tag set or a single tag. In this example, we wanted to have four different tags for the DRG Deep Dive assignment and DRG Deep Dive was the name of the Tag Set.
Step 1: Create the Tag Set
- Go to People
- Select Manage Tags
- Select Get Started
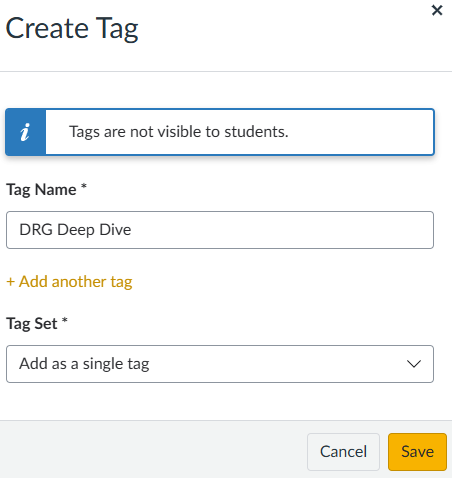
- Create the first tag as the name of your Tag Set. In this example, I first added DRG Deep Dive as the Tag Name and clicked Save.
Step 2: Create the Tags
Once you have your Tag Set, you can add tags to your Tag Set.
- Select Manage Tags.
- Select +Tag
- When you click the +Tag, you can select “DRG Deep Dive” for the Tag Set.
- Create “Set 1” click Save and click +Add another tag
- Create “Set 2” +Add another tag…and continue until you have all for sets in the “DRG Deep Dive”
- You will now have a “DRG Deep Dive” Tag Set and four tags with no students assigned.

Associate the Students with the Tags
- Go to People.
- Each student will have a checkbox.
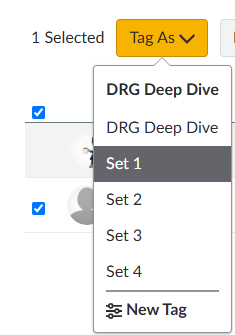
- Select all of the students that should be tagged as “Set 1”
- Press the orange “Tag As” button and select “Set 1”
- Repeat the process for Set 2, Set 3, and Set 4.
Associate Each Assignment with a Tag
The last step is to associate the assignments with the correct tag.
- Go to the first assignment and press the Edit button.
- Scroll down to the “Assign Access” section.
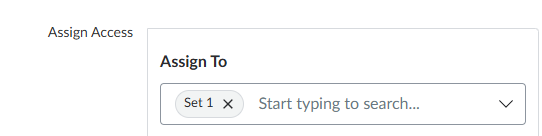
- In the “Assign To” box, select the drop down arrow.
- Remove “Everyone Else” from the box so that DRG Deep Dive Assignment 1 is assigned only to “Set 1.” It should look like the screenshot below.
- You will get a warning “Not everyone will be assigned this item! Would you like to continue?” This is good! You only want the students in Set 1 to have access to this assignment.
Resources
- Canvas Guide: How do I create and manage Differentiation Tags as an instructor?
- Renowned Educator and Scholar Carol Tomlinson Defined a New Way of Teaching from UVa
- What is Differentiated Instruction? A Guide for Educators. TEFL Institute.