Create a Lecture Using Zoom

Not only can Zoom be used for meetings, but it can also be used to create lectures for your courses.
Setting Up Zoom and PowerPoint
Preparing Zoom
Zoom Settings
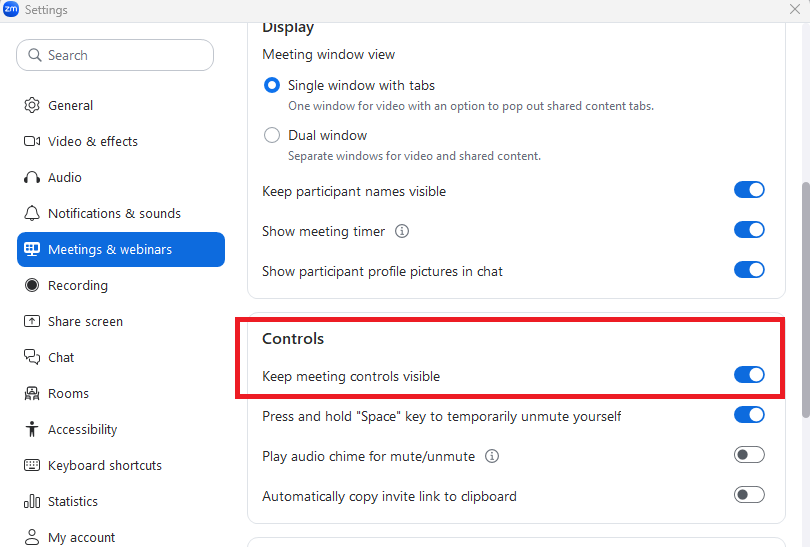
The first thing you will want to do is to make sure that your Zoom controls always remain visible during meetings. This will help you when you are sharing your screen so that you can easily find the Zoom controls to stop your share and end your recording.
- Open up your Zoom Workplace App on your desktop before starting your meeting.
- In the lower left corner you will see the Settings icon. Select Settings and go to Meetings & webinars in the menu. Scroll down until you see the “Controls” group and make sure “Keep meeting controls visible” is toggled on. See this video: How to Keep Meeting Controls Visible in Zoom (Full Guide 2026).
Start Your Meeting
Start your meeting from the Zoom Desktop app by going to Home and choosing New meeting. You can also go to the VCU Zoom Portal and choose Host.
Setting Up Audio and Video
- When you turn your audio on…make sure that you can see green in your microphone icon in the bottom left of your screen. If your microphone is picking up audio, it will be green. The louder you are, the more green will fill the audio icon.
- Turn on your video if you want to use it.
Preparing Your PowerPoint
- Close all windows and applications on your computer other than Zoom and PowerPoint.
- Open your lecture.
- Go back to Zoom to share your screen.
- In screen sharing, select the screen that has your PowerPoint lecture.
Record and Start Sharing
- In Zoom, select More > Record > Record to this computer. The recording button will turn red.
- In Zoom, select More > Share
- Choose the screen that has your PowerPoint and select the blue Share button at the bottom.
- Put your PowerPoint in Slideshow mode.
- When finished, press the Stop share button and the Stop recording button.
- Zoom will convert the recording to an MP4 file on your computer.
Add the Recording to Kaltura
Find the Recording
- Go to the Documents directory on your computer.
- Find the Zoom folder.
- Each folder will be named with the date, time, and name of the meeting.
- Find and open the folder containing your lecture recording.
- There will be 3 files. You will want the file that is named “video” followed by a number.
Upload the Recording to Kaltura
- Go to VCU’s Kaltura server and login with your VCU eID and password.
- Select Add New in the top menu and choose Media Upload.
- Upload your video file.
Add the Recording to Canvas
- Go to the Canvas page or assignment where the lecture will go.
- Edit the page.
- Put your cursor onto the page where you would like the lecture to go.
- In the Toolbar, find the icon that looks like a plug and choose “View All”
- Find “Embed Kaltura 1.3 MediaSpace” in the dropdown menu.
- Select the Blue Embed button.
- Save your page.
Resources
- VCU’s Zoom portal
- VCU’s Kaltura server
- How to record a video lecture using Zoom YouTube video
- Embed a Kaltura Video in Canvas