Navigating RAMS-IRB to Add, Remove, and Update Documents
This RAMS Gif Guide is intended for researchers and research teams using the RAMS-IRB system to manage IRB submissions. This guide will walk users through the steps in RAMS-IRB necessary to manage documents, including adding, removing, and updating documents. At the end of this post are general document management tips.
You can access more RAMS Gif Guides made for researchers by using the researcher gif guide tag on our blog. View all gif guides by using the RAMS Gif Guides tag on our blog.
Adding New Documents
To add new documents to an IRB submission, navigate to any page within the Smartform that contains a document upload section, such as the Documents page, the Background, Rationale and Goals page, or the Study Procedures page.
Then, click the “Add” button in the document upload section. In the pop-up window that appears, enter a name for the document in question #1, click the drop-down menu in question #2 and select the type of document, and then click the “Choose File” button in question #3. This will open a dialogue on your computer where you can navigate to the document you wish to upload, click the document, and then click “open” within the dialogue window.
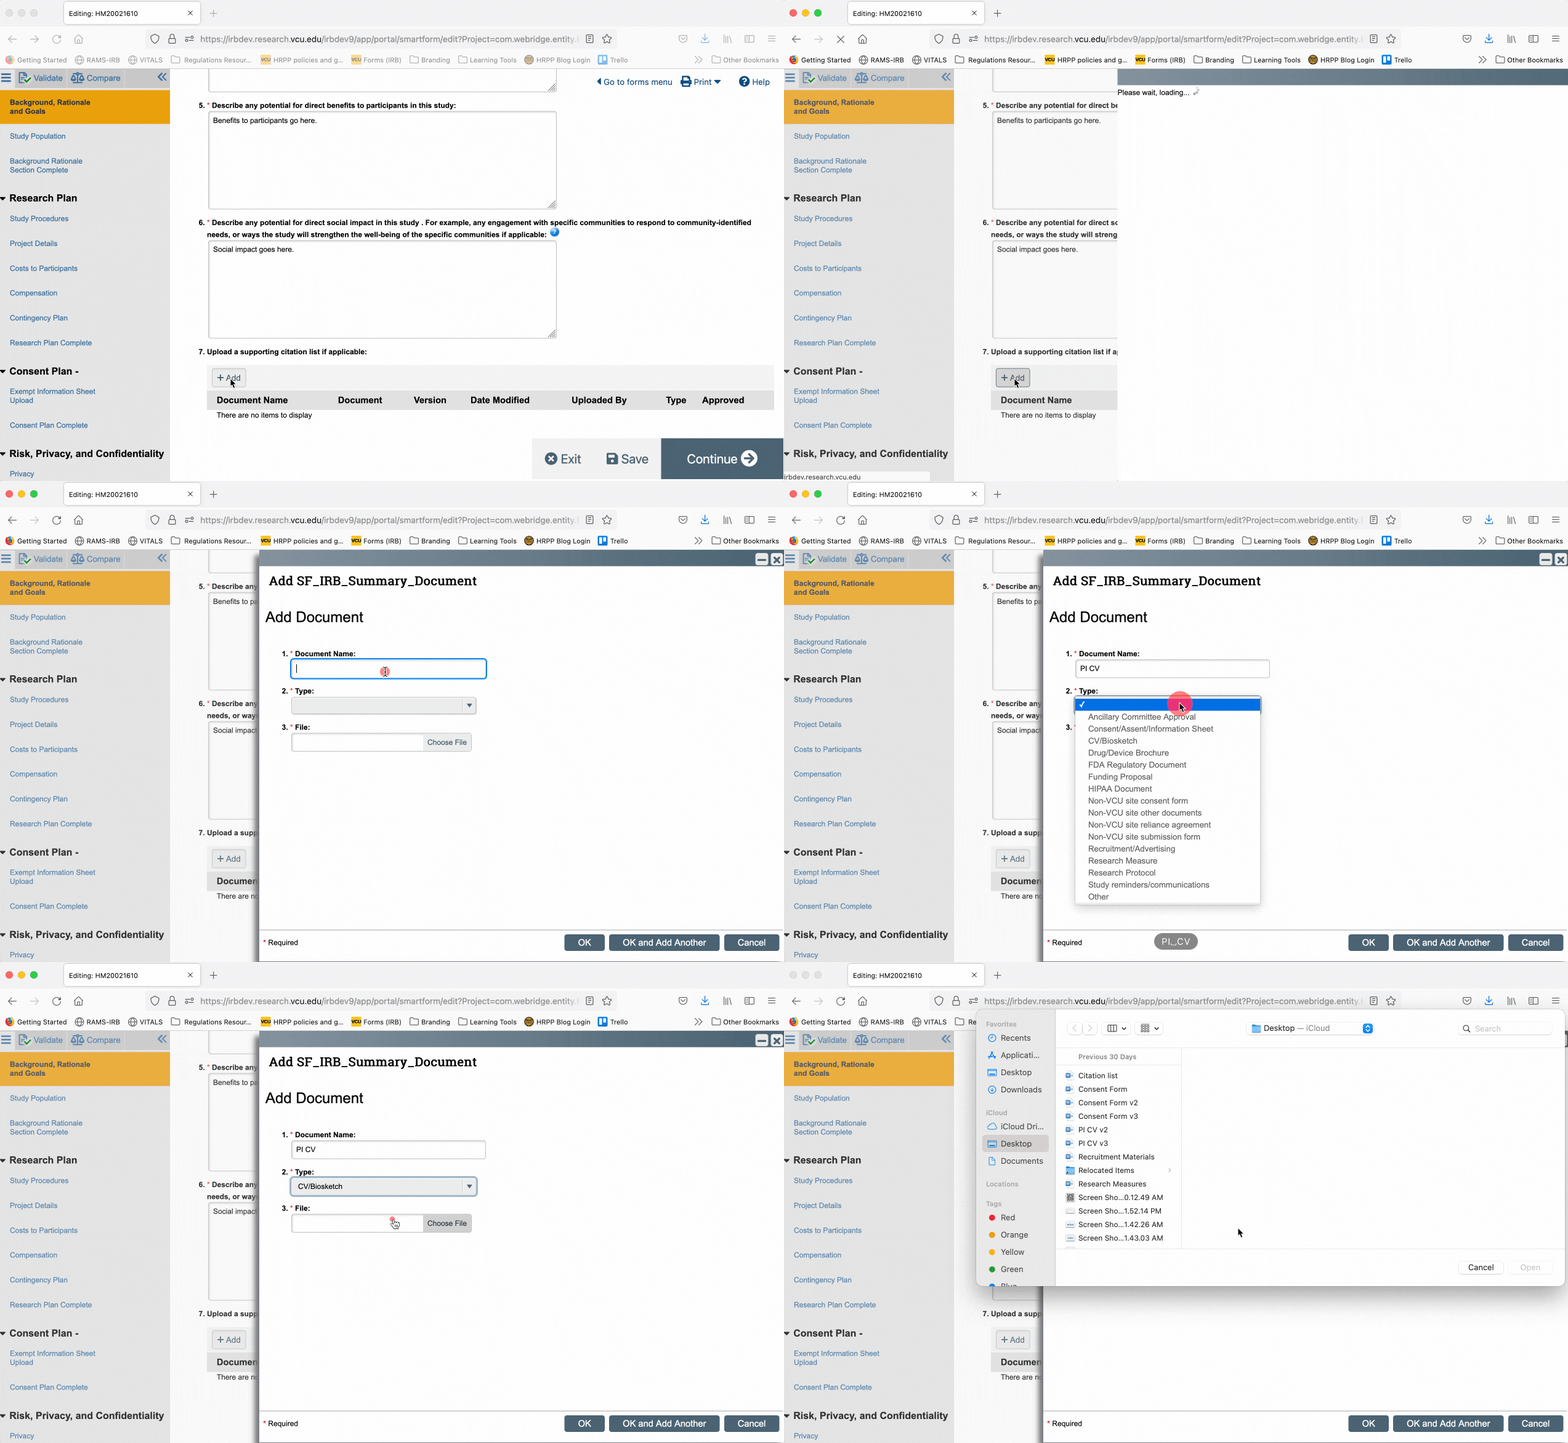
Finally, in the pop-up window, click “OK” to upload the document to the submission.
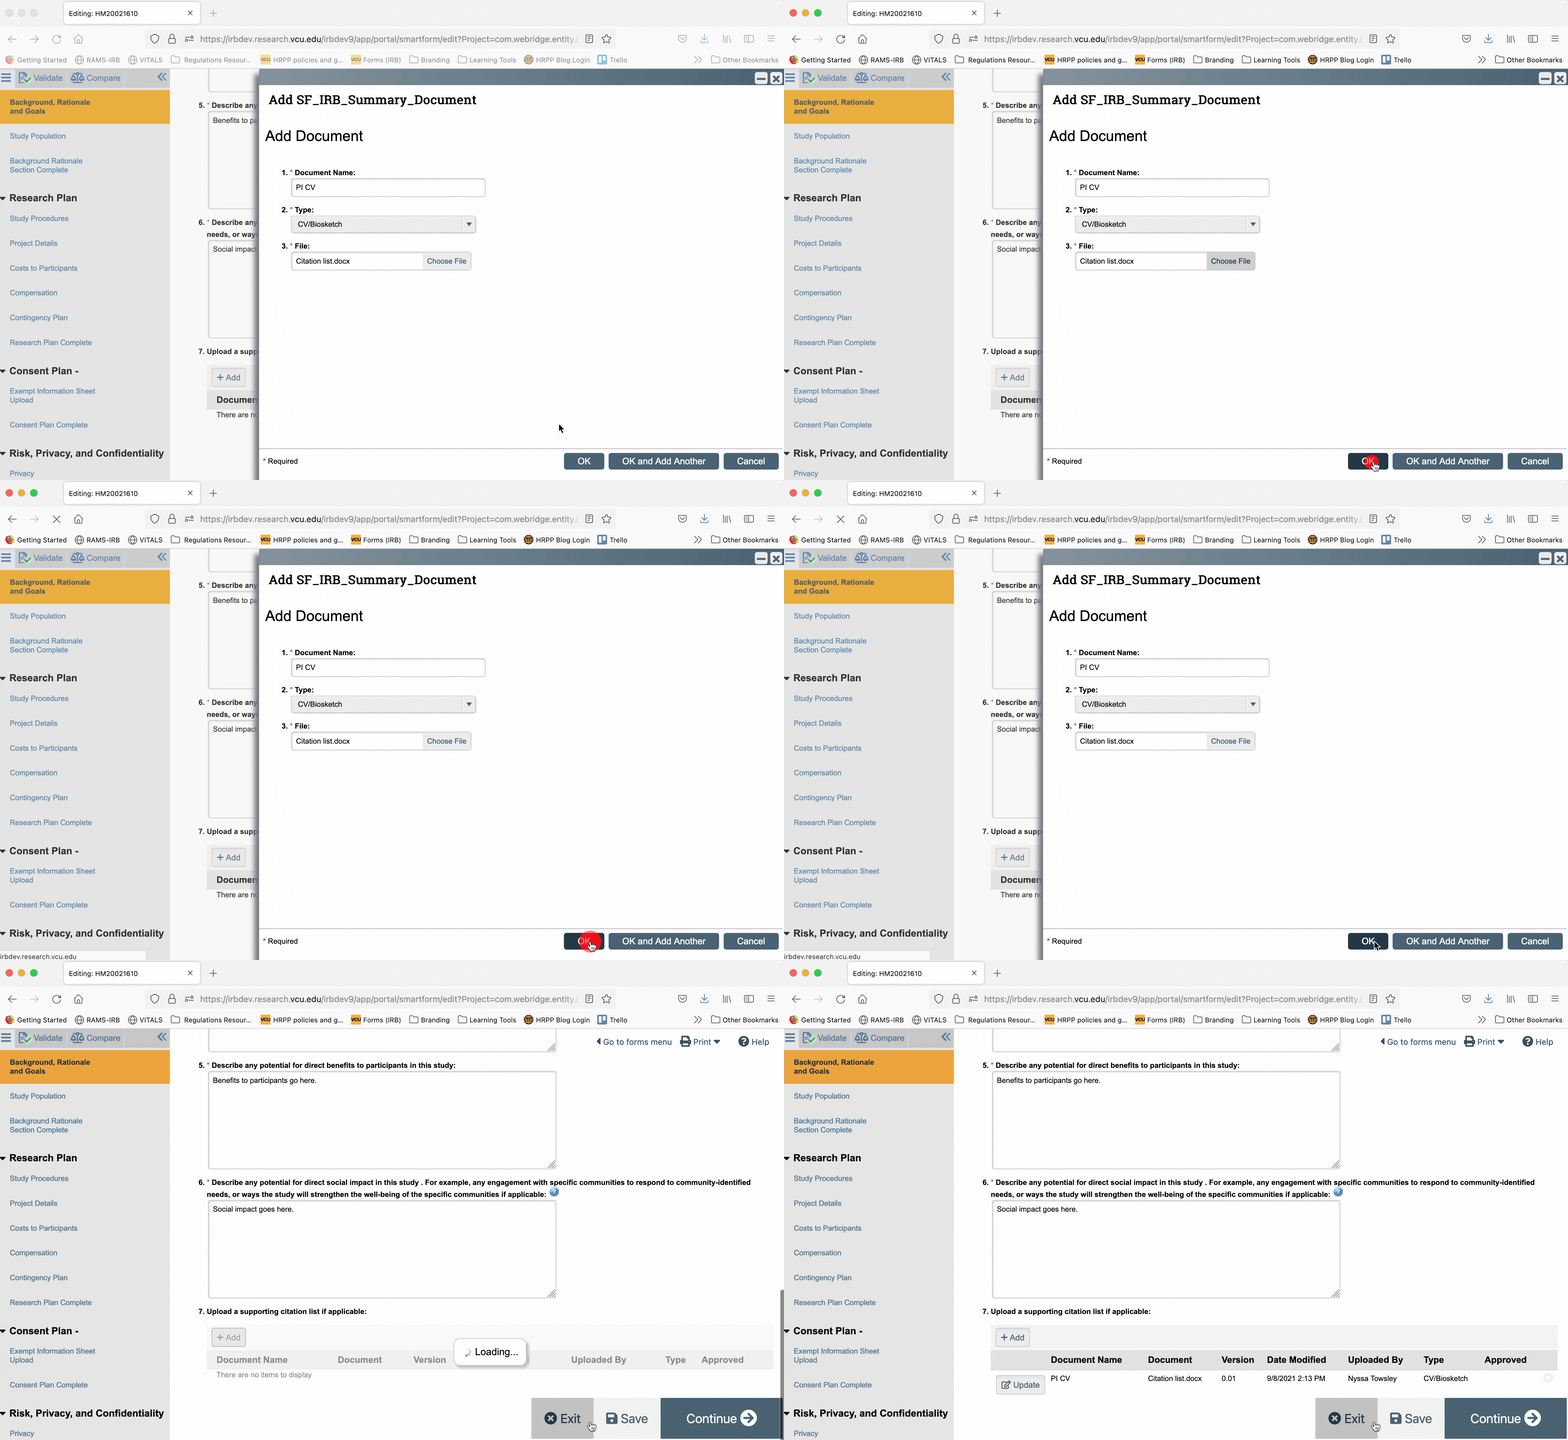
Once “OK” is selected in the pop-up window, you will see the new document entry appear in the documents list on the Smartform page.
Updating (AKA “Stacking”) Documents
Often during IRB review, documents are edited by IRB reviewers, or changes to documents are requested. When this happens, you will need to update the currently-uploaded document to add the new version. This is accomplished by updating a currently-uploaded document entry, rather than creating an entirely new document entry.
When a document is updated, the old version is retained, but is hidden “underneath” the most recent version of the document. Because all versions of a document live in a single place, this process is sometimes called “stacking,” because the new version of the document is placed “on top” of older versions. This allows the IRB to retain a record of past versions of documents, while avoiding having too many individual documents uploaded to a submission.
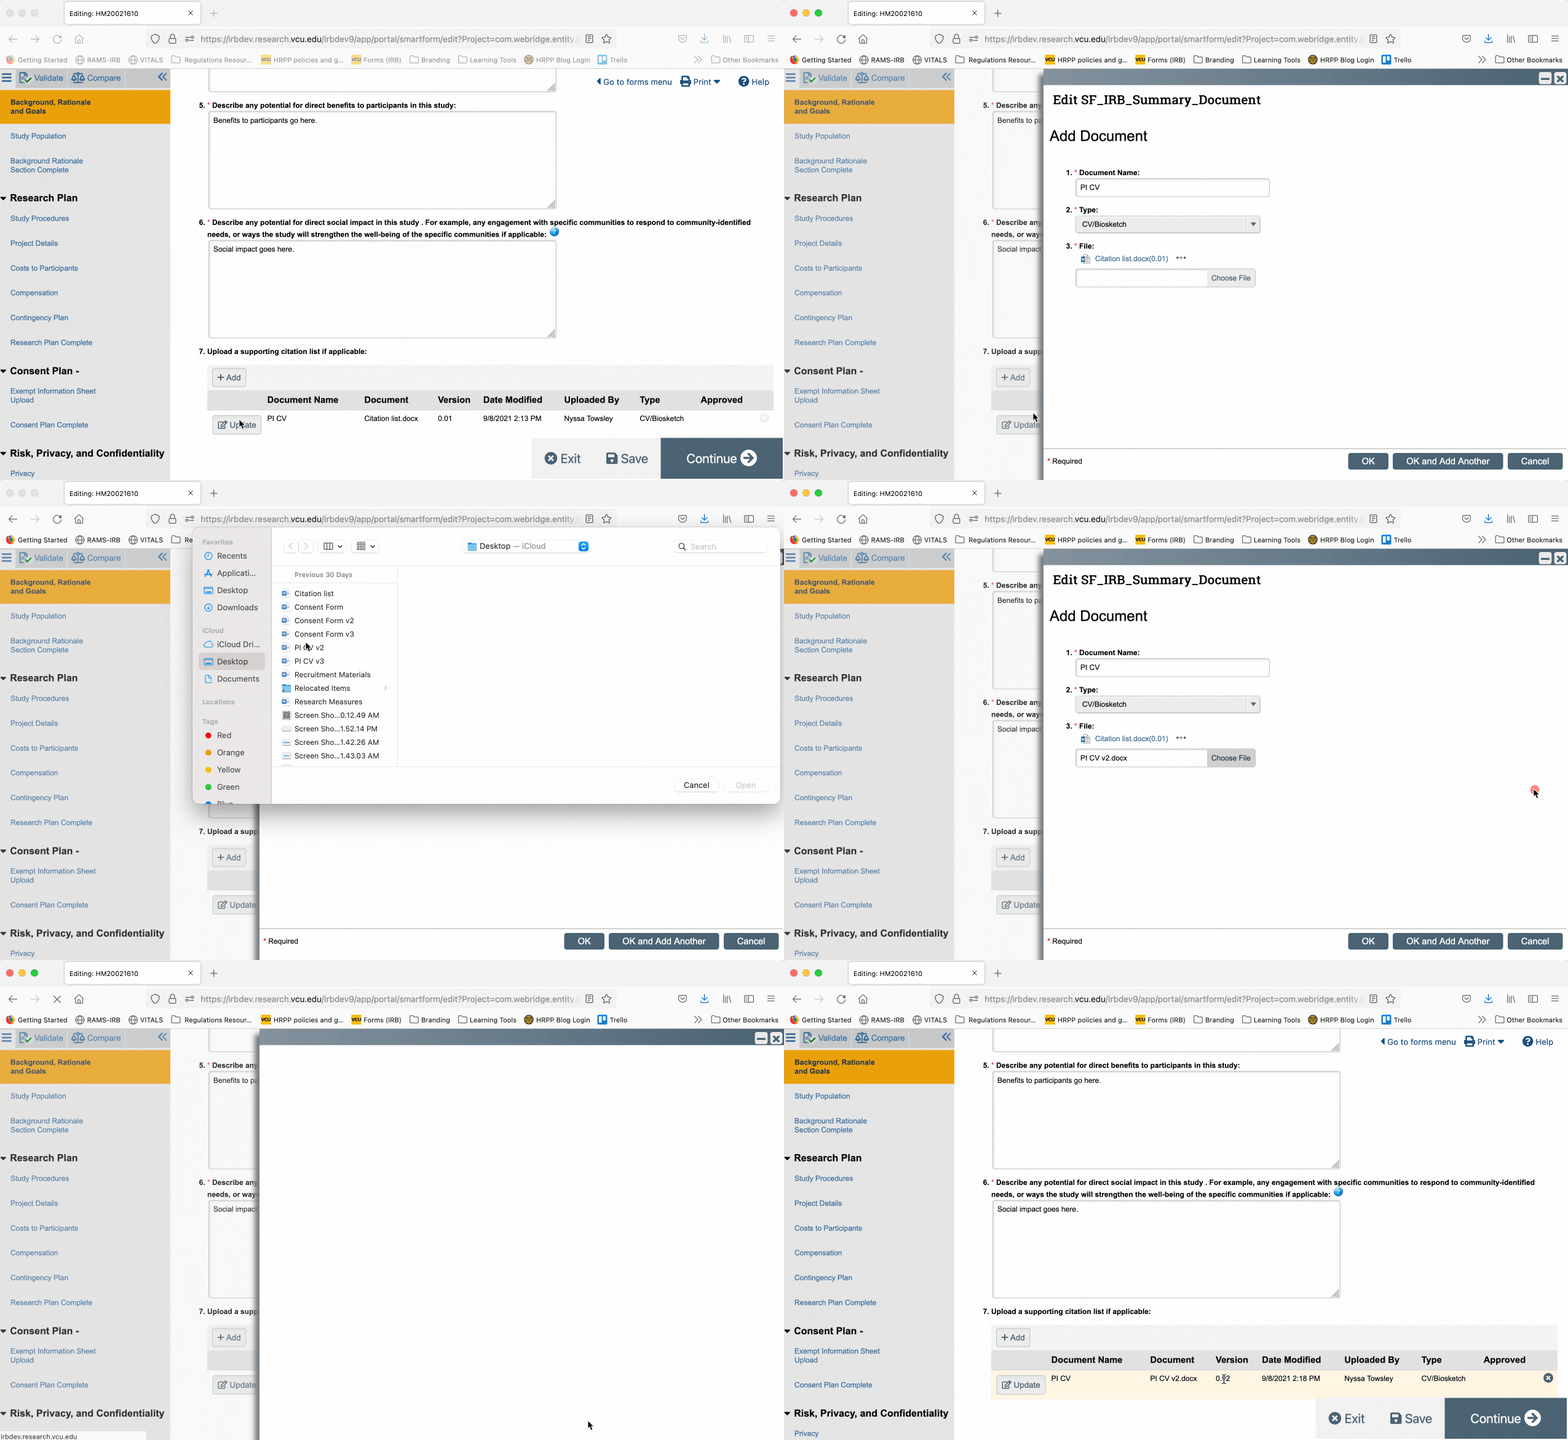
To update a document, first navigate to a Smartform page that contains a document upload section. Locate the document you wish to update, and click the “Update” button. In the pop-up window that appears, in question #3, you will see the current version’s file name. Underneath that file name is the space to upload a new version.
Click “Choose File” and navigate to the new version of the document within the file finder. Once you’ve selected the new version of the document, click the “OK” button in the pop-up window. You will see that under the “Version” column of the document upload section, the number has changed from 0.01 to 0.02, to indicate that multiple versions of that document exist within that document entry.
I
Viewing a Document’s “History” (i.e.: Past Versions)
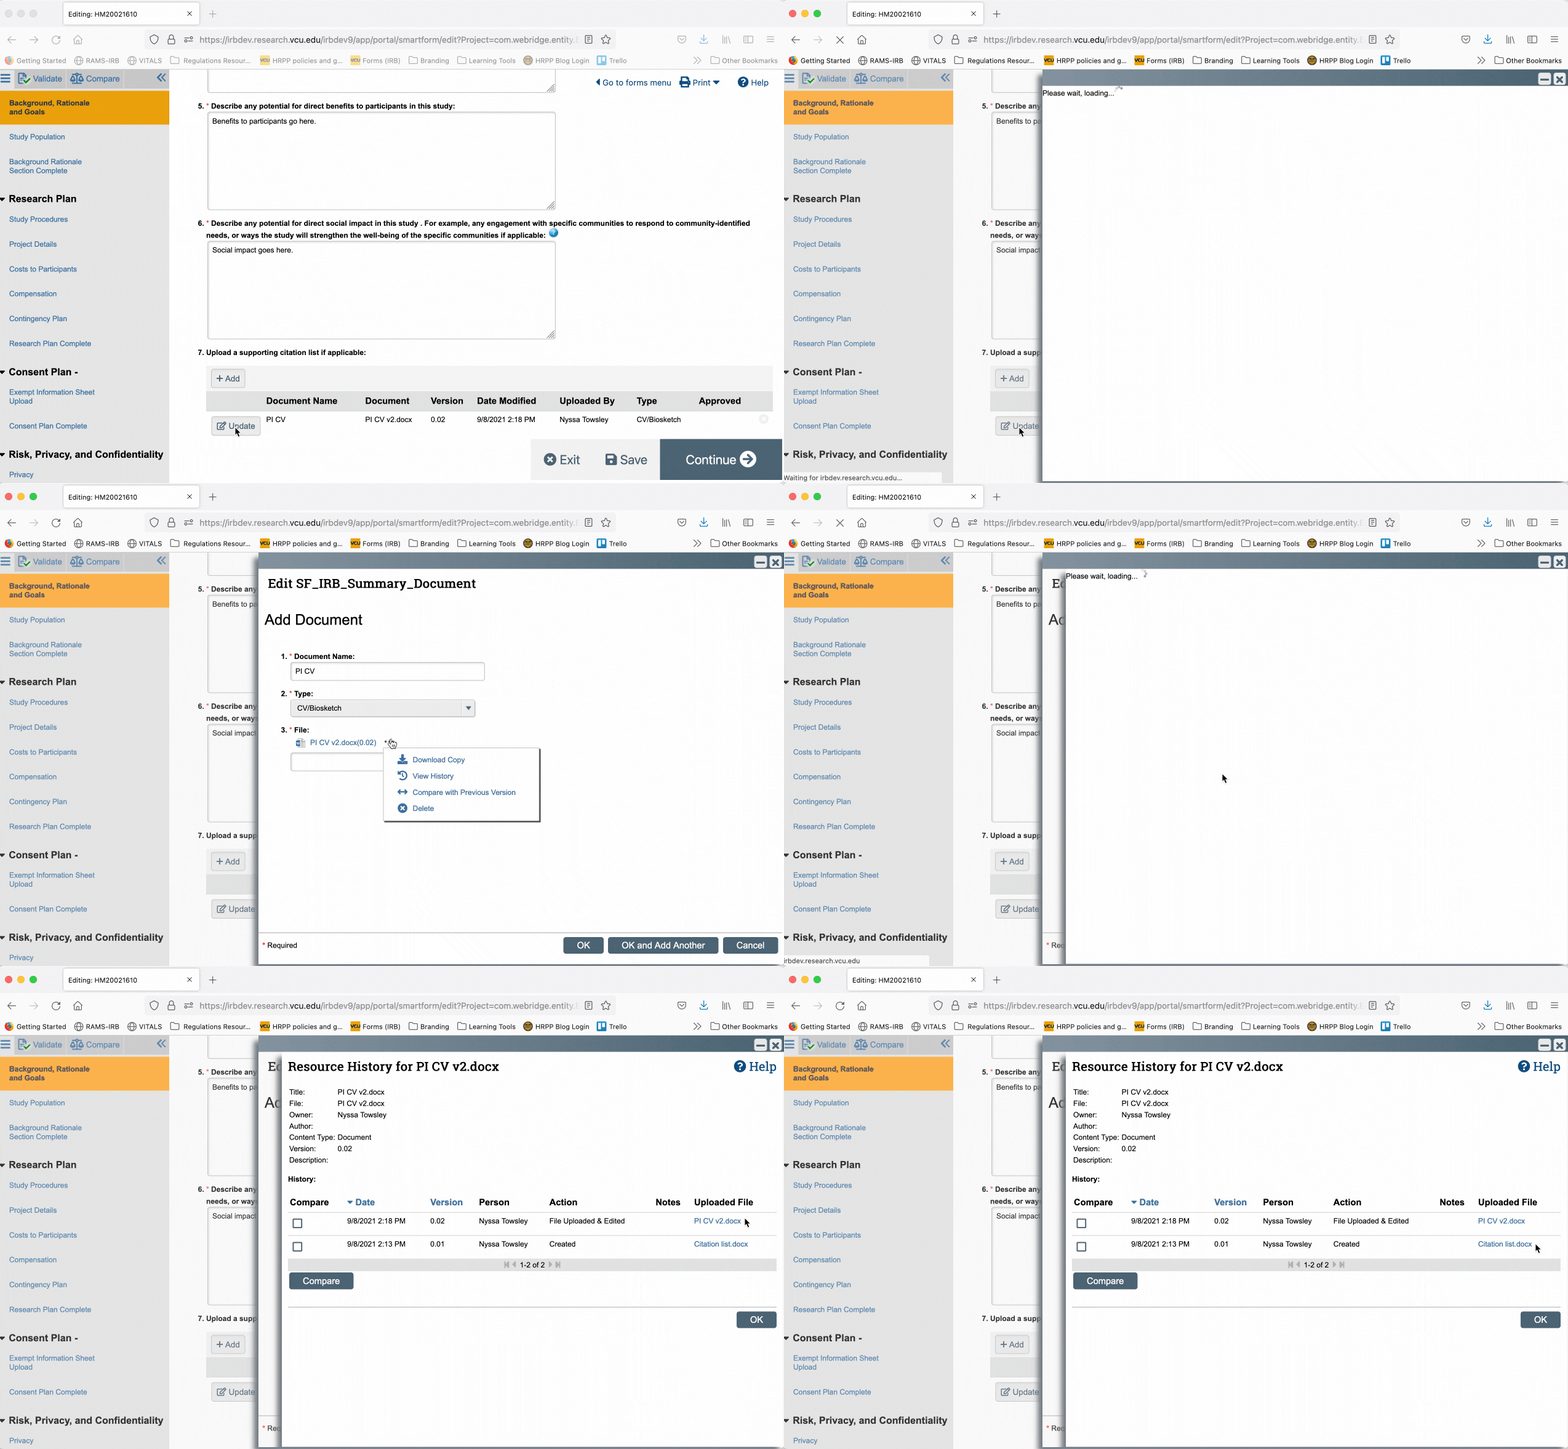
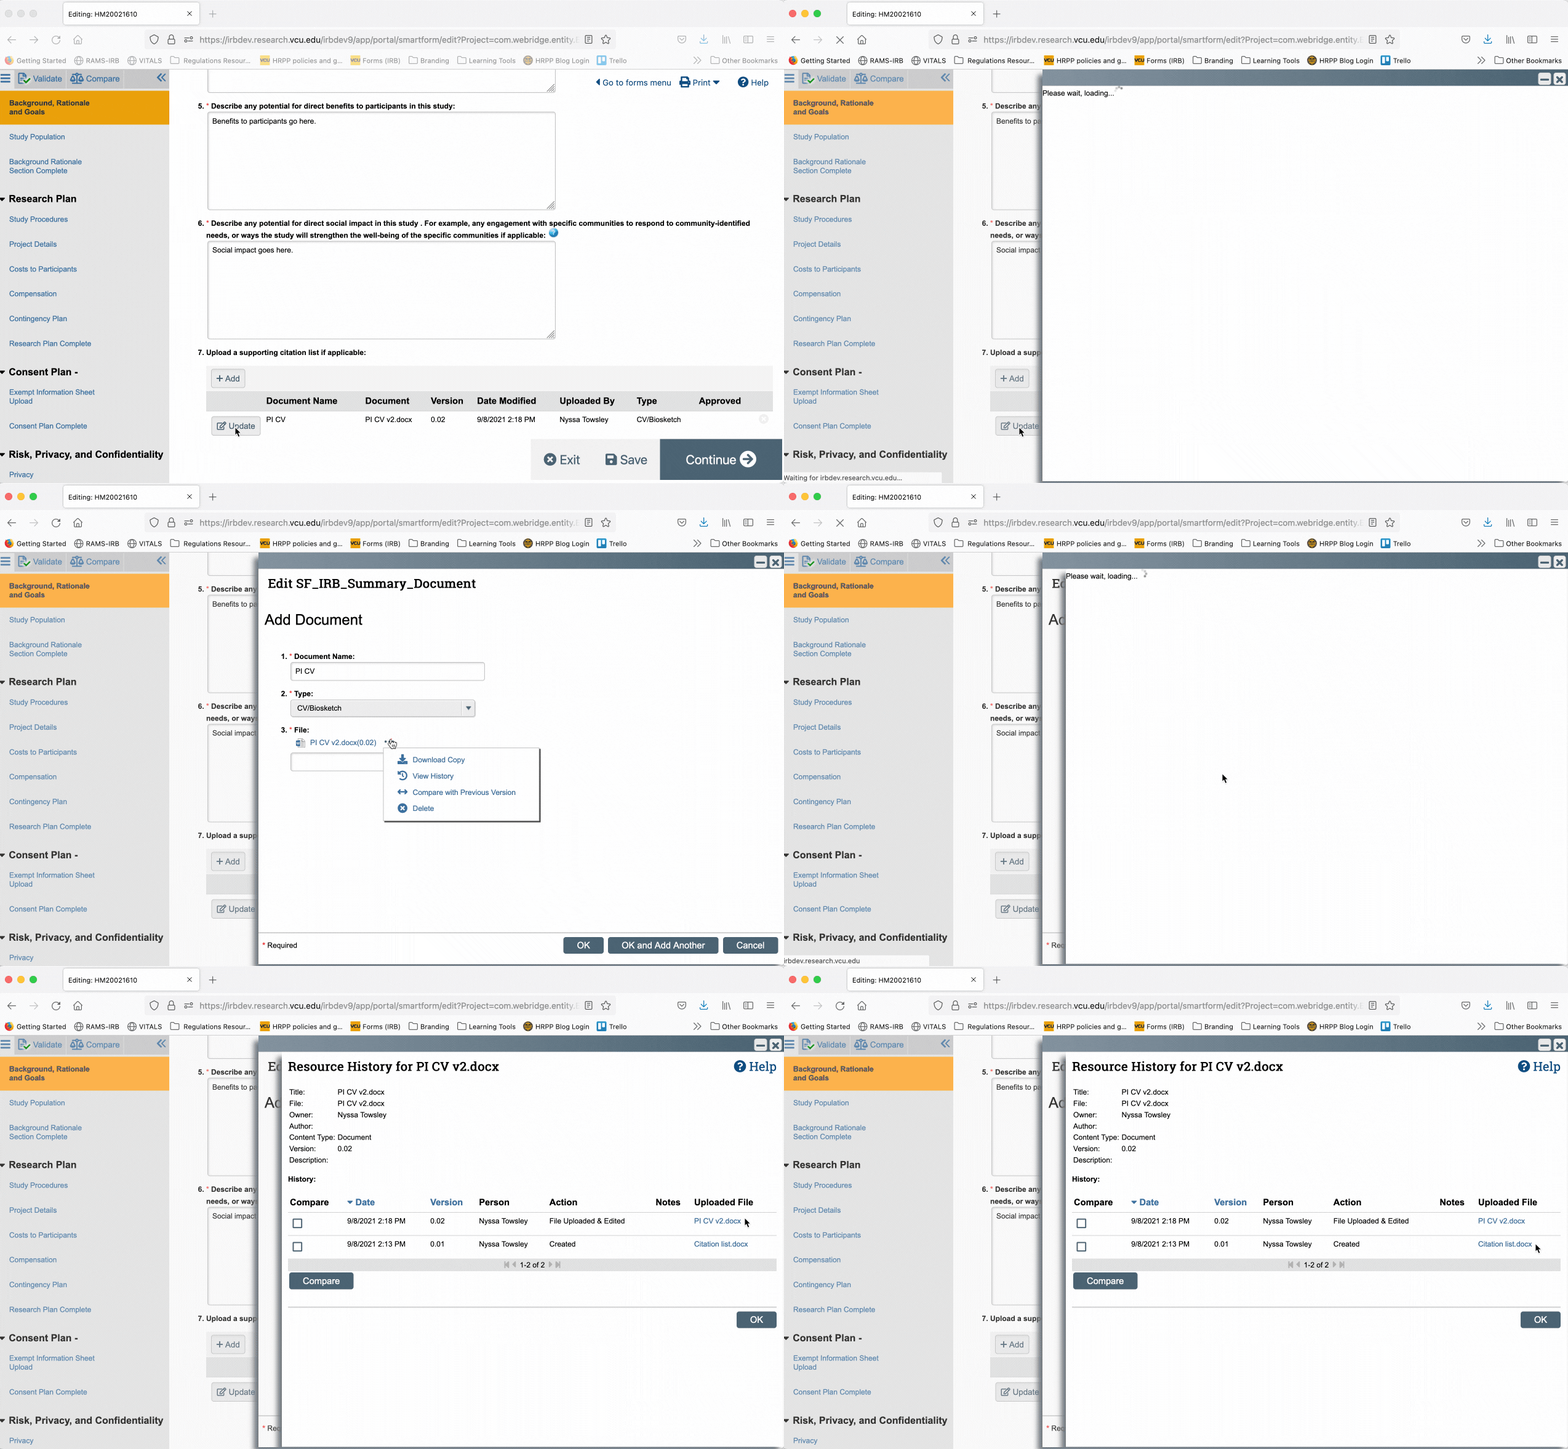
To view a document’s history to see all versions of an uploaded document, navigate to any page in the Smartform that contains a document upload section. First, click “Update” next to the document whose history you wish to view. Then, in the pop-up window, click the three dots to the right of the file’s name in question #3. Select “View history” in the drop down menu. This will cause another window to appear that will list all versions of a document in reverse chronological order (newest ones first).
Downloading Documents
Often during IRB review, a reviewer may upload a revised version of a document during their review, and may instruct you to download that revised version to make further edits. This is common with consent forms in particular.
To download the most recent version of a document, navigate to any Smartform page with a document upload section, locate the document you wish to download, and click “Update.” In the pop-up window, click the hyperlinked file name under question #3, or click the three dots to the right of the file name and select “Download copy” from the drop down menu. This will open a dialogue on your computer prompting you to open or save the document.
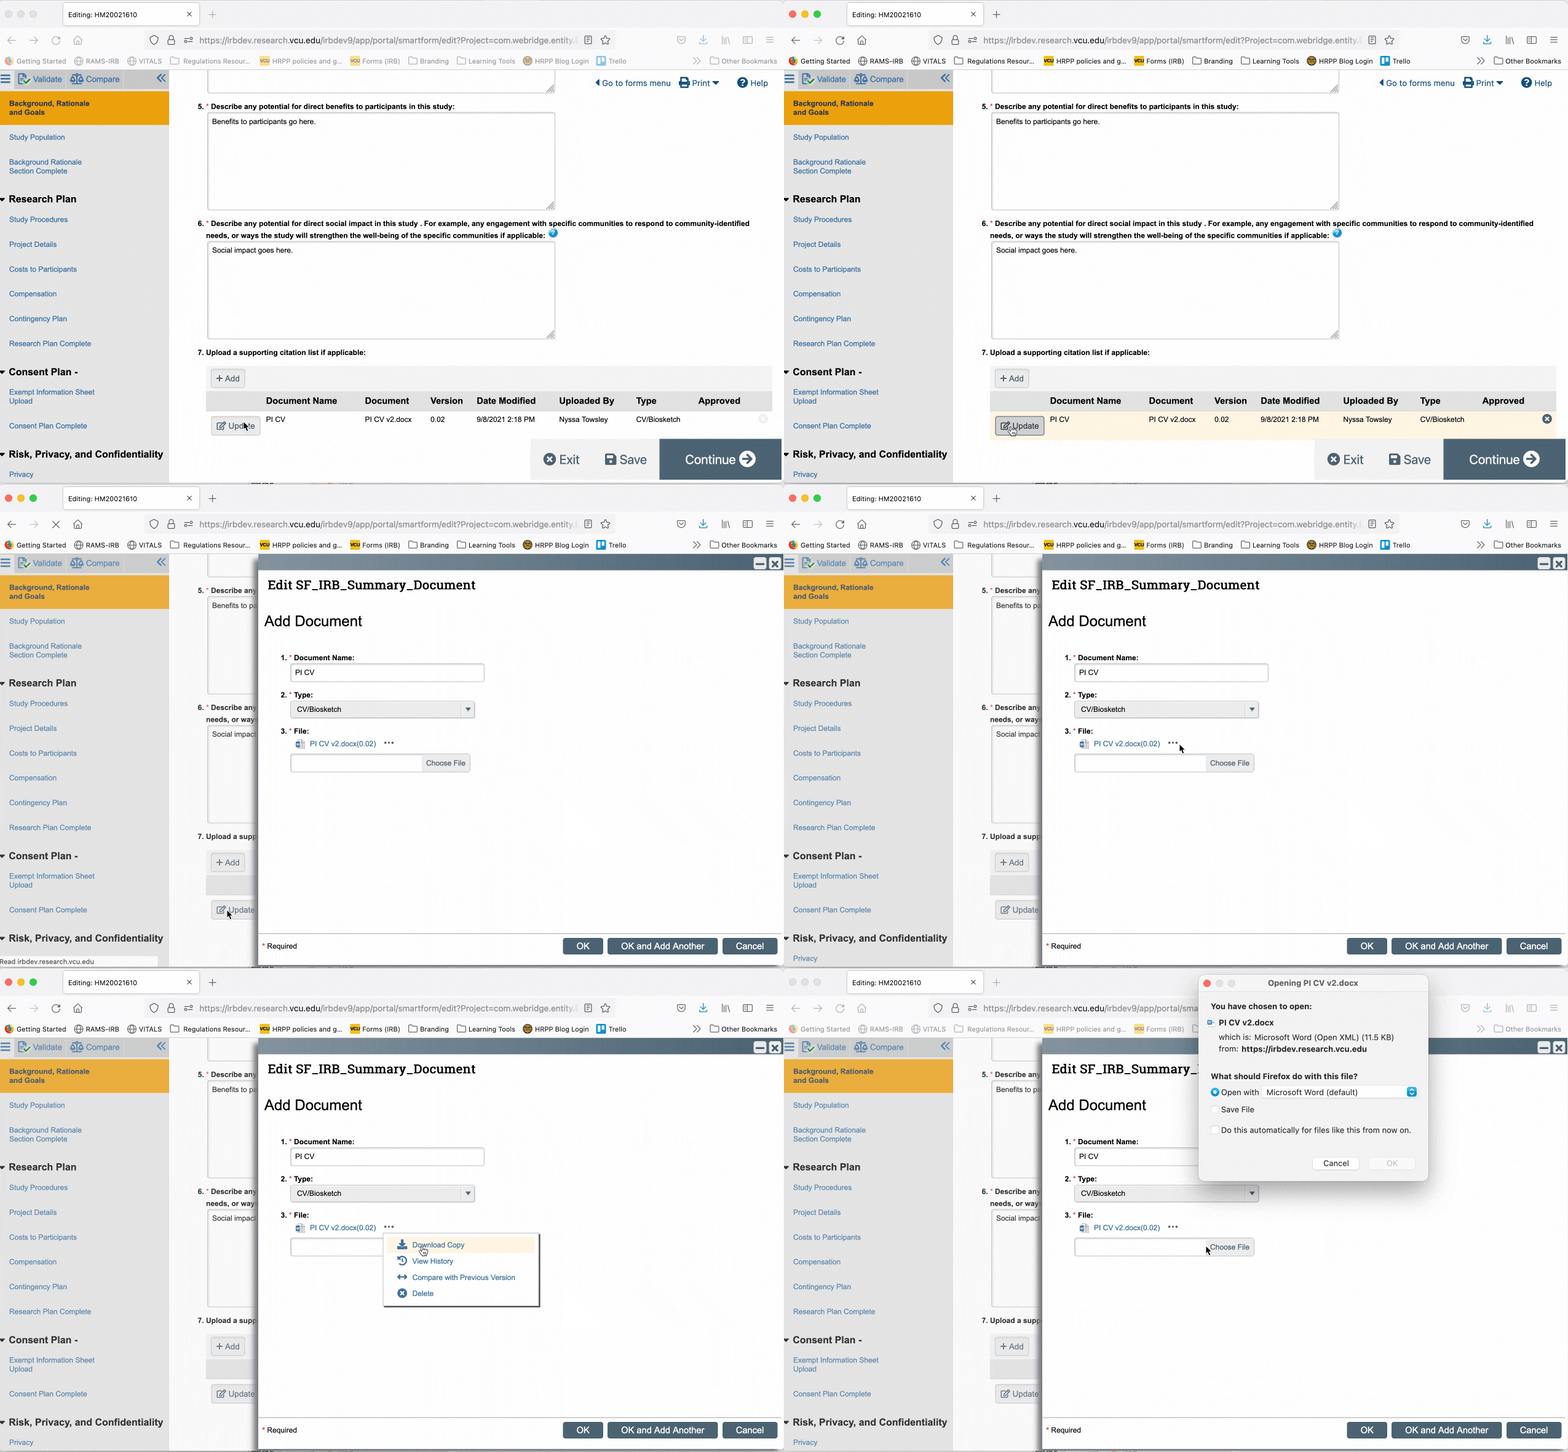
To download previous versions of a document, navigate to any Smartform page with a document upload section. First, click “Update” next to the document whose history you wish to view. Then, in the pop-up window, click the three dots to the right of the file’s name in question #3. Select “View history” in the drop down menu. This will cause another window to appear that will list all versions of a document in reverse chronological order (newest ones first).
To download any of the previous versions, click on the file name for the version you wish to download. This will open a dialogue on your computer prompting you to open or save the document.
Documents Tab
All of the previous examples of document management are done within the Smartform. You can also access your submission’s documents from the study’s workspace using the “Documents” tab. Click the “Documents” tab in the study’s workspace, and scroll down to view all of the documents uploaded to your study.
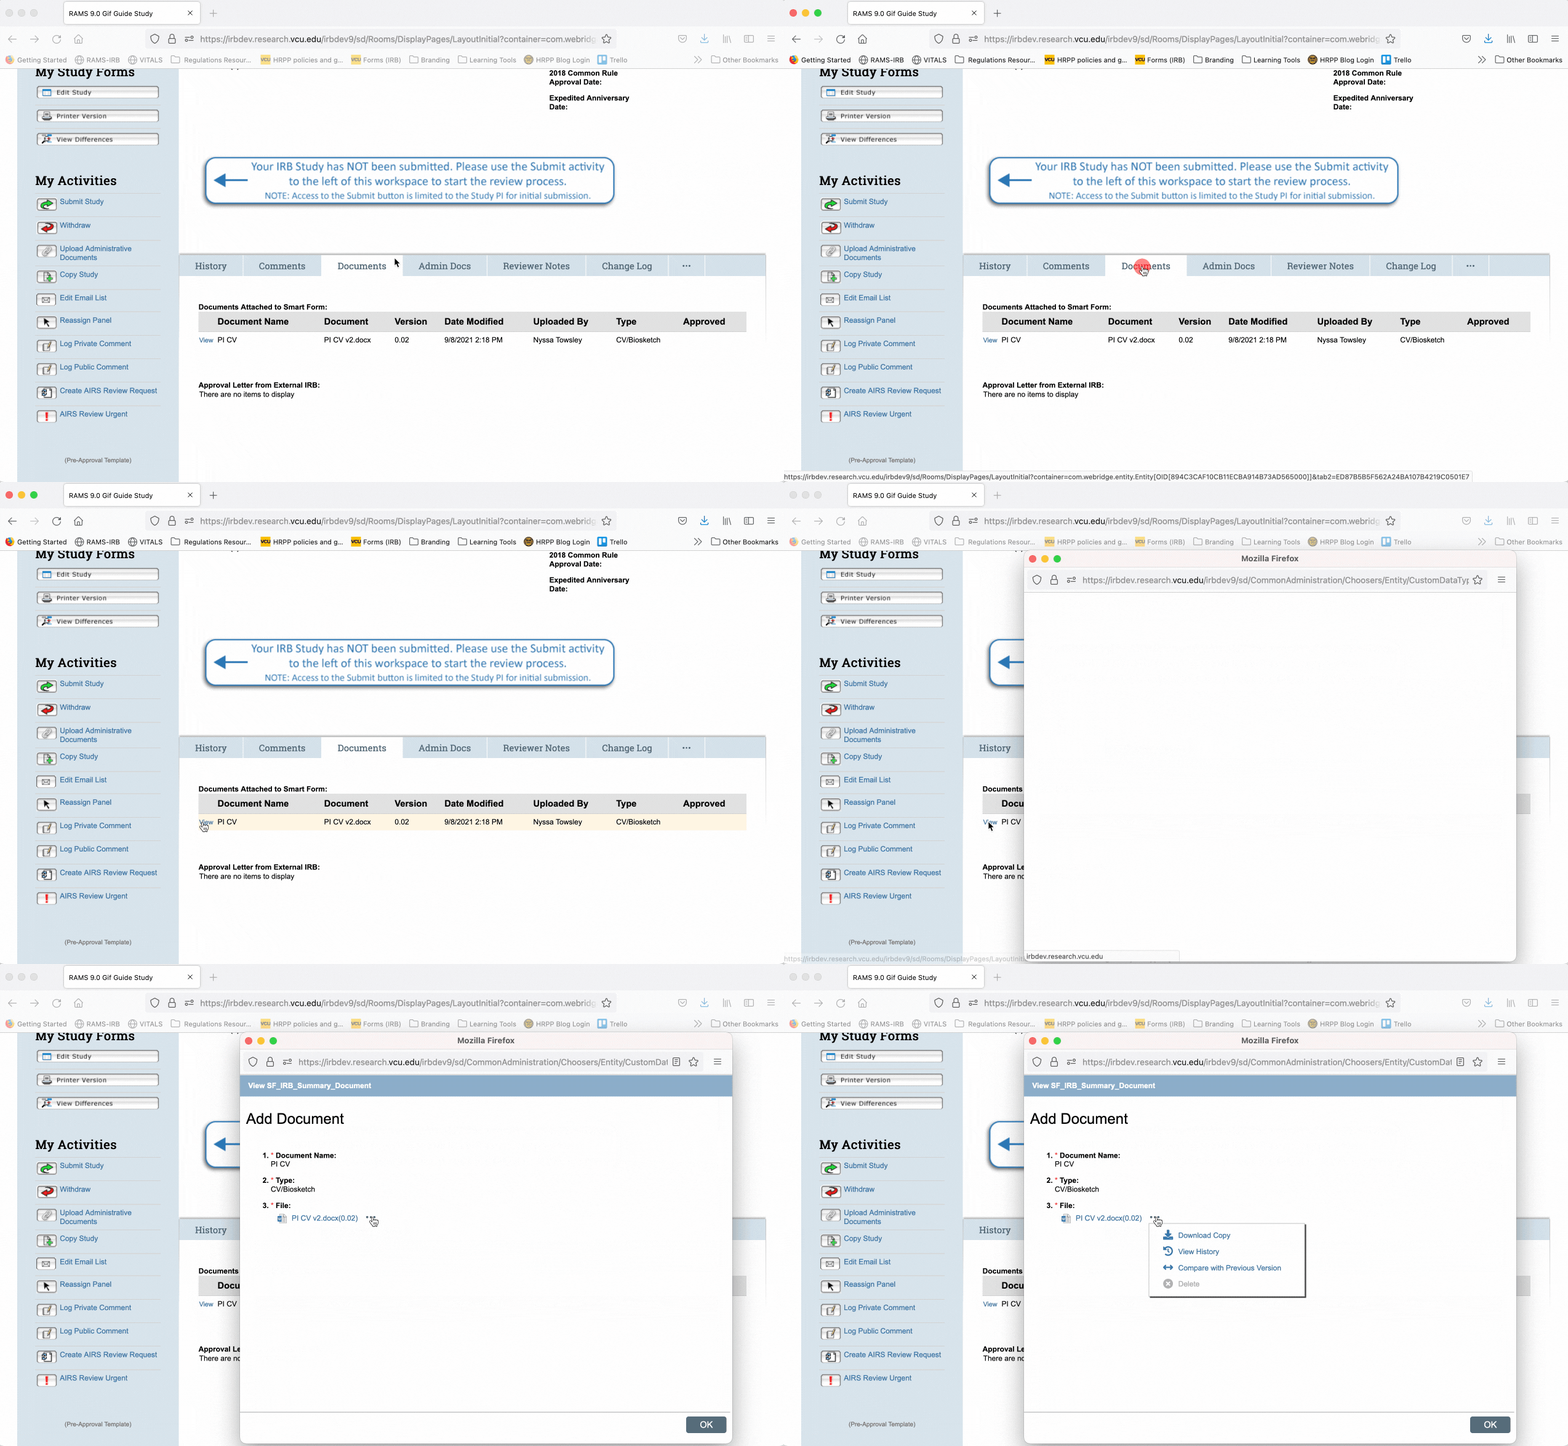
You cannot add documents from the Documents tab, but you may view and download them from that tab.
Removing Documents
It is important to understand that you should never delete a document from your study unless the study is in development, or — if the study is under review — the reviewer explicitly instructs you to delete a document.
When documents are retired or revised, we do not want to lose the history of that document, so deletion should only be used when you are explicitly instructed to do so by IRB staff or reviewers.
To delete a document, navigate to any page in the Smartform that contains a document upload section. Locate the small button with an X on it on the far right side of the document upload entry. Click that button, and then confirm the deletion by clicking “OK” in the dialogue that appears asking if you’re sure you wish to delete the document.
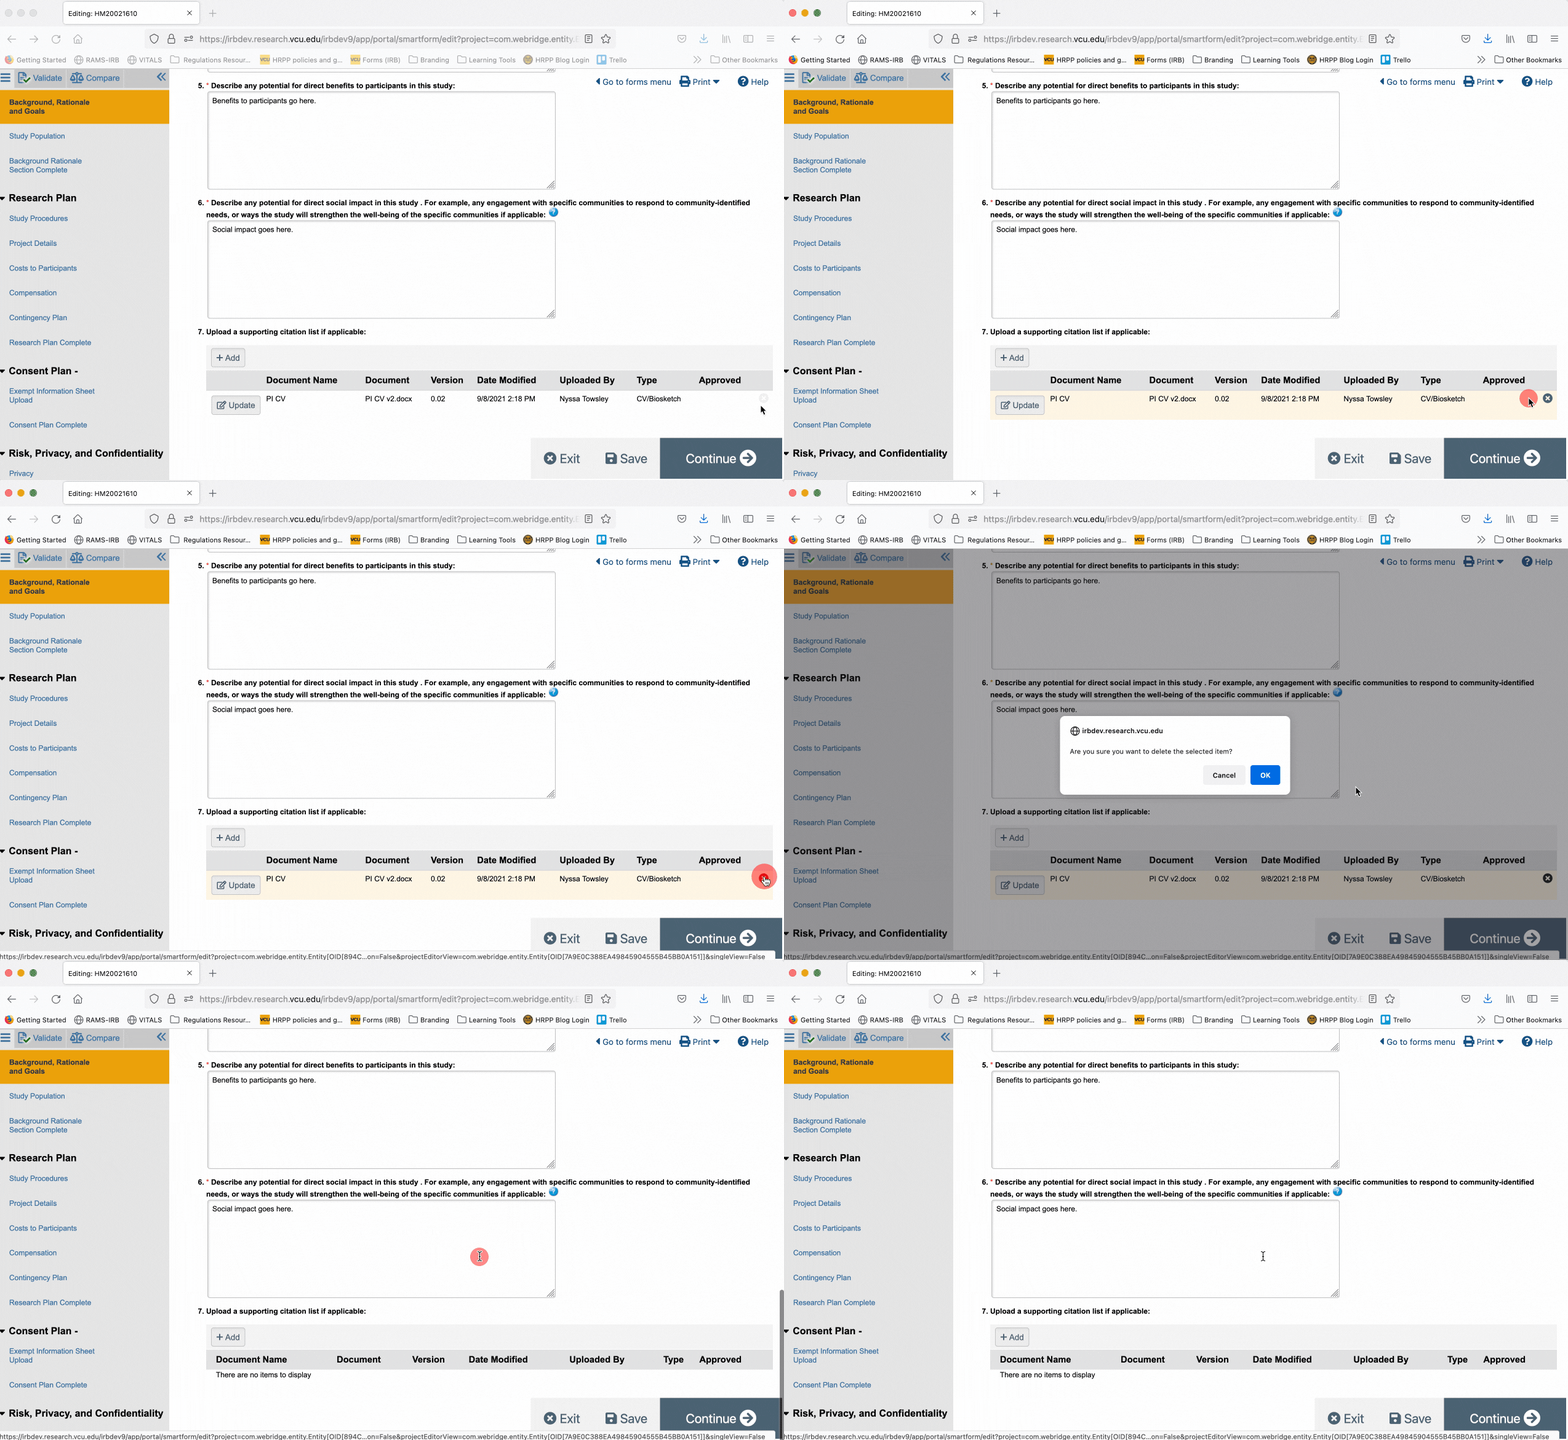
Deleting a document entry line will delete ALL versions of the uploaded document. There is no way to delete individual versions of documents. This is why it is critical to only delete documents when explicitly instructed to do so.
General Document Management Tips
Here are some general tips for managing your documents both within RAMS-IRB and within your own study files.
- Combine documents of the same type into a single file, to reduce the overall number of documents attached to a study. For example, consolidate all recruitment materials into a single document titled “Recruitment Materials.”
- Provide editable (i.e.: Word) versions of documents wherever possible, especially for consent forms. Consent forms often require edits during the IRB review process, so providing the IRB with an editable version of a document can streamline the review process.
- When editing documents, use Word’s “track changes” feature so that reviewers can easily see what changes were made in the document. A document containing tracked changes is often called a “redline” version of the document (because the tracked changes often show up in red). IRB reviewers will often ask you to provide both a redline and a “clean” version of a document (“clean” meaning all tracked changes have been accepted), and will instruct you to “stack” those versions on top of older versions of a document, using the document updating (“stacking”) procedures demonstrated above. Always put “clean” versions of documents on the “top” of a document stack, when stacking both redline and clean versions of a document. To learn more about how to use track changes in Word, see this webpage.
- If a document type does not allow for track changes (i.e.: a PDF), be sure to provide the reviewer with a detailed description of what changes were made to the document.
- Devise a file naming system for your files and stick to it. Decide how you will denote version numbers in your file names. A good way to track versions is to use the date the document was updated as the version number, using a YYYY MM DD format, so that the documents will display in version order within your study files (i.e.: Protocol version 2021 04 14.docx). It can also help to denote that a file is “redline” or “clean” in the file name (i.e.: Protocol version 2021 04 14 REDLINE.docx). Having good file naming conventions can help you stay organized, and will help your reviewer more easily navigate your document versions.
Comments
Comments are closed.