Navigating RAMS-IRB to Conduct Reviews
This RAMS Gif Guide is intended for IRB members who need to conduct reviews of studies/submissions that are assigned to them at a meeting. This Gif Guide covers navigation of the SmartForm, logging reviewer notes, viewing documents, logging public/private comments, and finalizing reviews.
To learn how to locate IRB meetings in RAMS-IRB, use this Gif Guide. To learn how to navigate a meeting workspace (to confirm/decline attendance, view agendas, etc.), use this Gif Guide.
You can access more RAMS Gif Guides by using the RAMS Gif Guides tag on our blog. You can access more Gif Guides specific to IRB members by using the member gif guides tag on our blog.
Viewing a Study
There are two mains ways to view a study in RAMS-IRB: the printer version and the SmartForm version.
Using the Printer Version
The printer version of a study is a continuous document that can be printed to a physical document, or “printed” to a PDF document. This differs from the SmartForm version, which divides the study up into sections that must be moved through individually. The printer version is continuous, meaning you do not need to navigate between pages and sections.
Using the printer version can be helpful when conducting a review if you want to continuously scroll through content or wish to print the study to a physical document for note-taking. Additionally, the printer version enables you to search for specific words or phrases by using control+F (PC) or command+F (Mac). This can be useful for checking for consistency across the submission.
You cannot log reviewer notes in the printer version. To log reviewer notes, you must open the SmartForm version of the study.
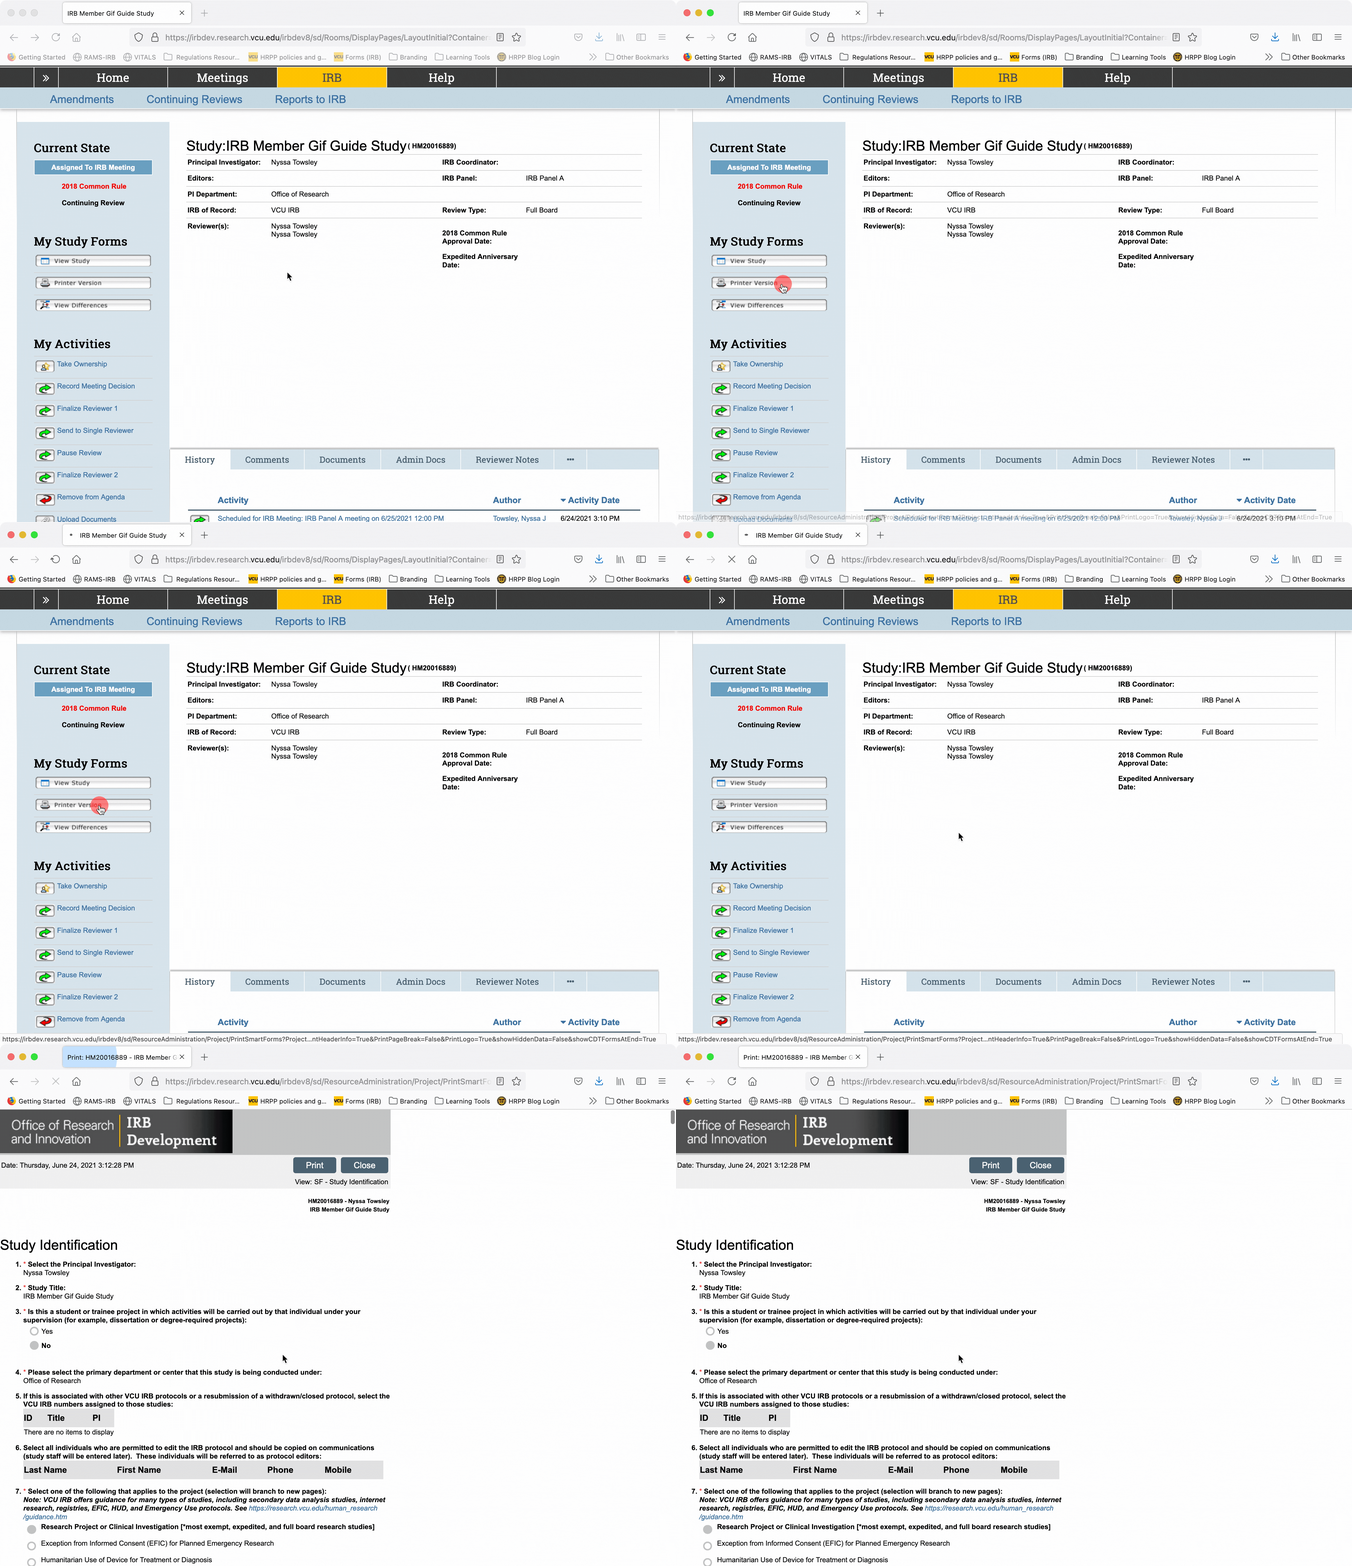
To access the printer version, click the “Printer Version” button under the “My Study Forms” menu on the left side of the screen. This will cause the printer version to open.
PRO-TIP: use control+click (PC)/command-click (Mac) or right click on the button and select “Open in new tab” from the drop-down menu to open the printer version in a new tab. This can make navigating back to the study workspace easier.
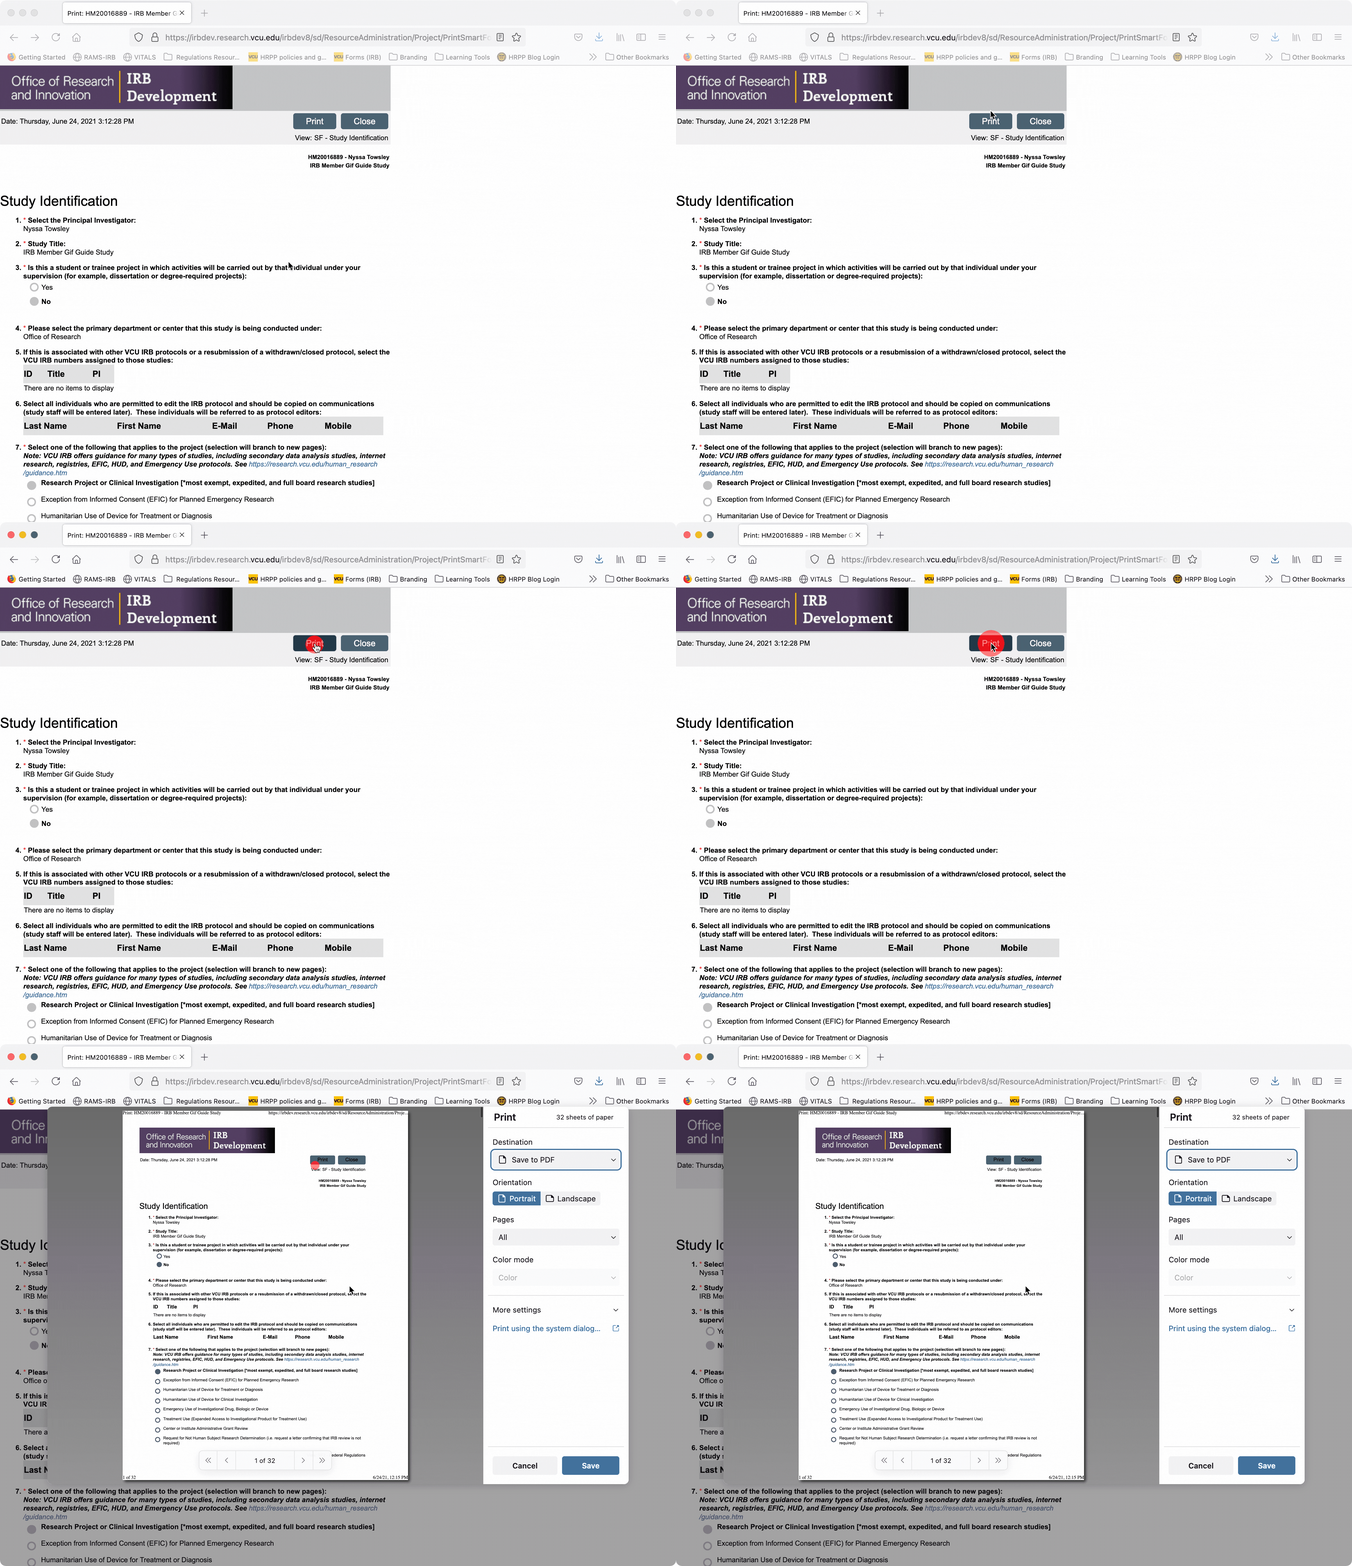
To print the printer version, either to a physical document or to print-to-PDF, click the “print” button in the upper right corner of the screen. This will open a dialogue in your browser prompting you to select the output (printer or PDF).
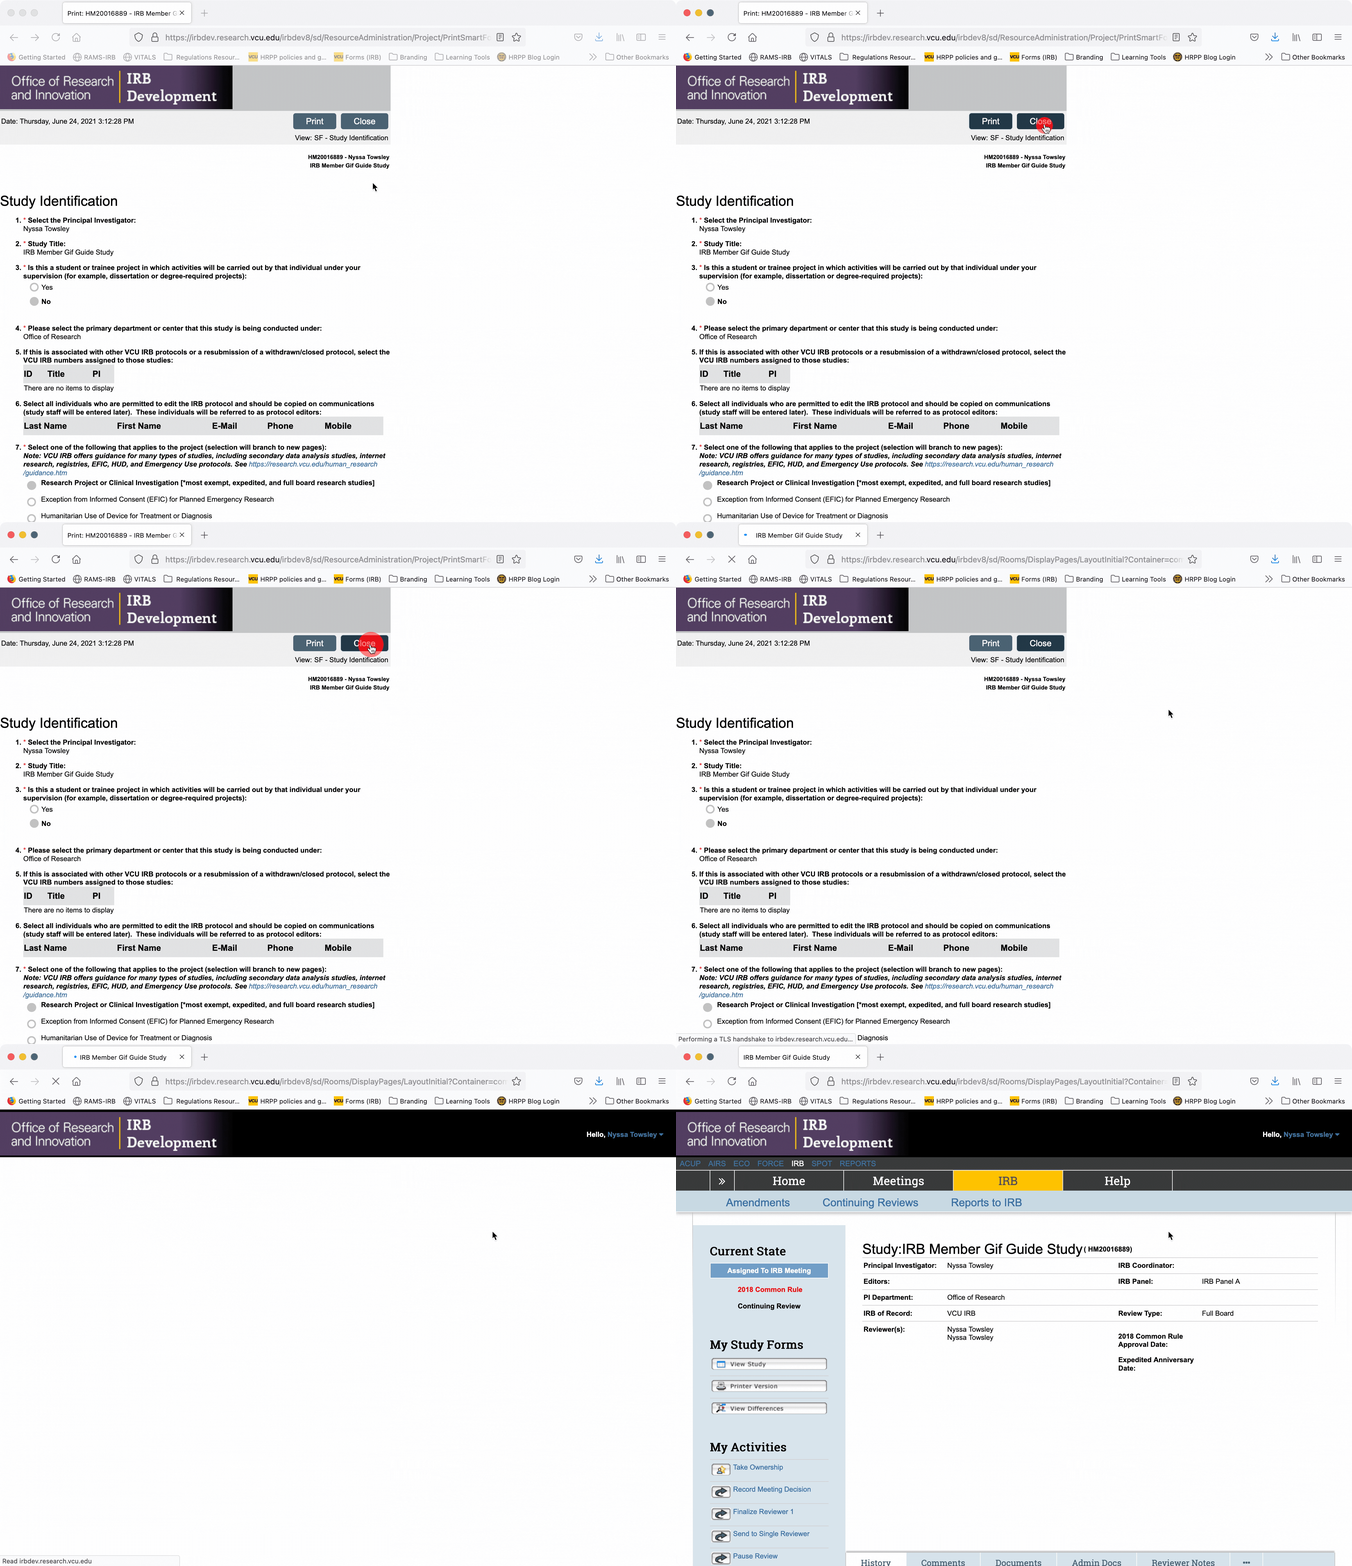
To exit the printer version and return to the main study workspace, click the “close” button in the upper right corner of the screen.
Using the SmartForm Version
The “SmartForm” is simply the series of questions asked in the RAMS-IRB system designed to elicit the information needed to conduct IRB review. It is “smart” because it uses branching logic to only populate certain sections/pages based on responses to earlier questions. It is a “form” because the user experience is similar to that of completing an online form.
The SmartForm version of a study is divided into sections, which are divided further into pages. These pages and sections can be navigated through simply by scrolling through the document continuously, or by jumping to specific pages or sections using the navigation menu.
The SmartForm version of the study is where you will log reviewer notes requesting changes to the study.
To open the SmartForm version of the study, click the “View Study” button under the “My Study Forms” menu on the left side of the screen. This will take you automatically to the first page of the SmartForm.
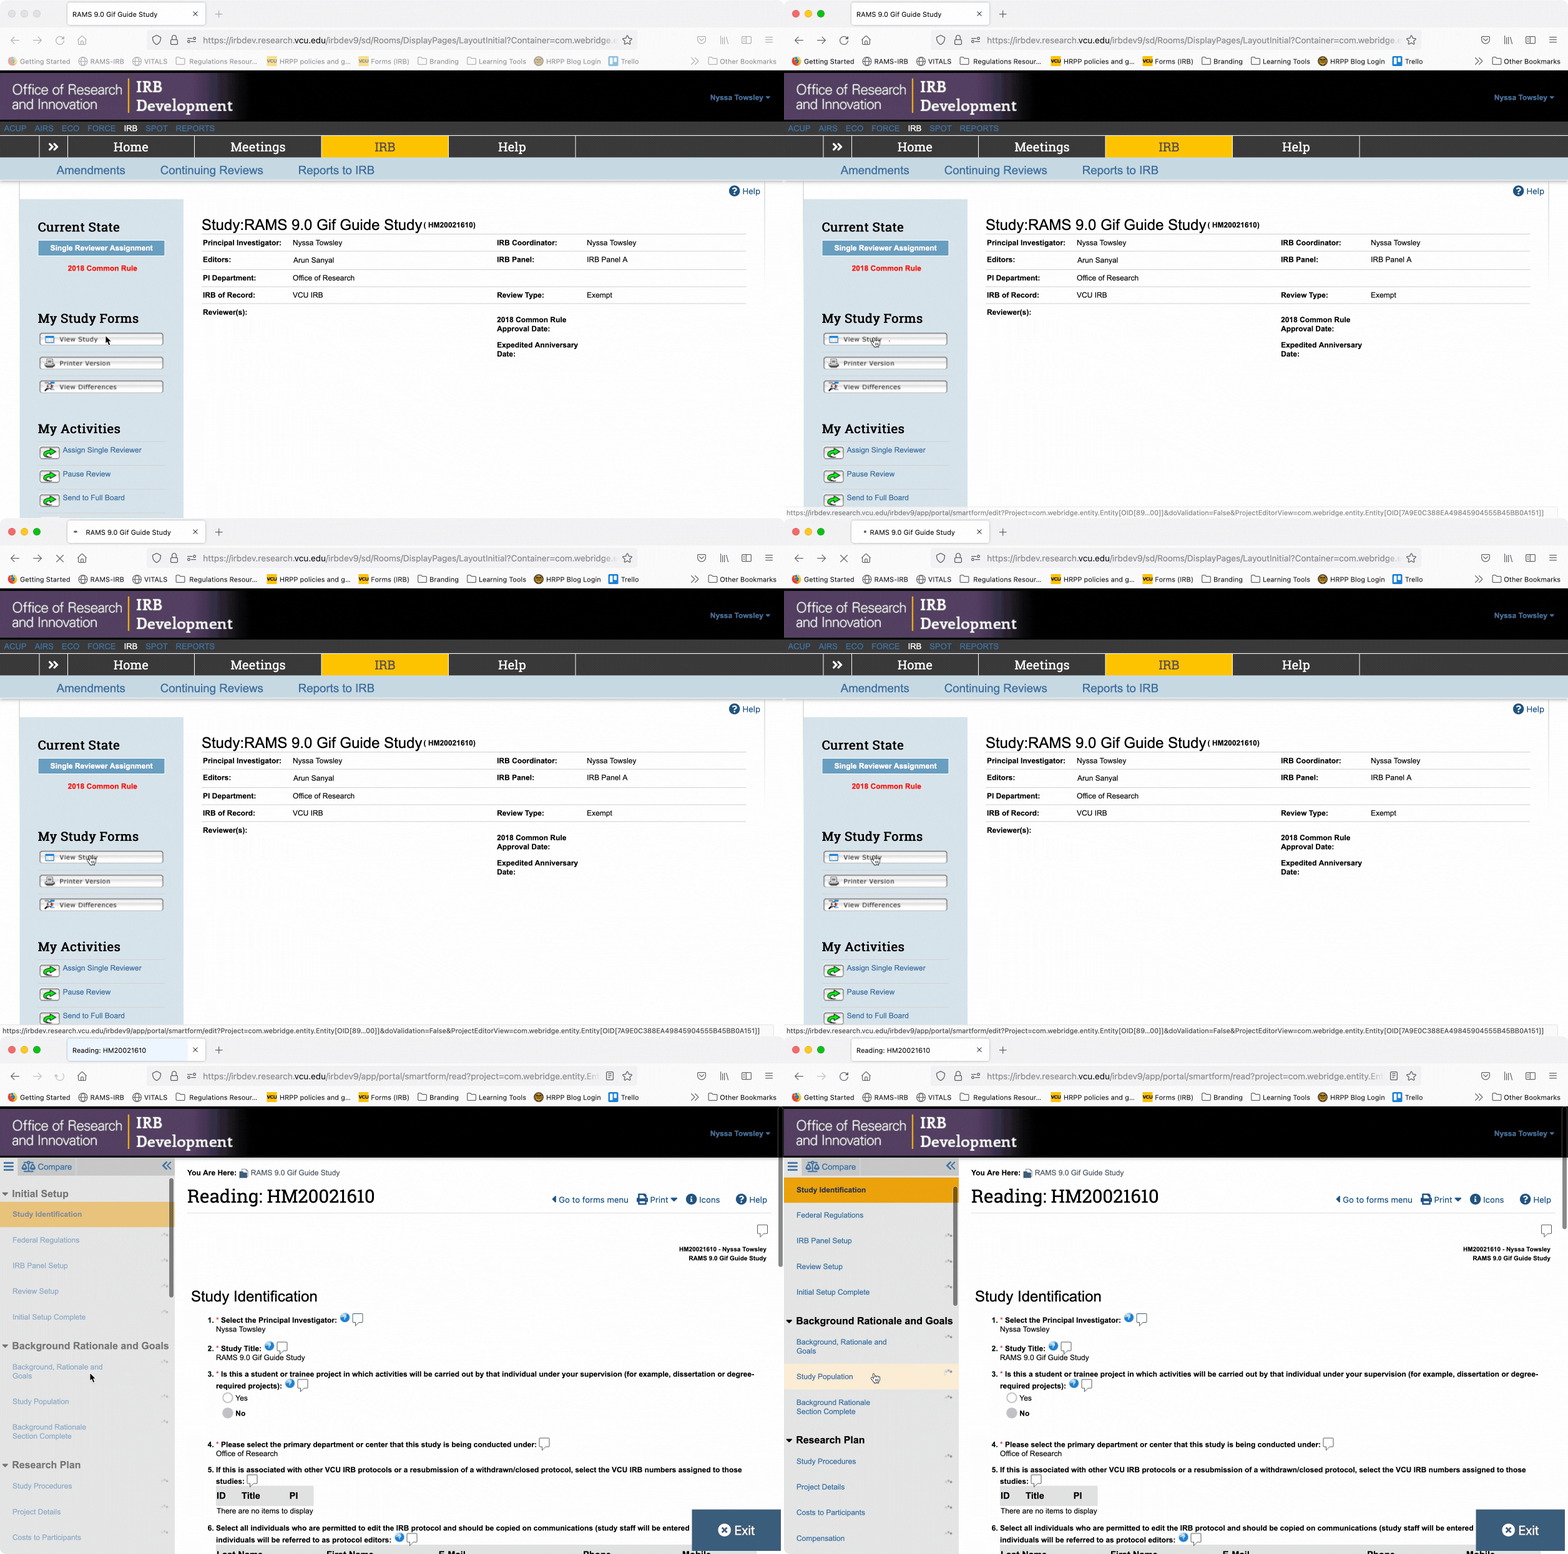
PRO-TIP: use control+click (PC)/command-click (Mac) or right click on the button and select “Open in new tab” from the drop-down menu to open the printer version in a new tab. This can make navigating back to the study workspace easier.
Navigating the SmartForm Version
To navigate through the SmartForm, you may simply scroll down, and each page of the SmartForm will load sequentially. You can also jump to a specific page of the SmartForm using the navigation menu on the left side of the screen. Scroll through the navigation menu and click on the name of the page you wish to navigate to, and the SmartForm will jump to the selected page.
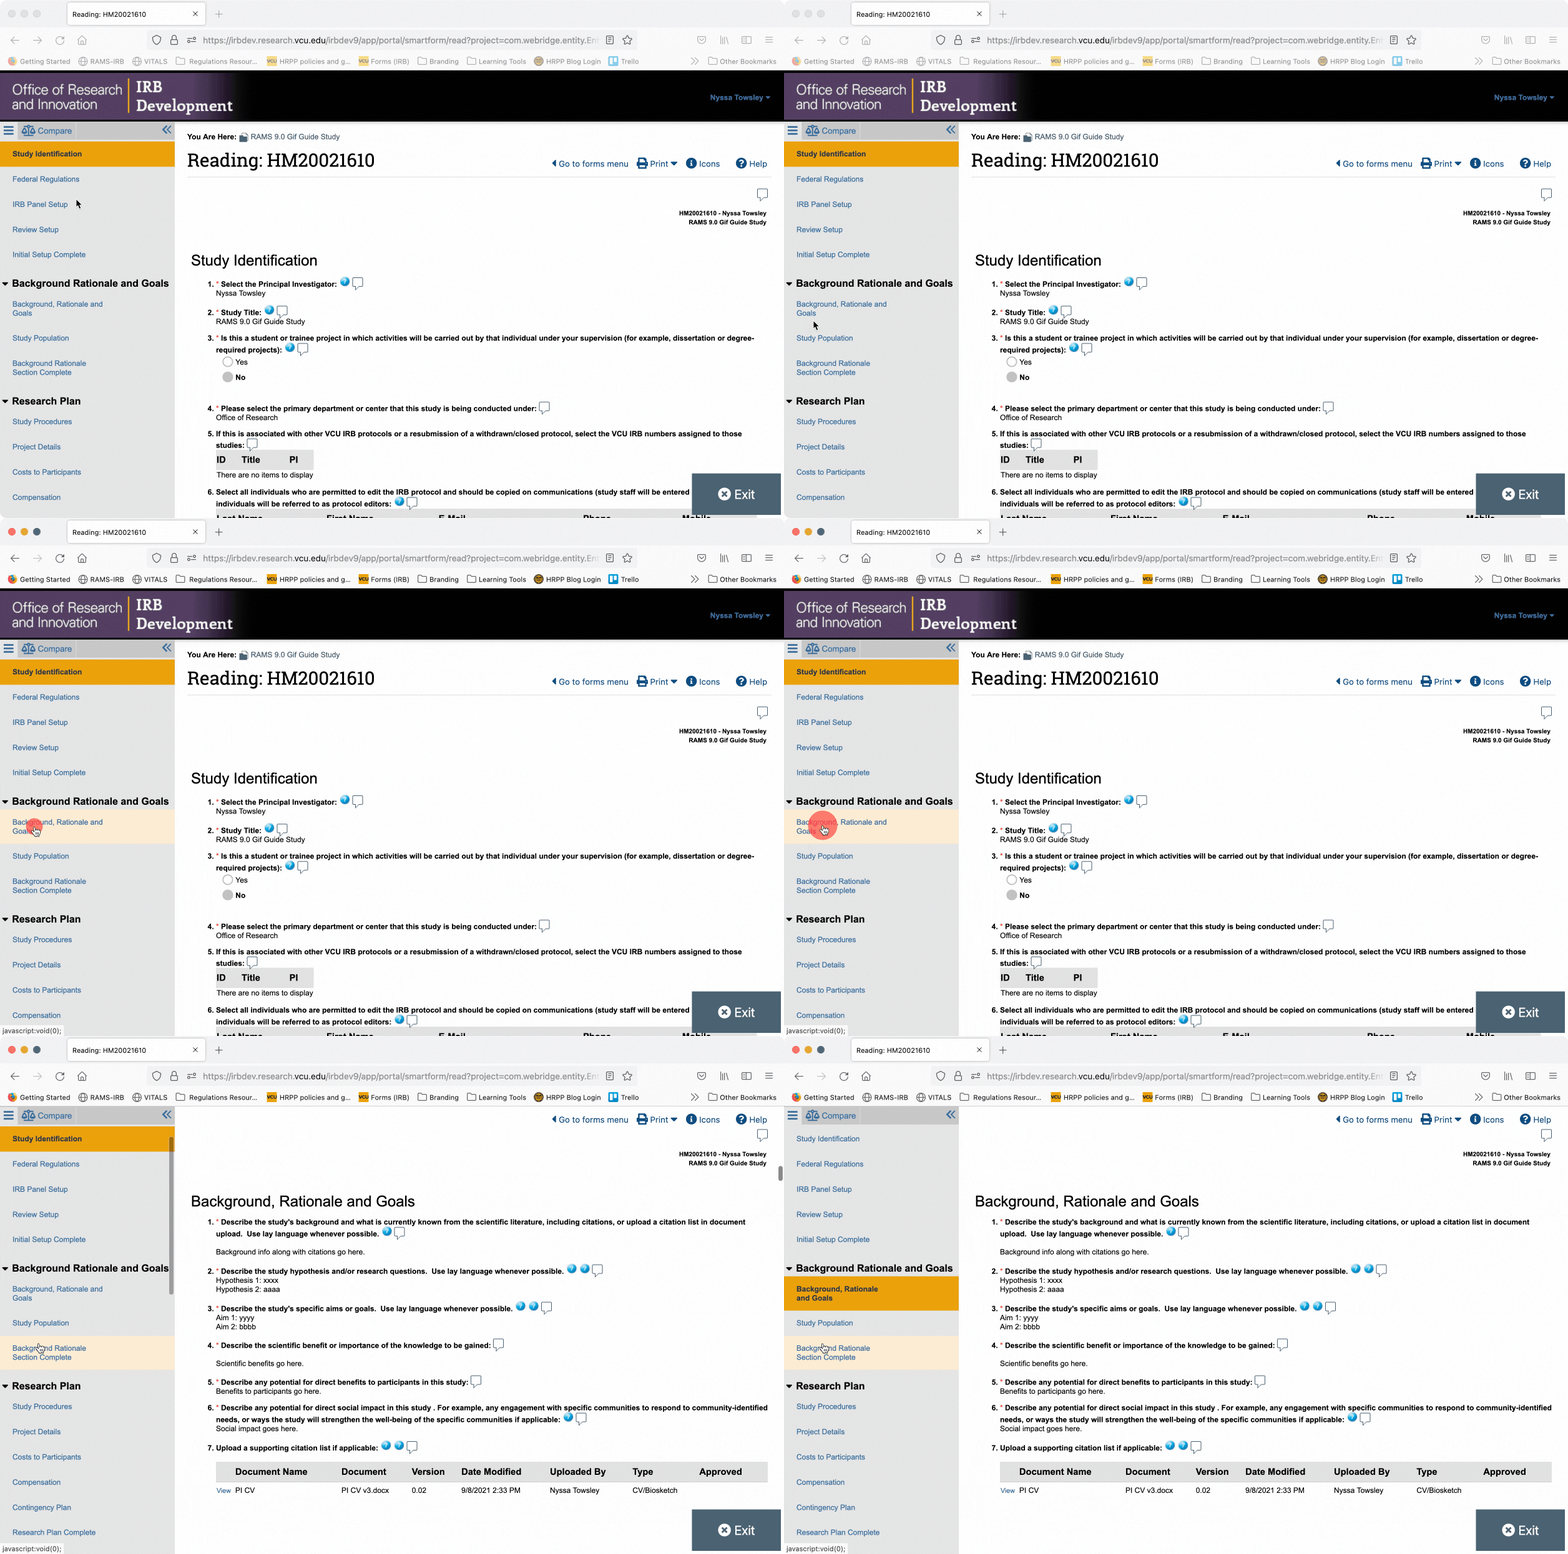
You can hide the navigation menu by clicking the “<<” button in the top right of the navigation menu. To expand the navigation menu, click the “>>” button that will appear in the upper left of the form.
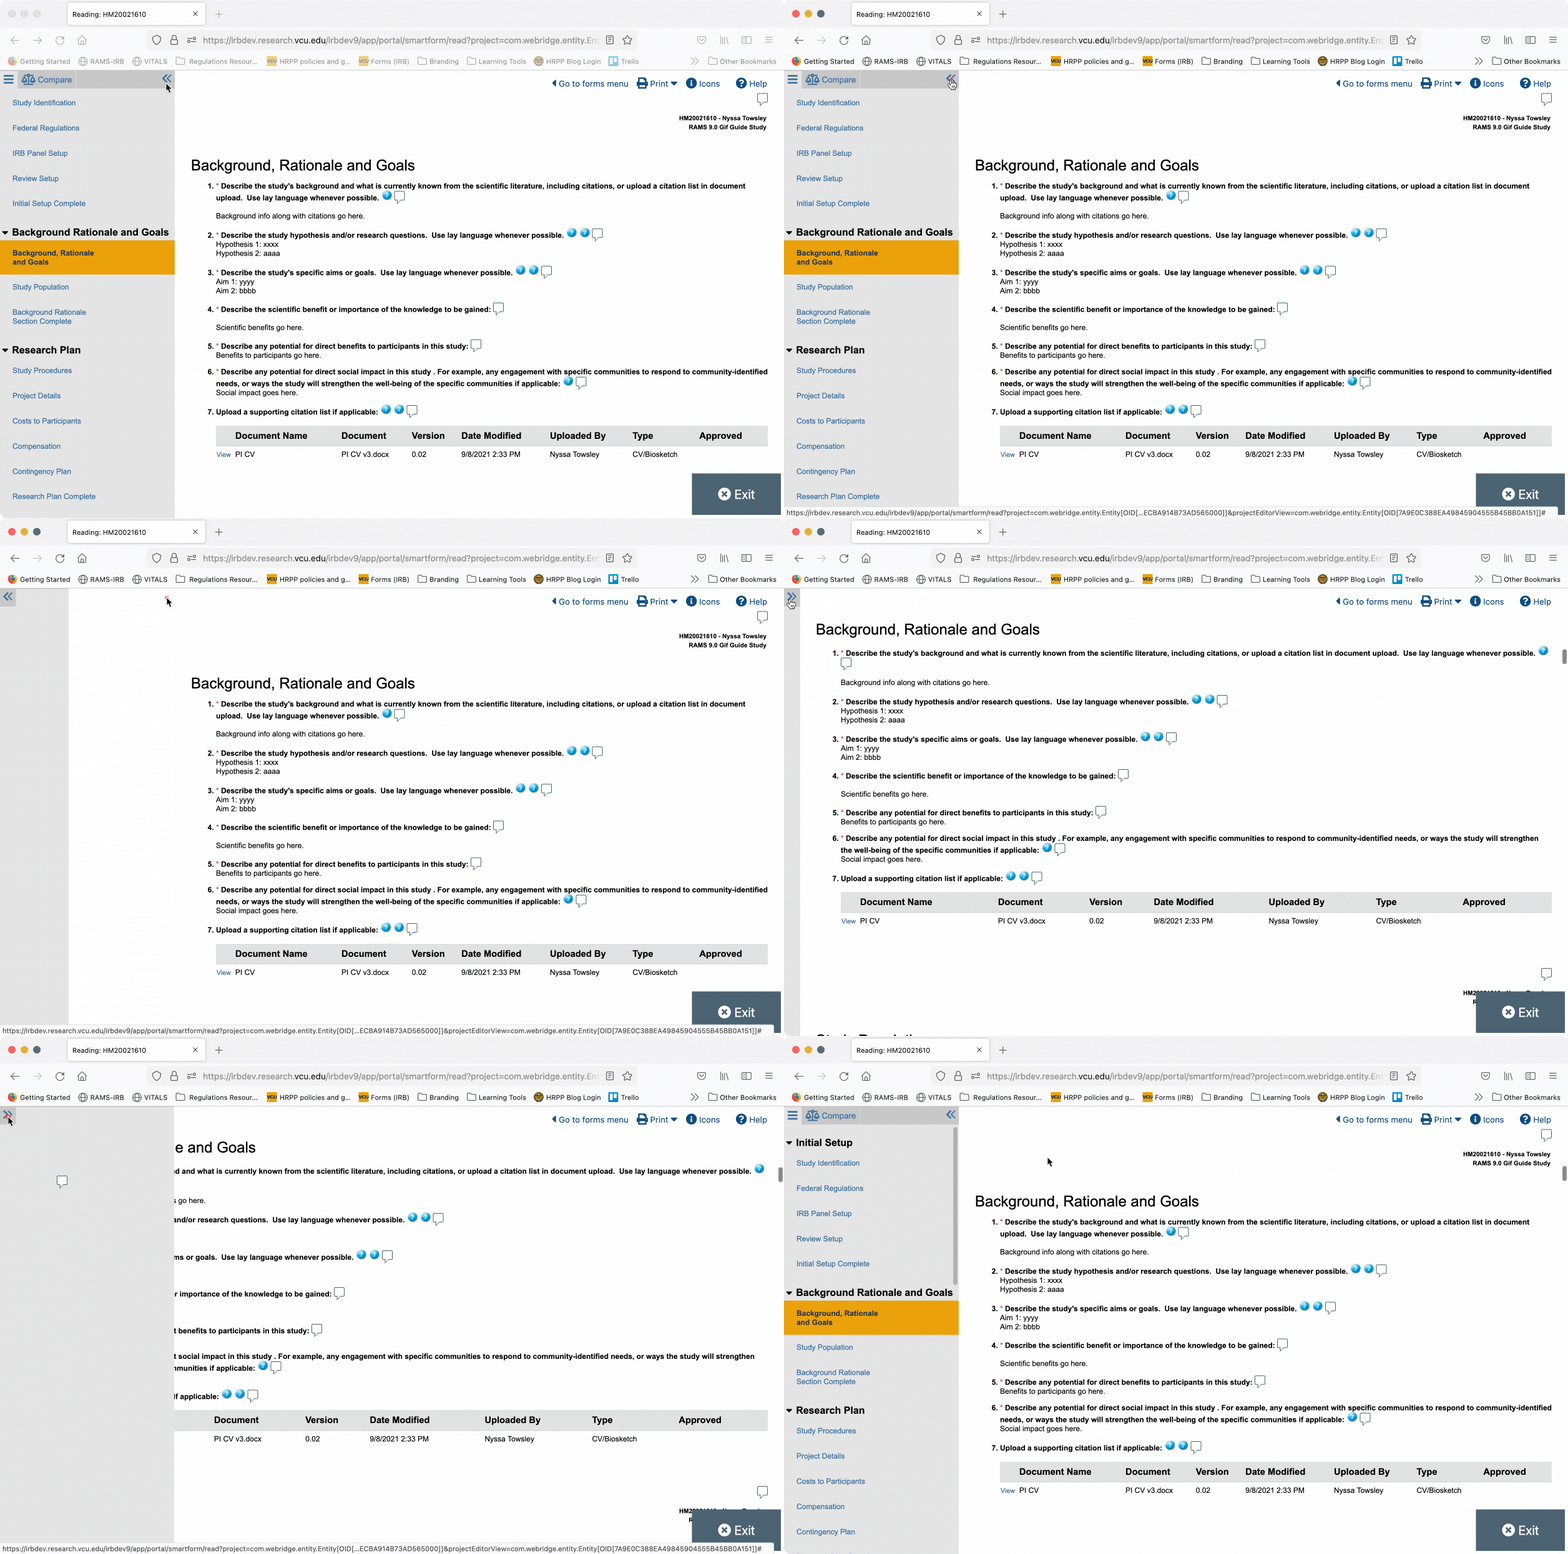
When the navigation menu is closed, you can also re-open the navigation menu by clicking the “Go to forms menu” button in the upper right corner of the SmartForm.
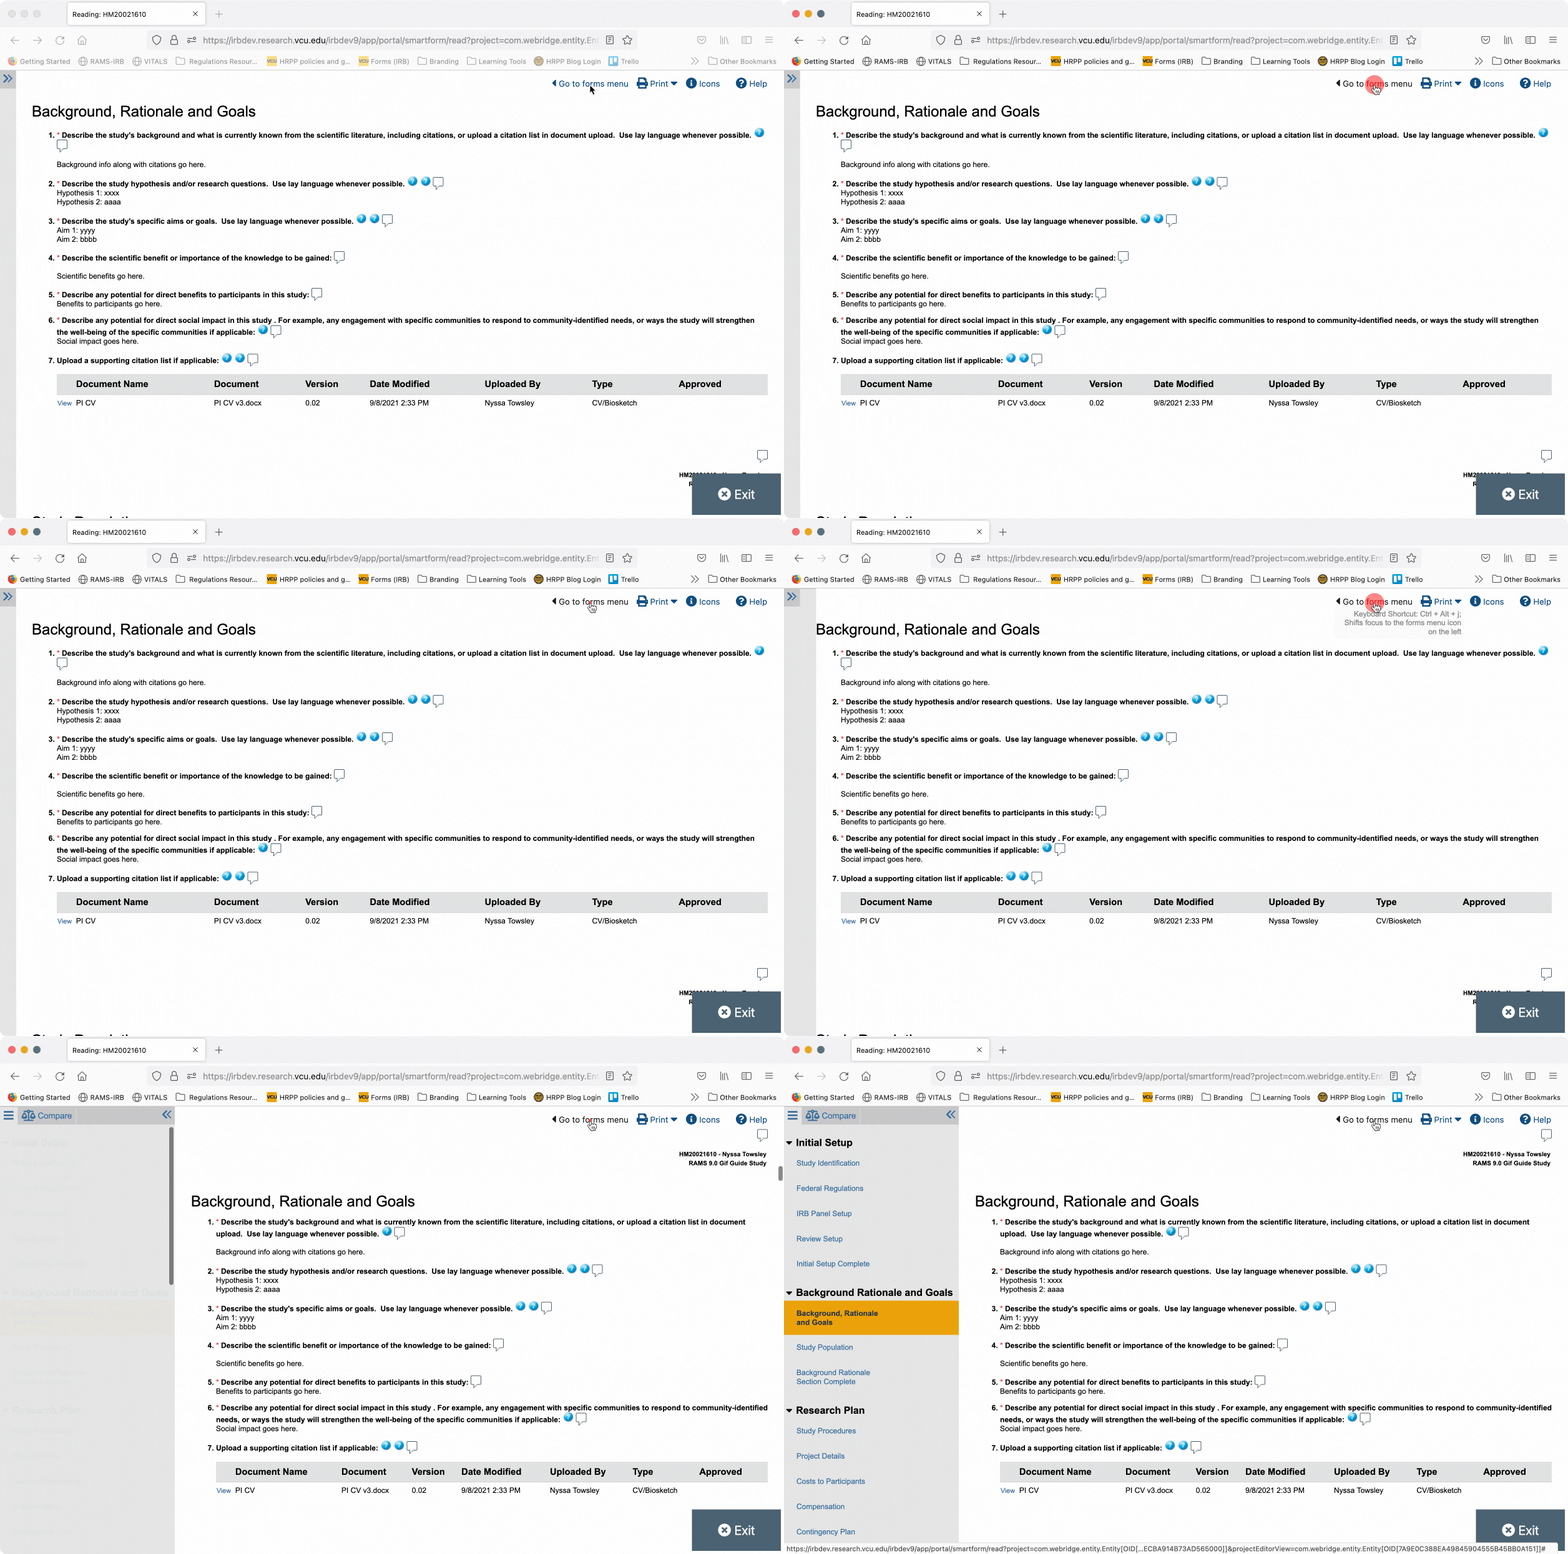
To exit the SmartForm and return to the study workspace, click the “Exit” button at the bottom of the page.
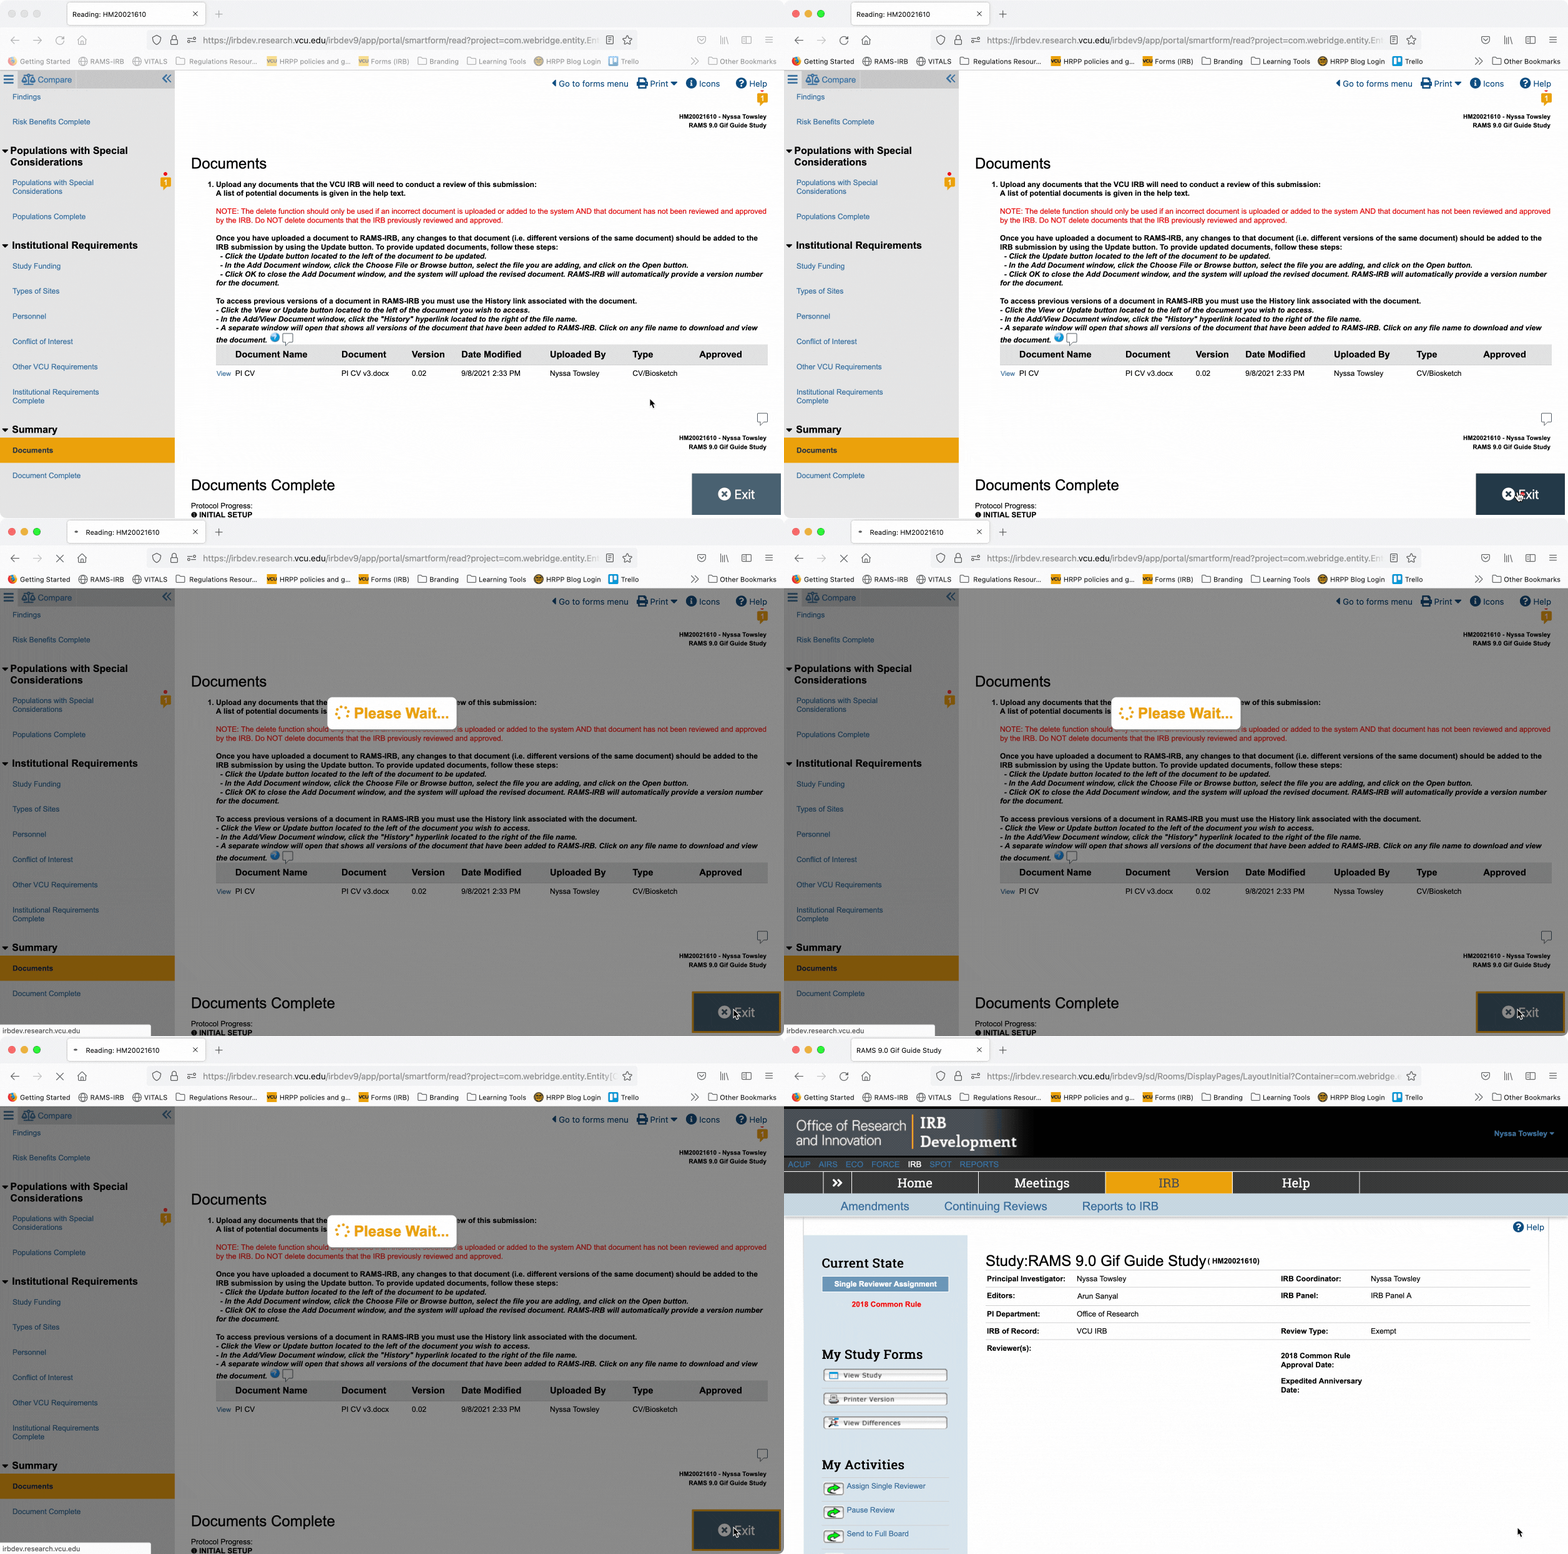
Reviewer Notes
Reviewer notes are used by reviewers to request that the PI/study team make specific changes to the SmartForm or supporting documents. Best practices for writing reviewer notes include:
- Writing in complete sentences and in a professional tone
- Addressing comments to the study team/PI (“Please do X” rather than “The PI should do X”)
- Clearly stating what change you want made (i.e.: “Check the box for children” or “Add citations for your references”)
- Clearly identifying where in the SmartForm you want the change to be made (i.e.: “check the box for children in question #1” or “add citations for your references in question #3”)
- Including an explanation as to why the change is required (i.e.: “in order to minimize risk, please add a pre-treatment PK sample to the study procedures” or “the regulations require that the consent form identify alternatives to the research. Please modify your consent form to include an alternatives section”)
- Don’t duplicate reviewer notes. If another reviewer has requested the same change, there is no need to log a separate reviewer note for the same issue
- Only identify one issue per reviewer note. Including multiple change requests in a single reviewer note can lead to the PI/study team easily missing a change request
Question-Level vs. Page-Level Reviewer Notes
Reviewer notes can be added either at the question-level or at the page-level. For the most part, it will be more useful to log a reviewer note at the question-level, as this will make it clearer to the investigator where the change is being requested. However, there may be circumstances where a page-level reviewer note makes more sense.
Additionally, any existing reviewer notes that were logged on a study prior to 9/15/2021 (the date RAMS-IRB was updated to 9.0, resulting in changes to the reviewer notes function) will appear as page-level notes, so it is important to know how to navigate page-level notes if you are conducting a review of a study that had reviewer notes logged on it prior to 9/15/2021.
Logging Question-Level Reviewer Notes
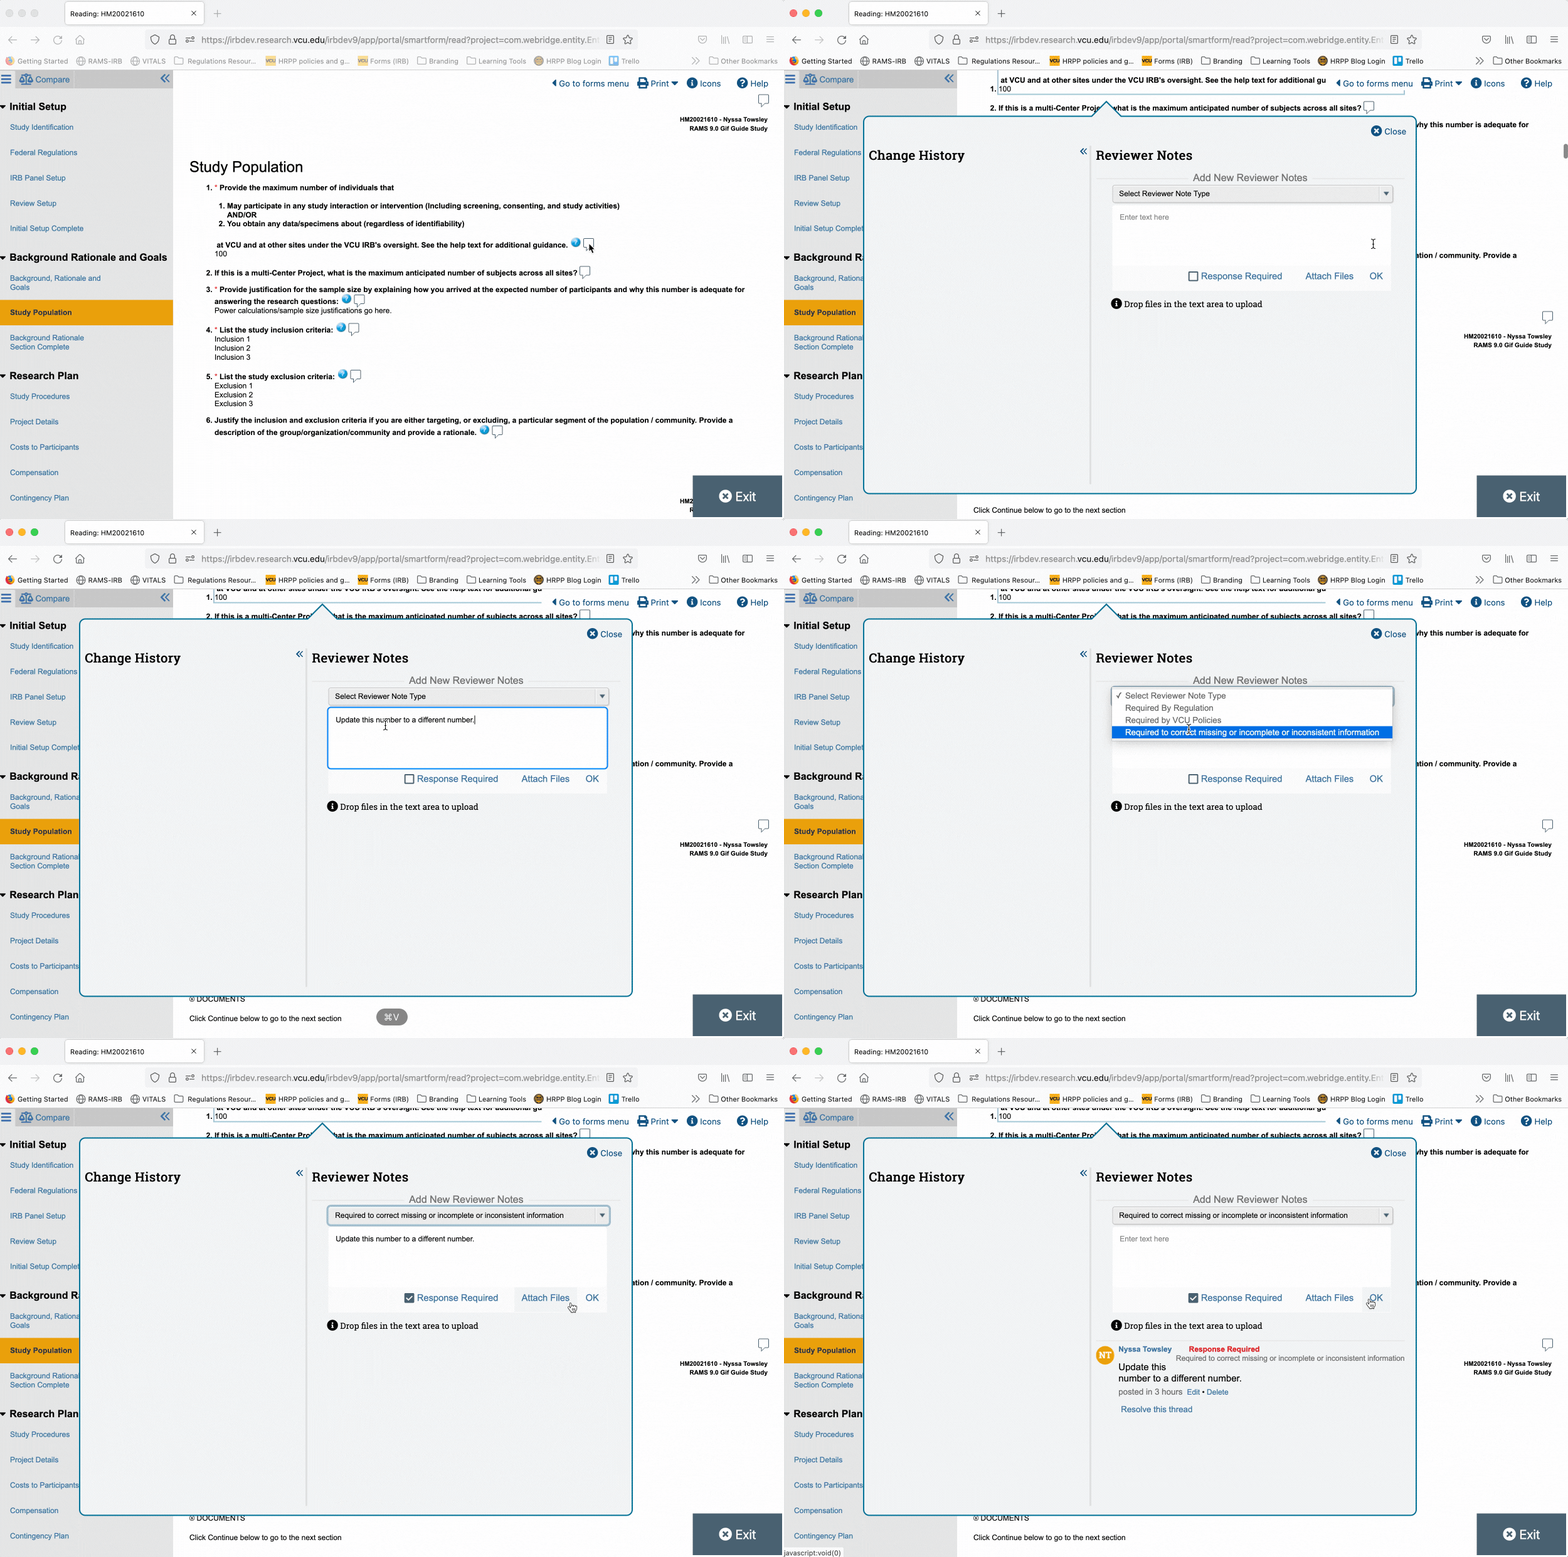
To log a question-level reviewer note, find the question in the SmartForm that corresponds to where you would like to see a change made. At the end of the question text, there will be a small icon in the shape of the outline of a speech bubble. Click on that icon, and the reviewer notes dialogue will open.
In the dialogue, first select the type of change request being made. The options are from the “Big 3” — required by regulations; required by VCU policy; or required to correct missing, incomplete, or incorrect information. Next, enter the text of your reviewer note into the text box, ensure that “Response Required” is checked (this should be done by default), and then click “OK.” The reviewer note will then appear within the reviewer note dialogue.
Logging a Page-Level Reviewer Note
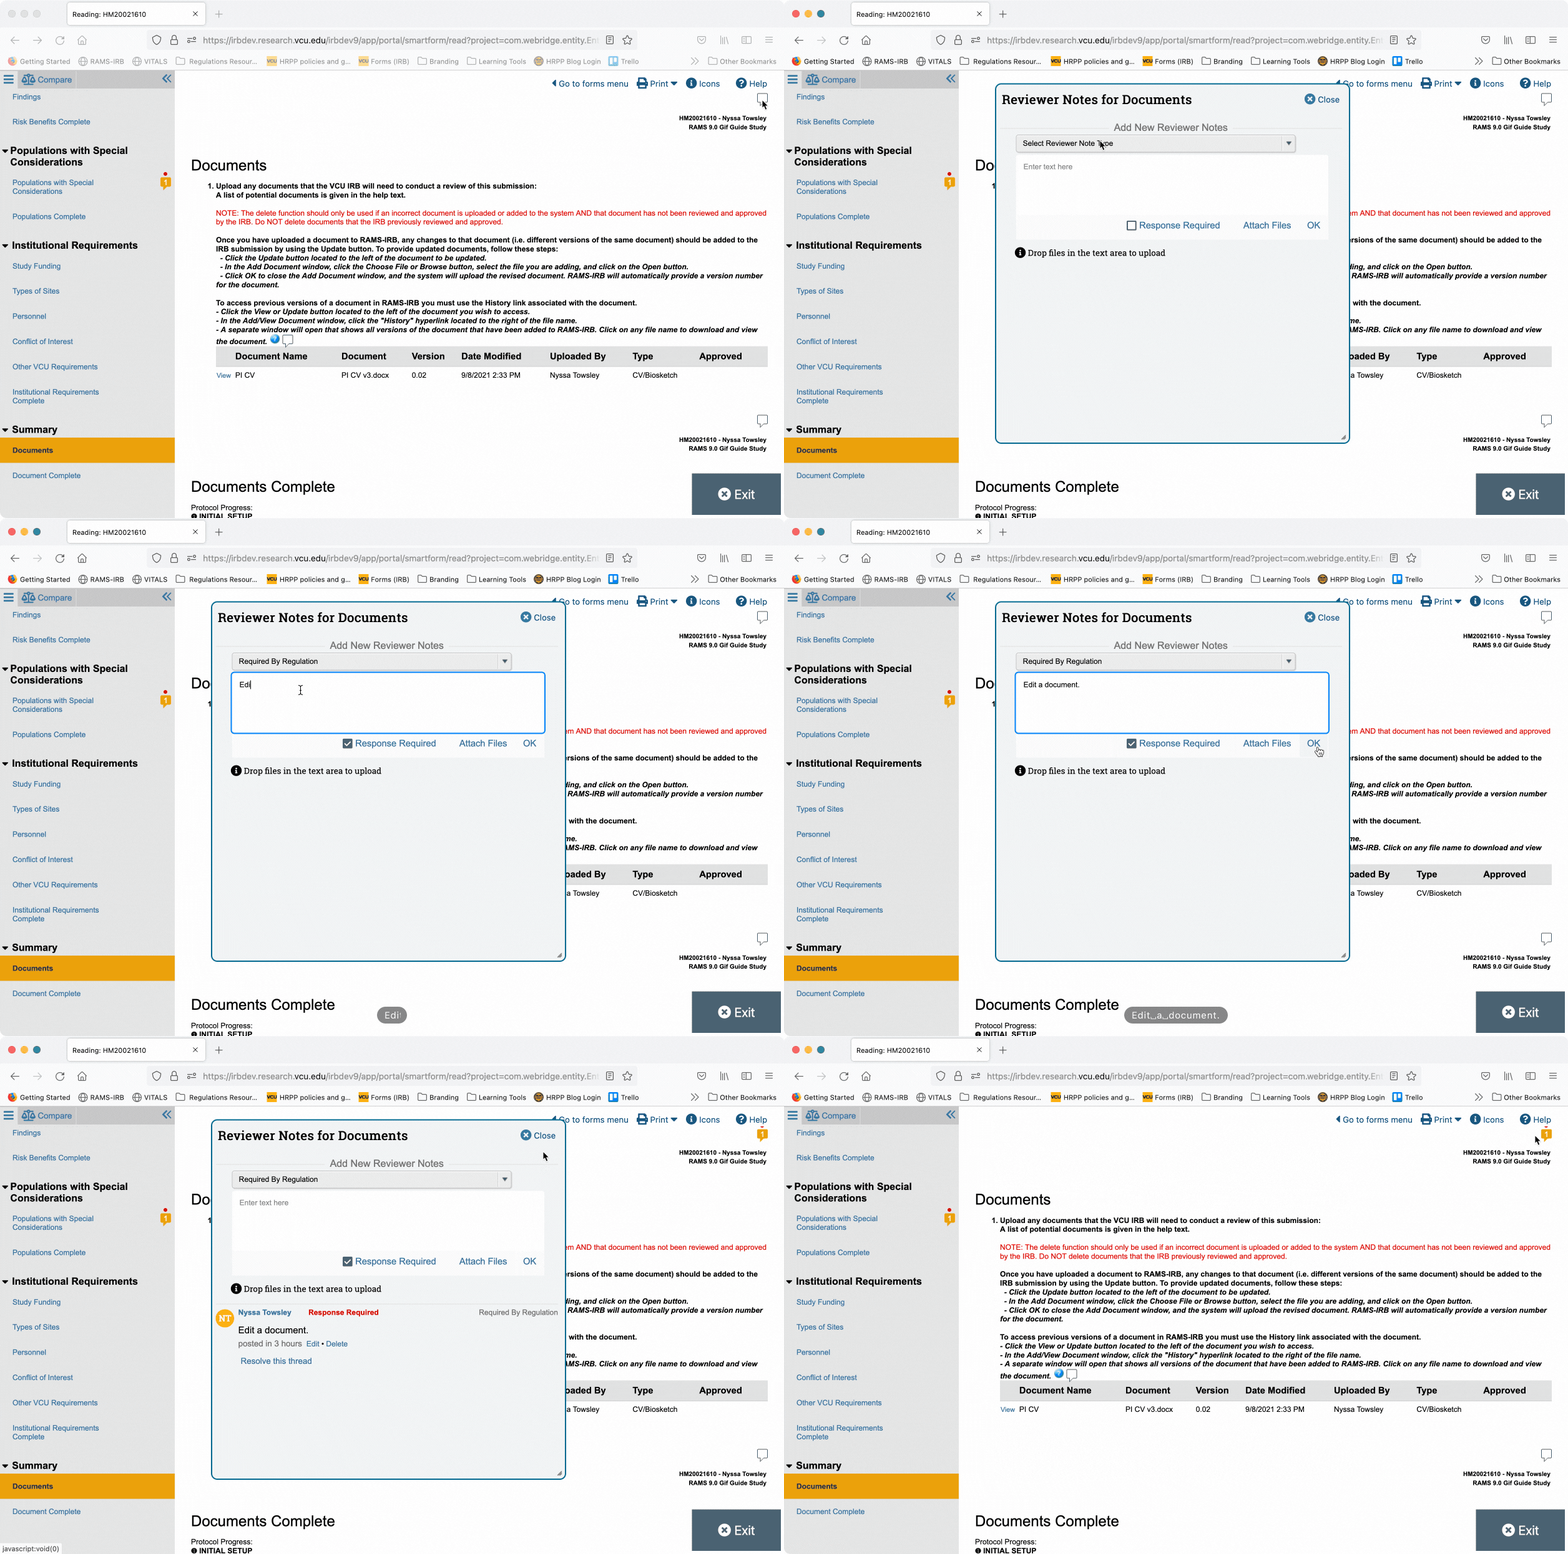
Logging a page-level reviewer note will be the same as logging a question-level note, except that the speech bubble outline icon will appear at the top of the SmartForm page. Navigate to the page you wish to leave the note on, and click the outline of the speech bubble to open the reviewer note dialogue.
From there, log a note as you would in a question-level reviewer note. Once you close the page-level reviewer note, you will see that the outline of the speech bubble icon has now changed to a filled speech bubble icon, containing a number to indicate the number of reviewer notes logged at the page-level for that page, and will have a red dot above the icon, to indicate to the investigator that at least one note at the page-level requires action on their part.
Editing a Reviewer Note
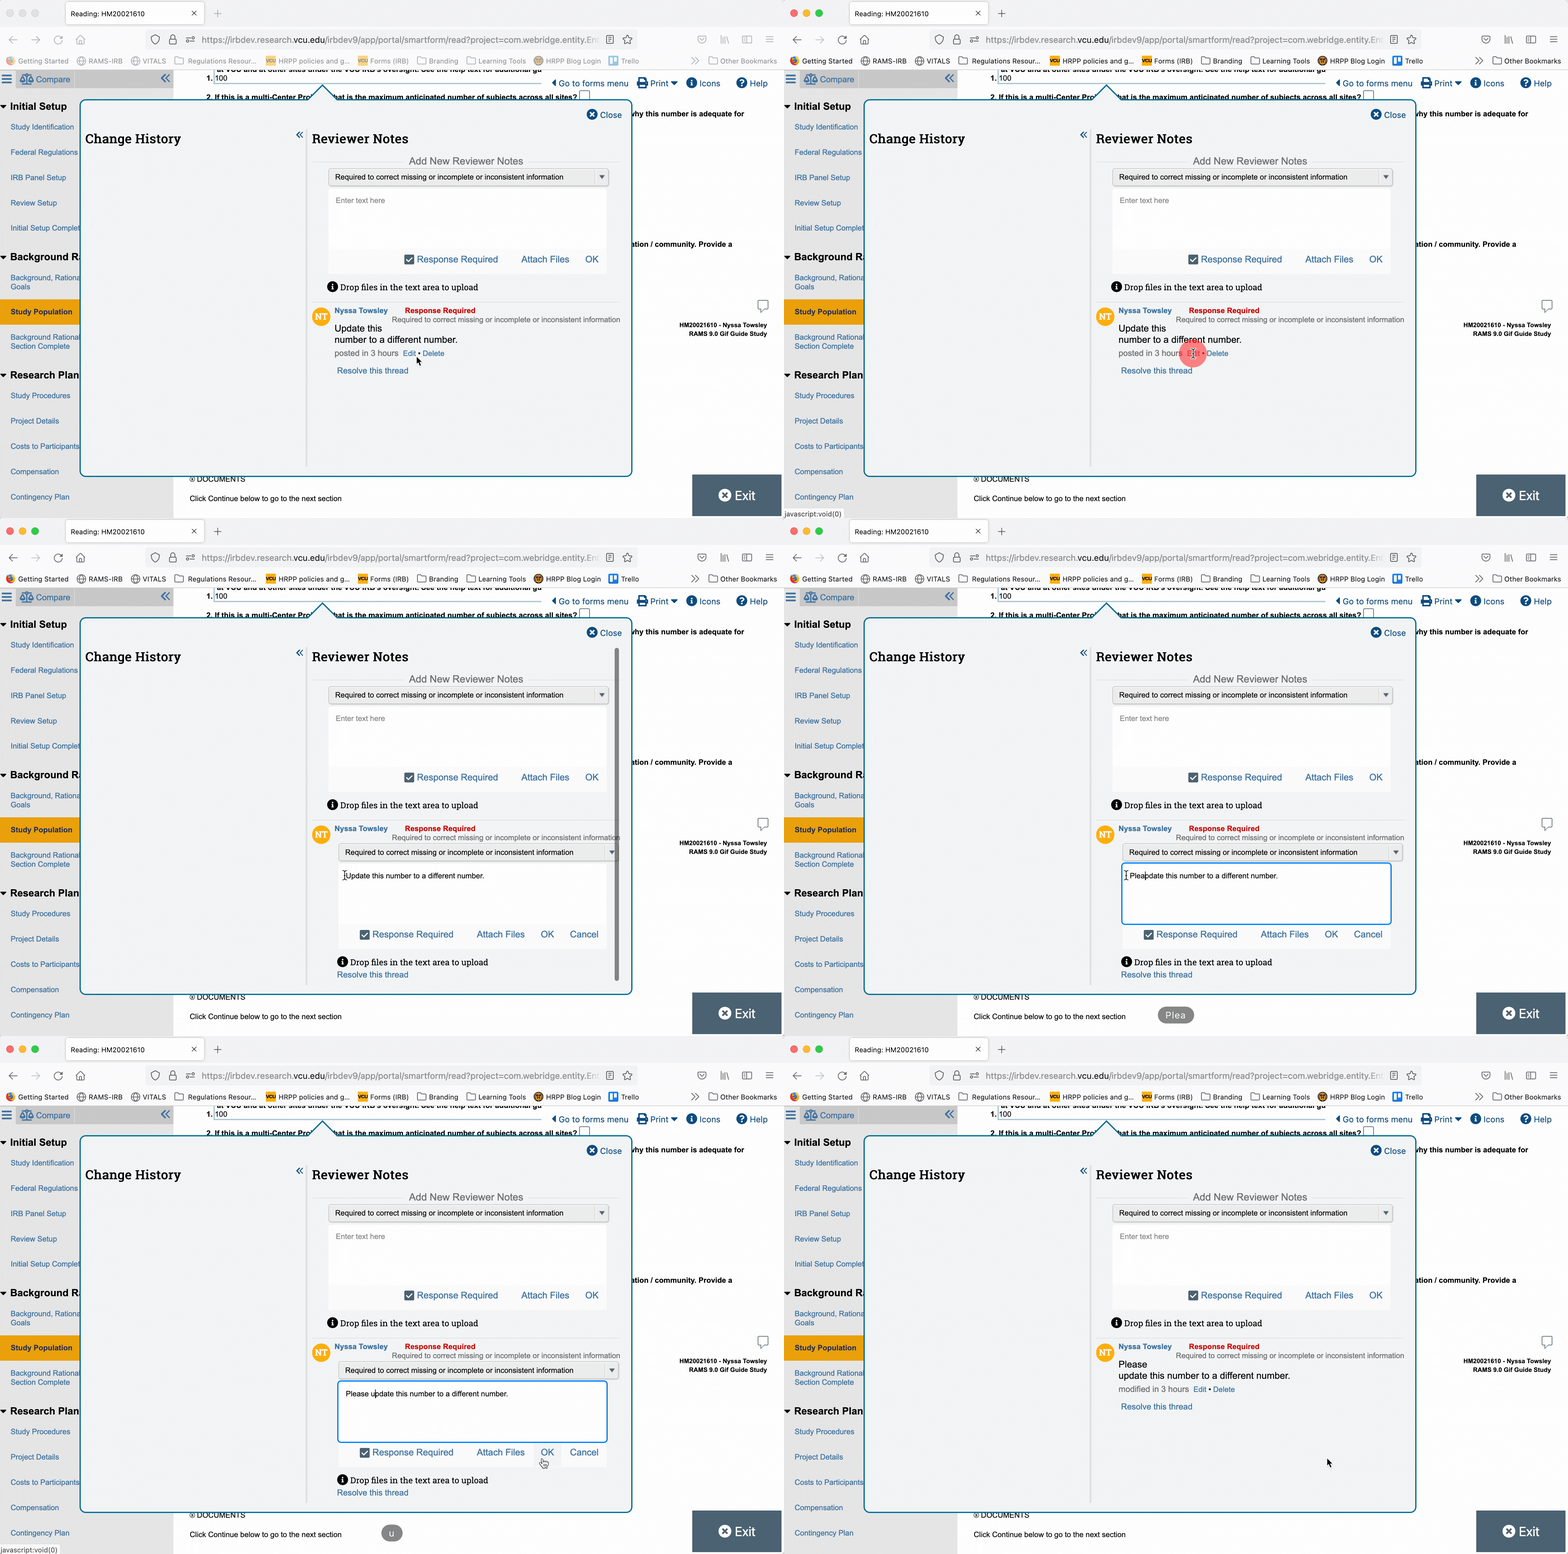
To edit a reviewer note, open the reviewer note dialogue by clicking the speech bubble icon at the end of the question text (if you have not done so already). Then, click “edit” underneath the text of your reviewer note. This will open the text box of the reviewer note and allow you to edit the text. Once you have finished editing, click “OK” and the revised reviewer note will populate.
Deleting a Reviewer Note
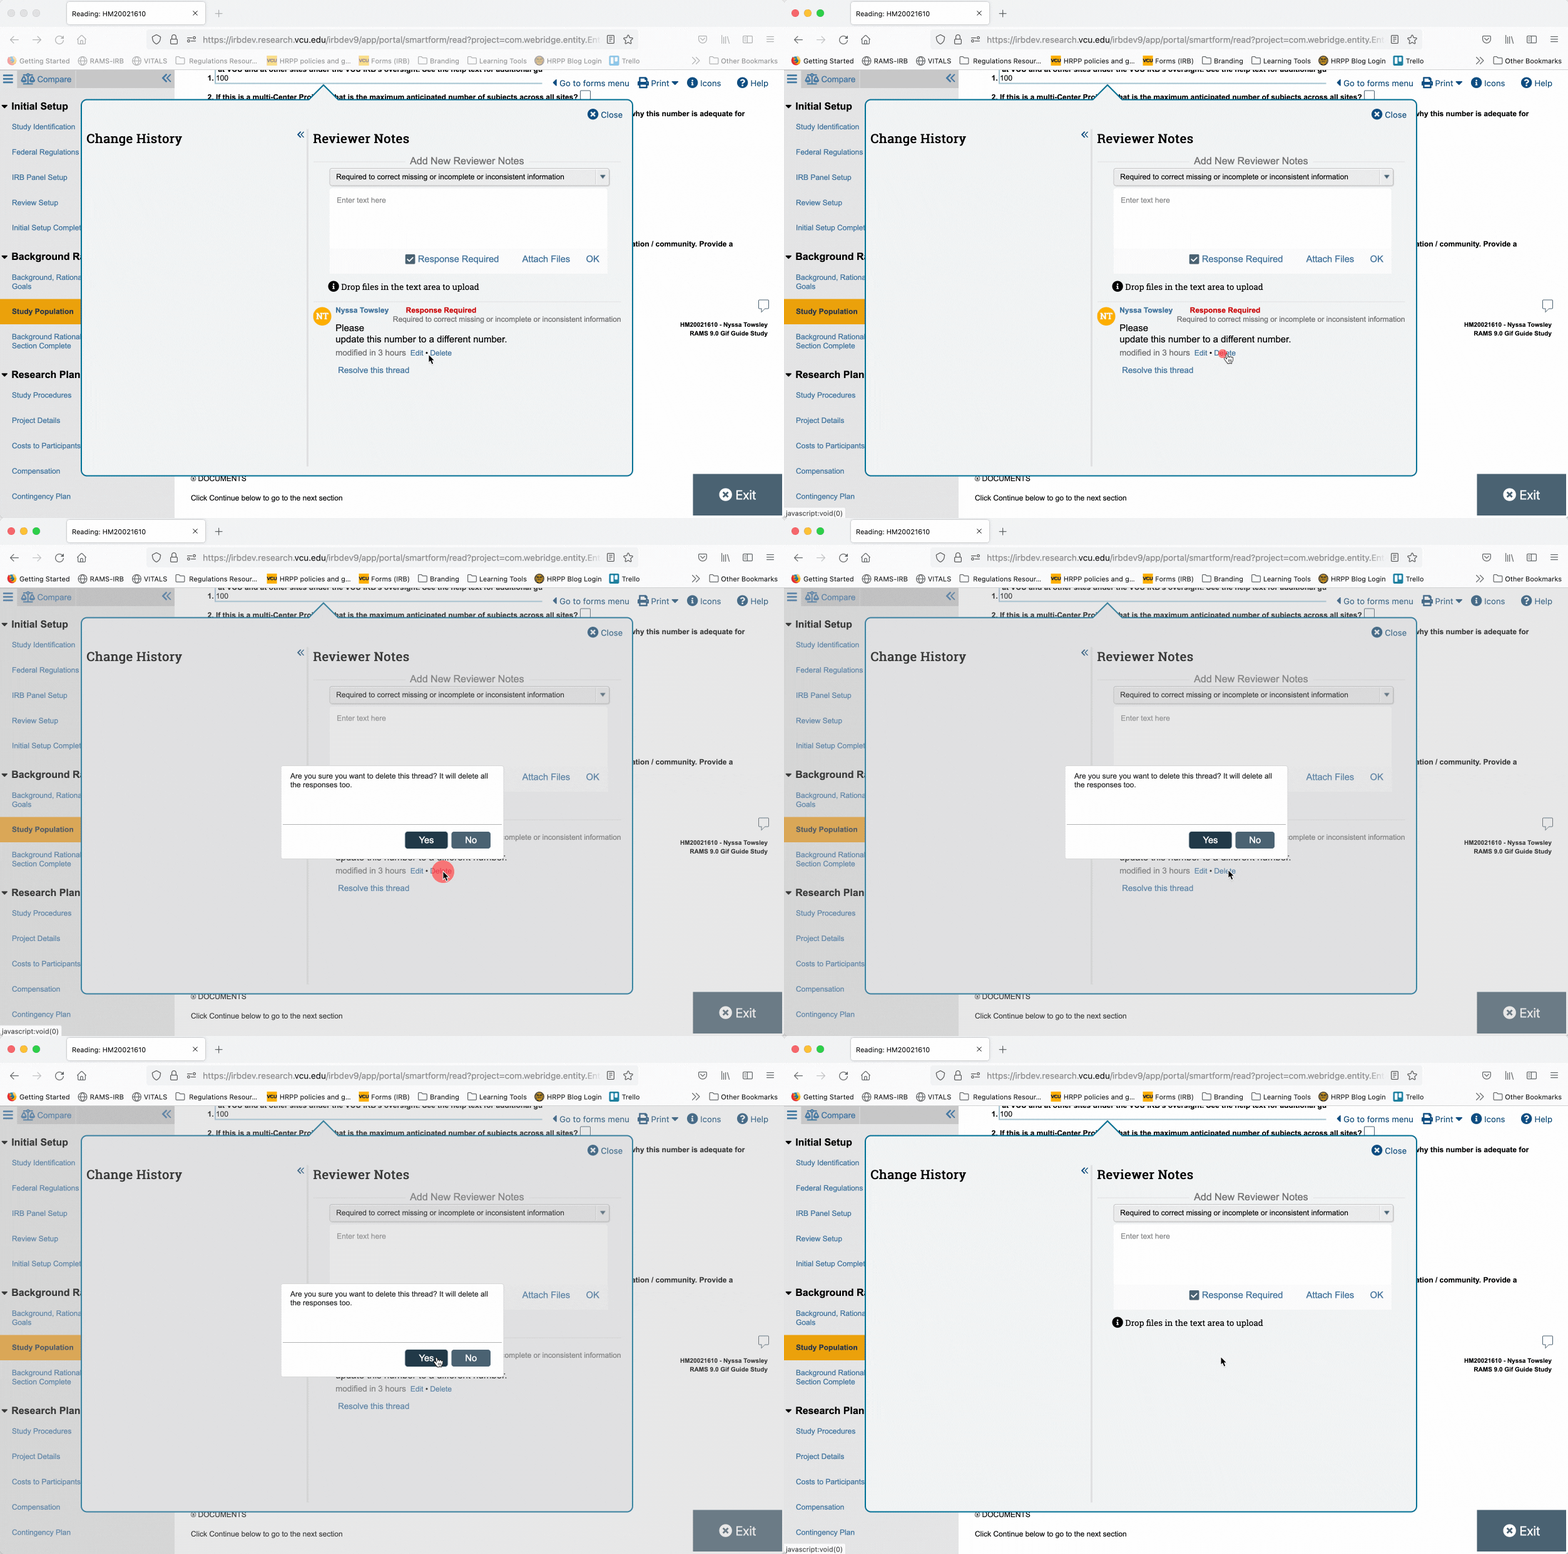
To delete a reviewer note, open the reviewer note dialogue by clicking the speech bubble icon at the end of the question text (if you have not done so already). Then, click “delete” underneath the reviewer note you wish to remove. A dialogue will pop up asking if you are sure you wish to delete the note. Click “Yes” in the dialogue to confirm deletion. Note that deleting a reviewer note will also delete any replies to that note.
Exiting a Reviewer Note
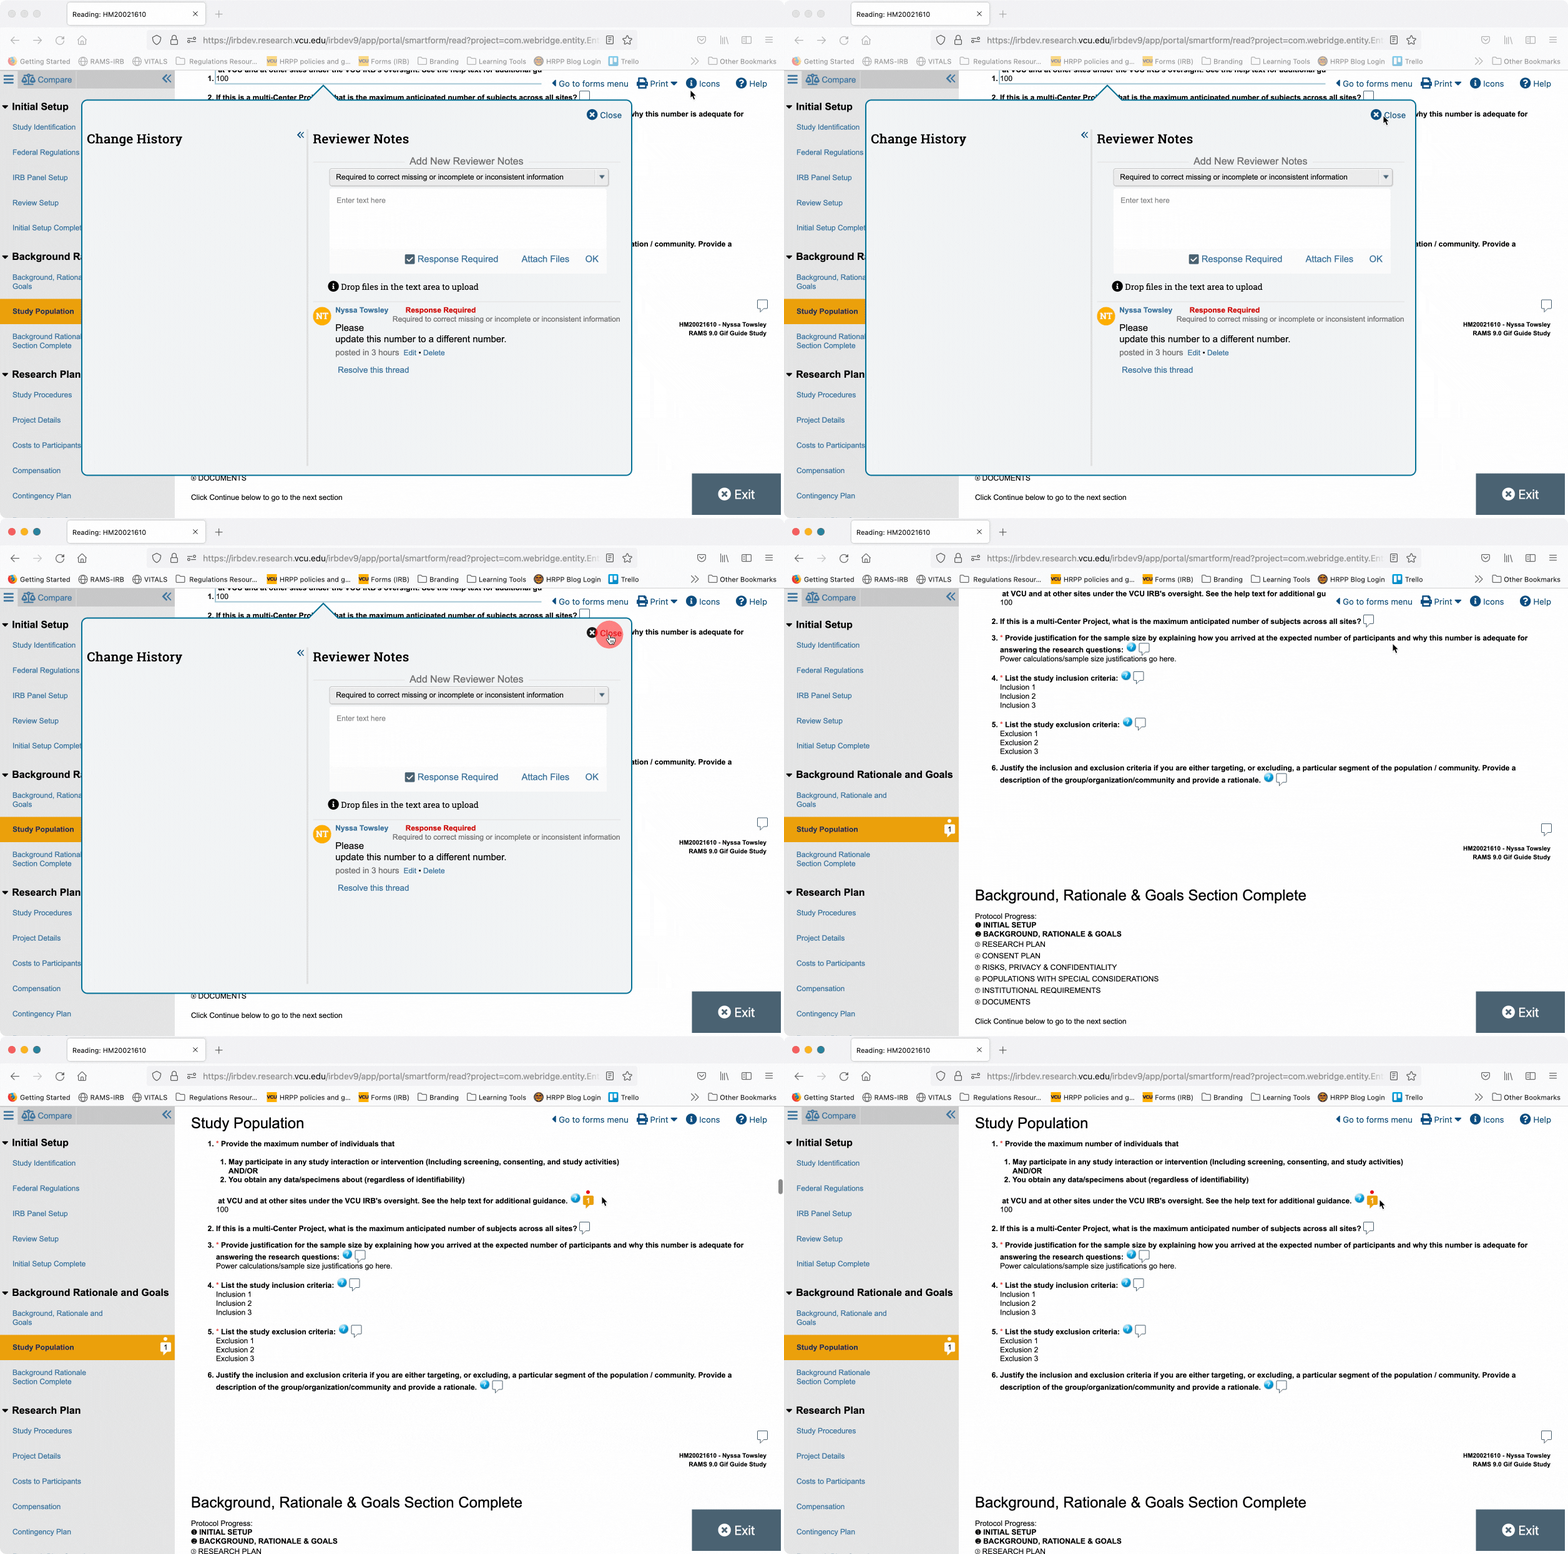
To close the reviewer notes dialogue, click the “Close” button in the upper right corner of the dialogue. When you close the reviewer notes dialogue, you will note that the speech bubble icon following the question text now appears in solid yellow with a number inside, indicating the numer of notes logged on that question. There is also a red dot above the speech bubble icon, indicating that at least one reviewer note associated with that question requires action on the part of the investigator.
Viewing a Reviewer Note Again
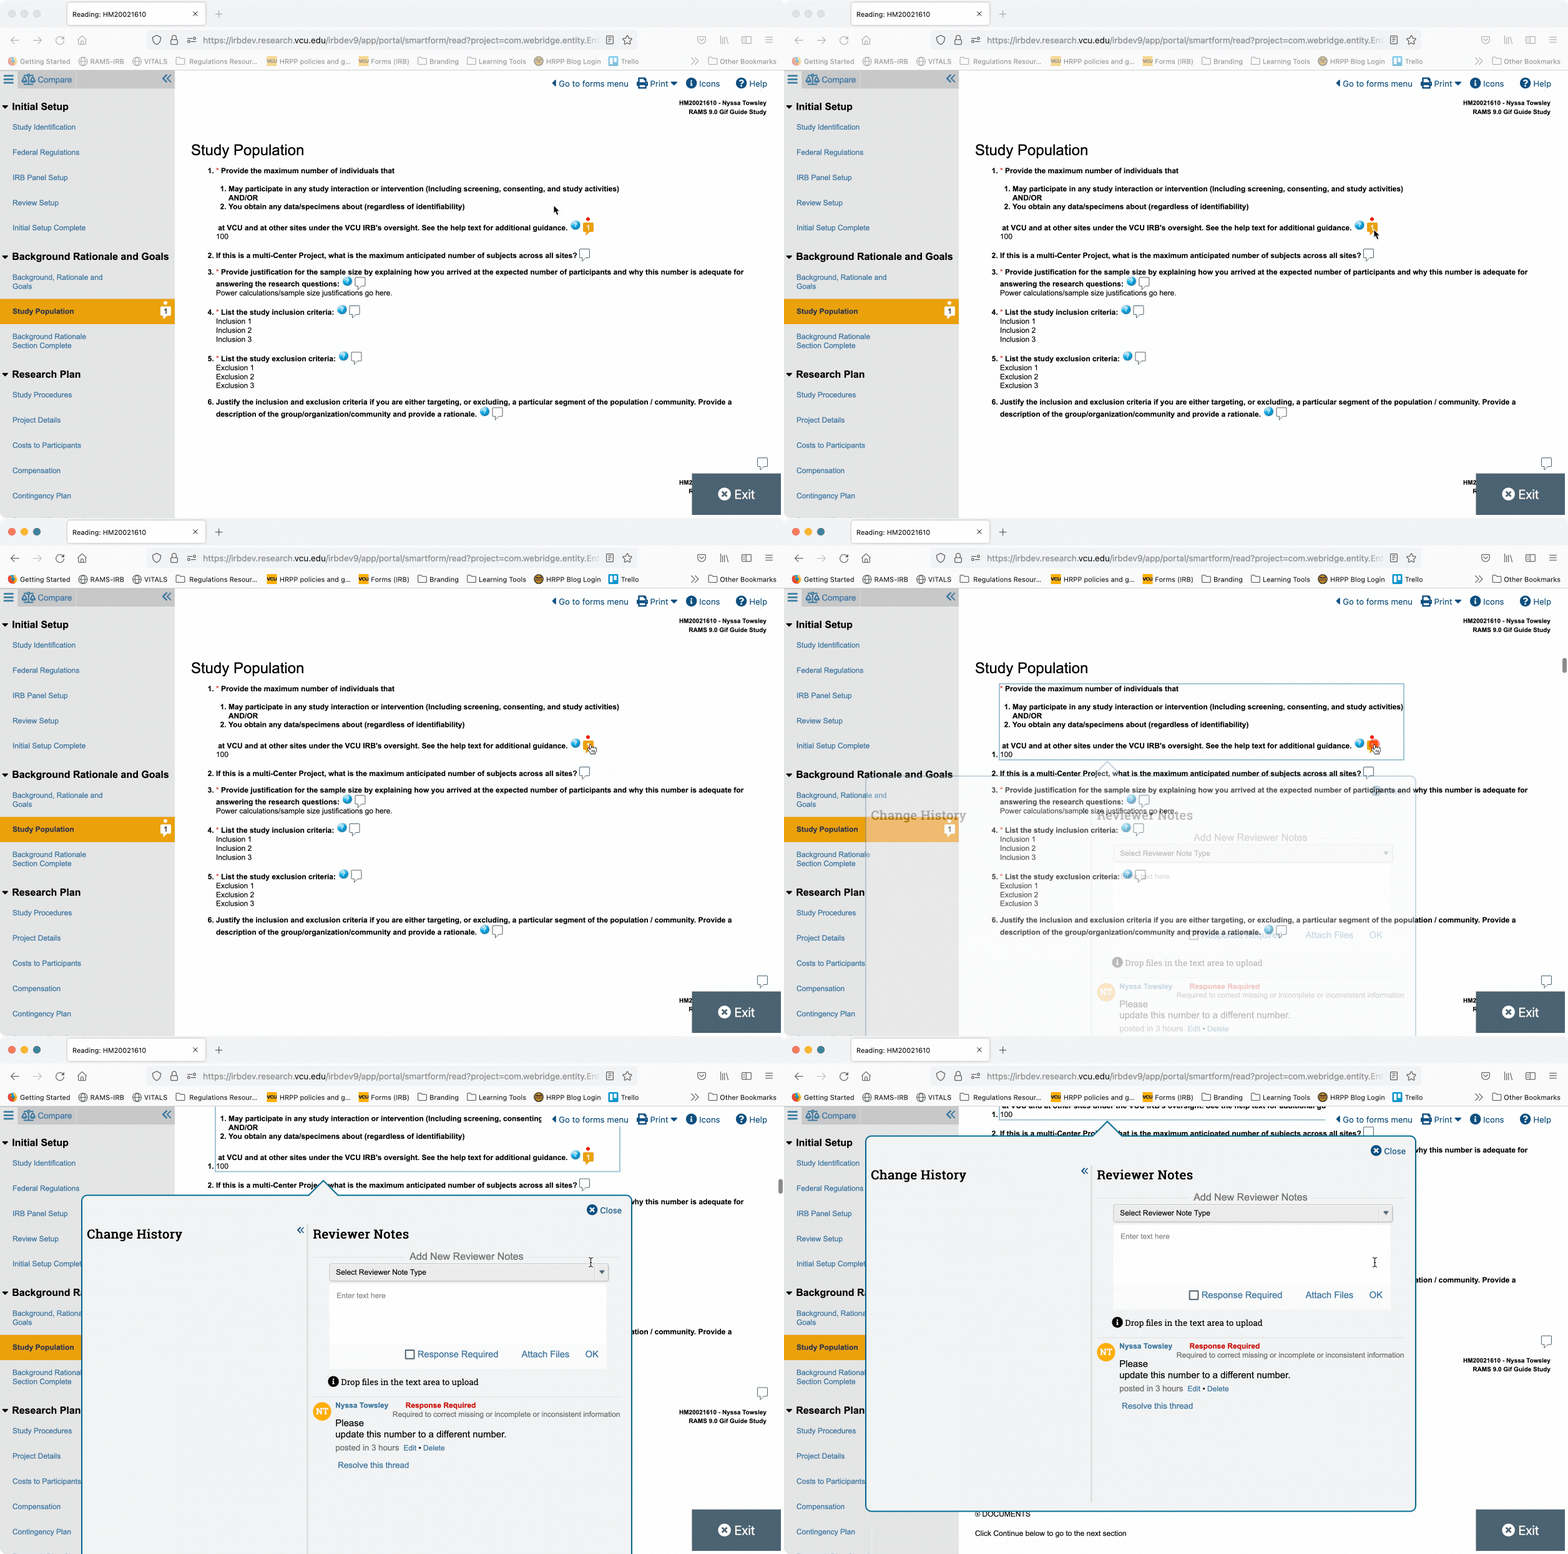
To view a reviewer note you have logged but closed, navigate to the question or page the reviewer note was logged on, then click the speech bubble icon to open the reviewer note dialogue. There you will be able to view the reviewer note(s) logged on that page or question.
Reviewer Notes in the Navigation Menu
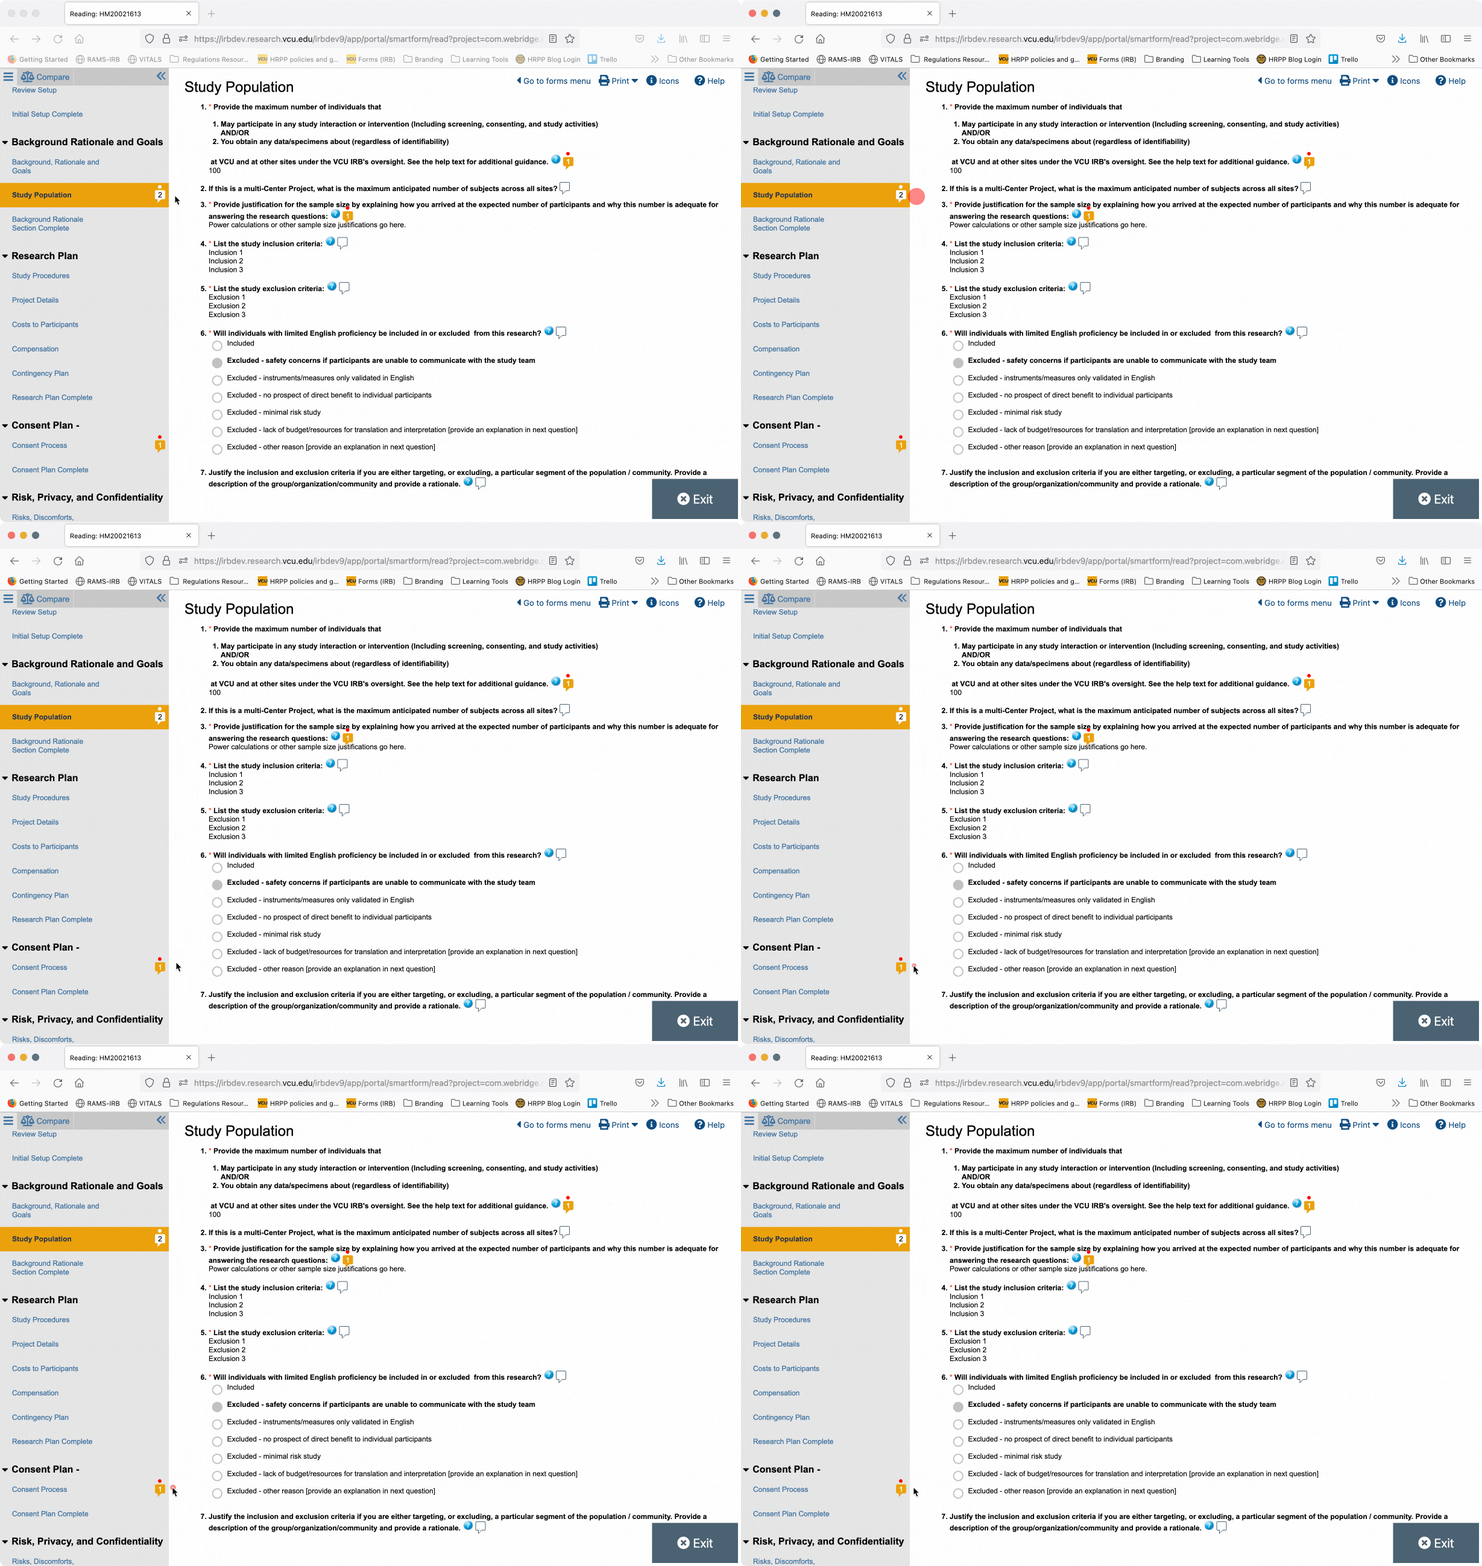
Once you have logged reviewer notes either at the question- or page-level, you will note that within the navigation menu, yellow speech bubble icons with red dots above them will appear to the right of page names that contain reviewer notes. This is how investigators will know which pages have reviewer notes on them and which reviewer notes require action.
Viewing All Logged Reviewer Notes
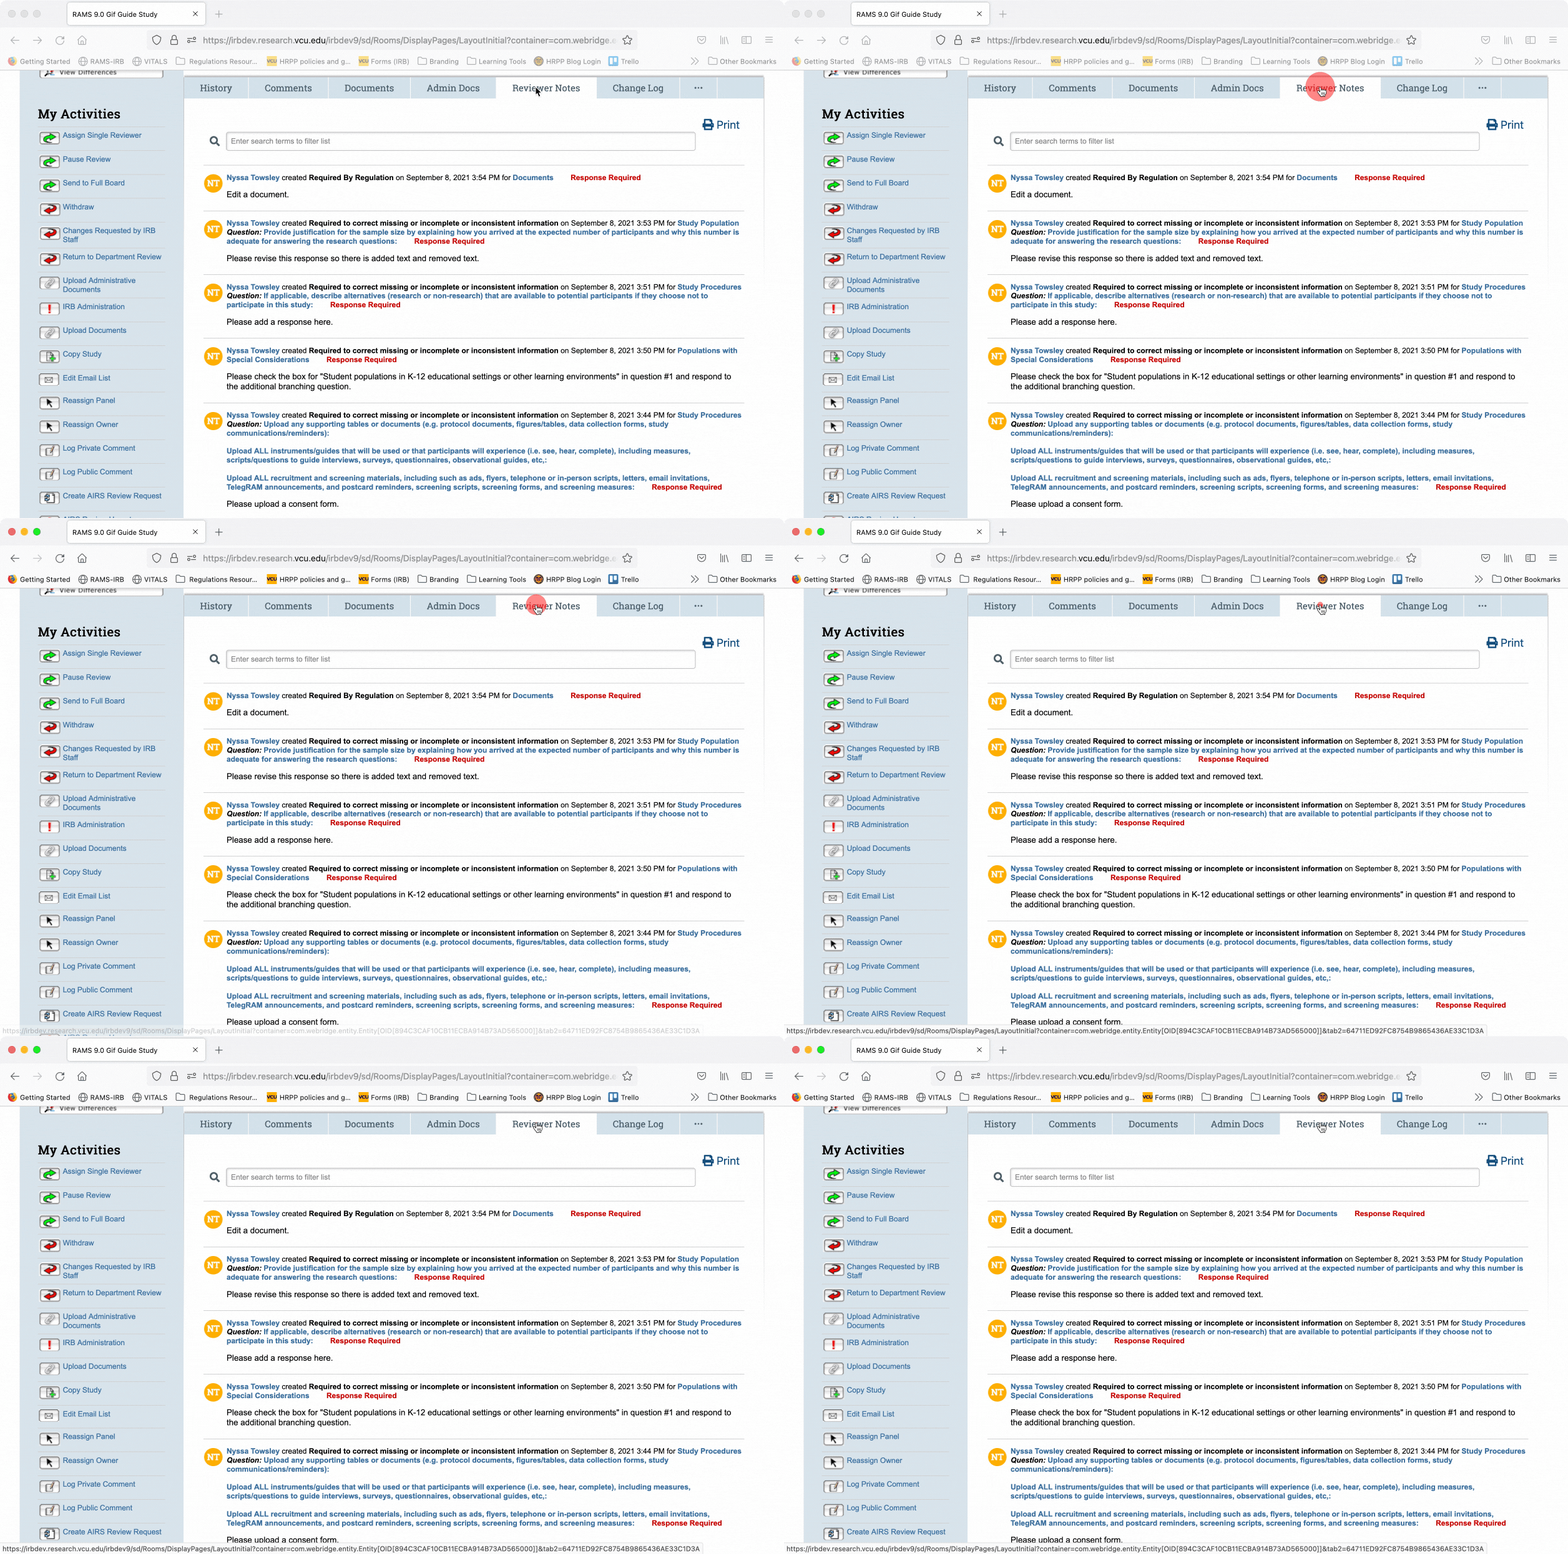
To view all reviewer notes together, navigate to the main study workspace and click the “Reviewer Notes” tab. There you will be able to see all of your reviewer notes.
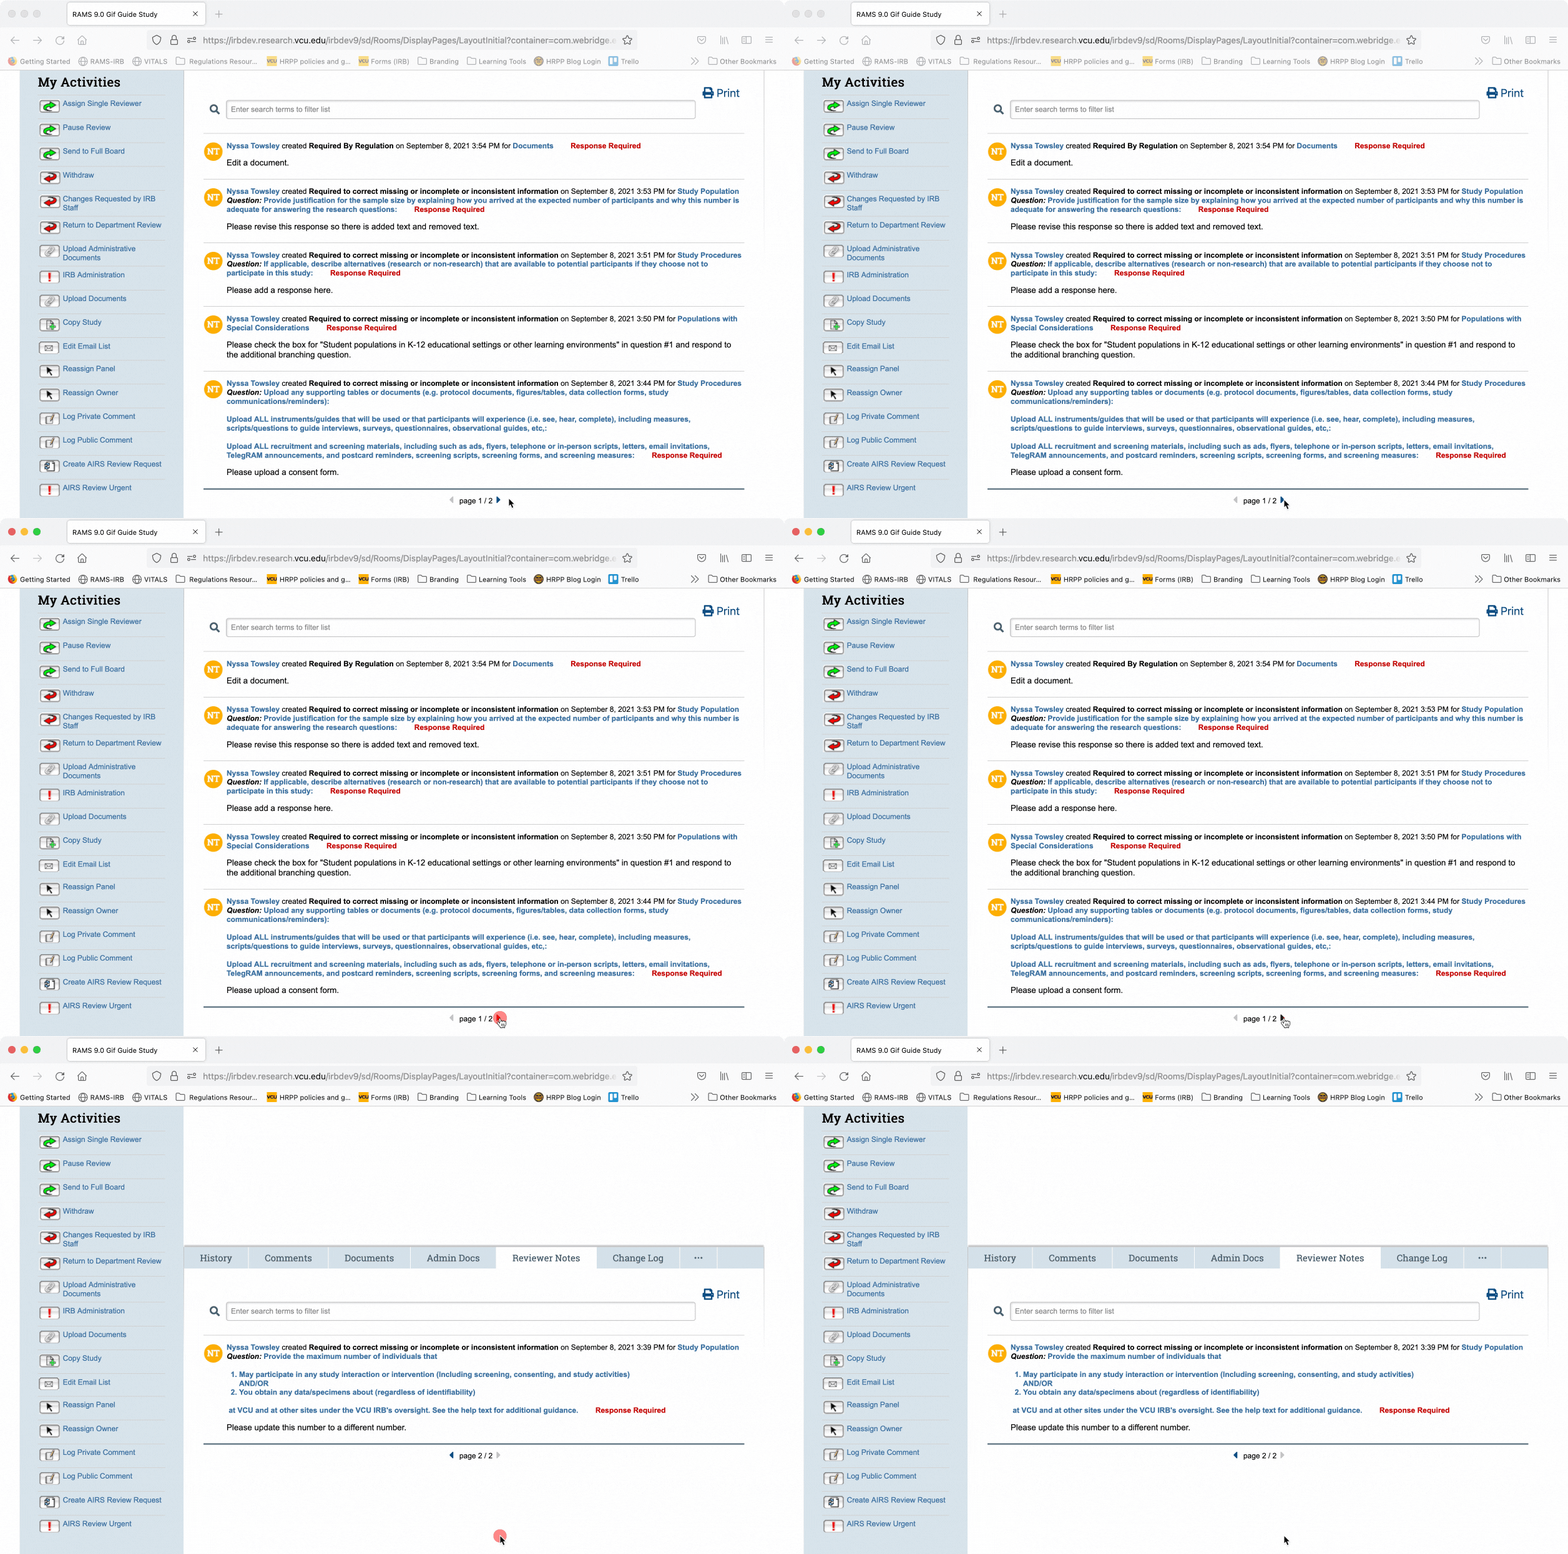
Click the forward and back icons at the bottom of the page to navigate to additional pages containing more reviewer notes.
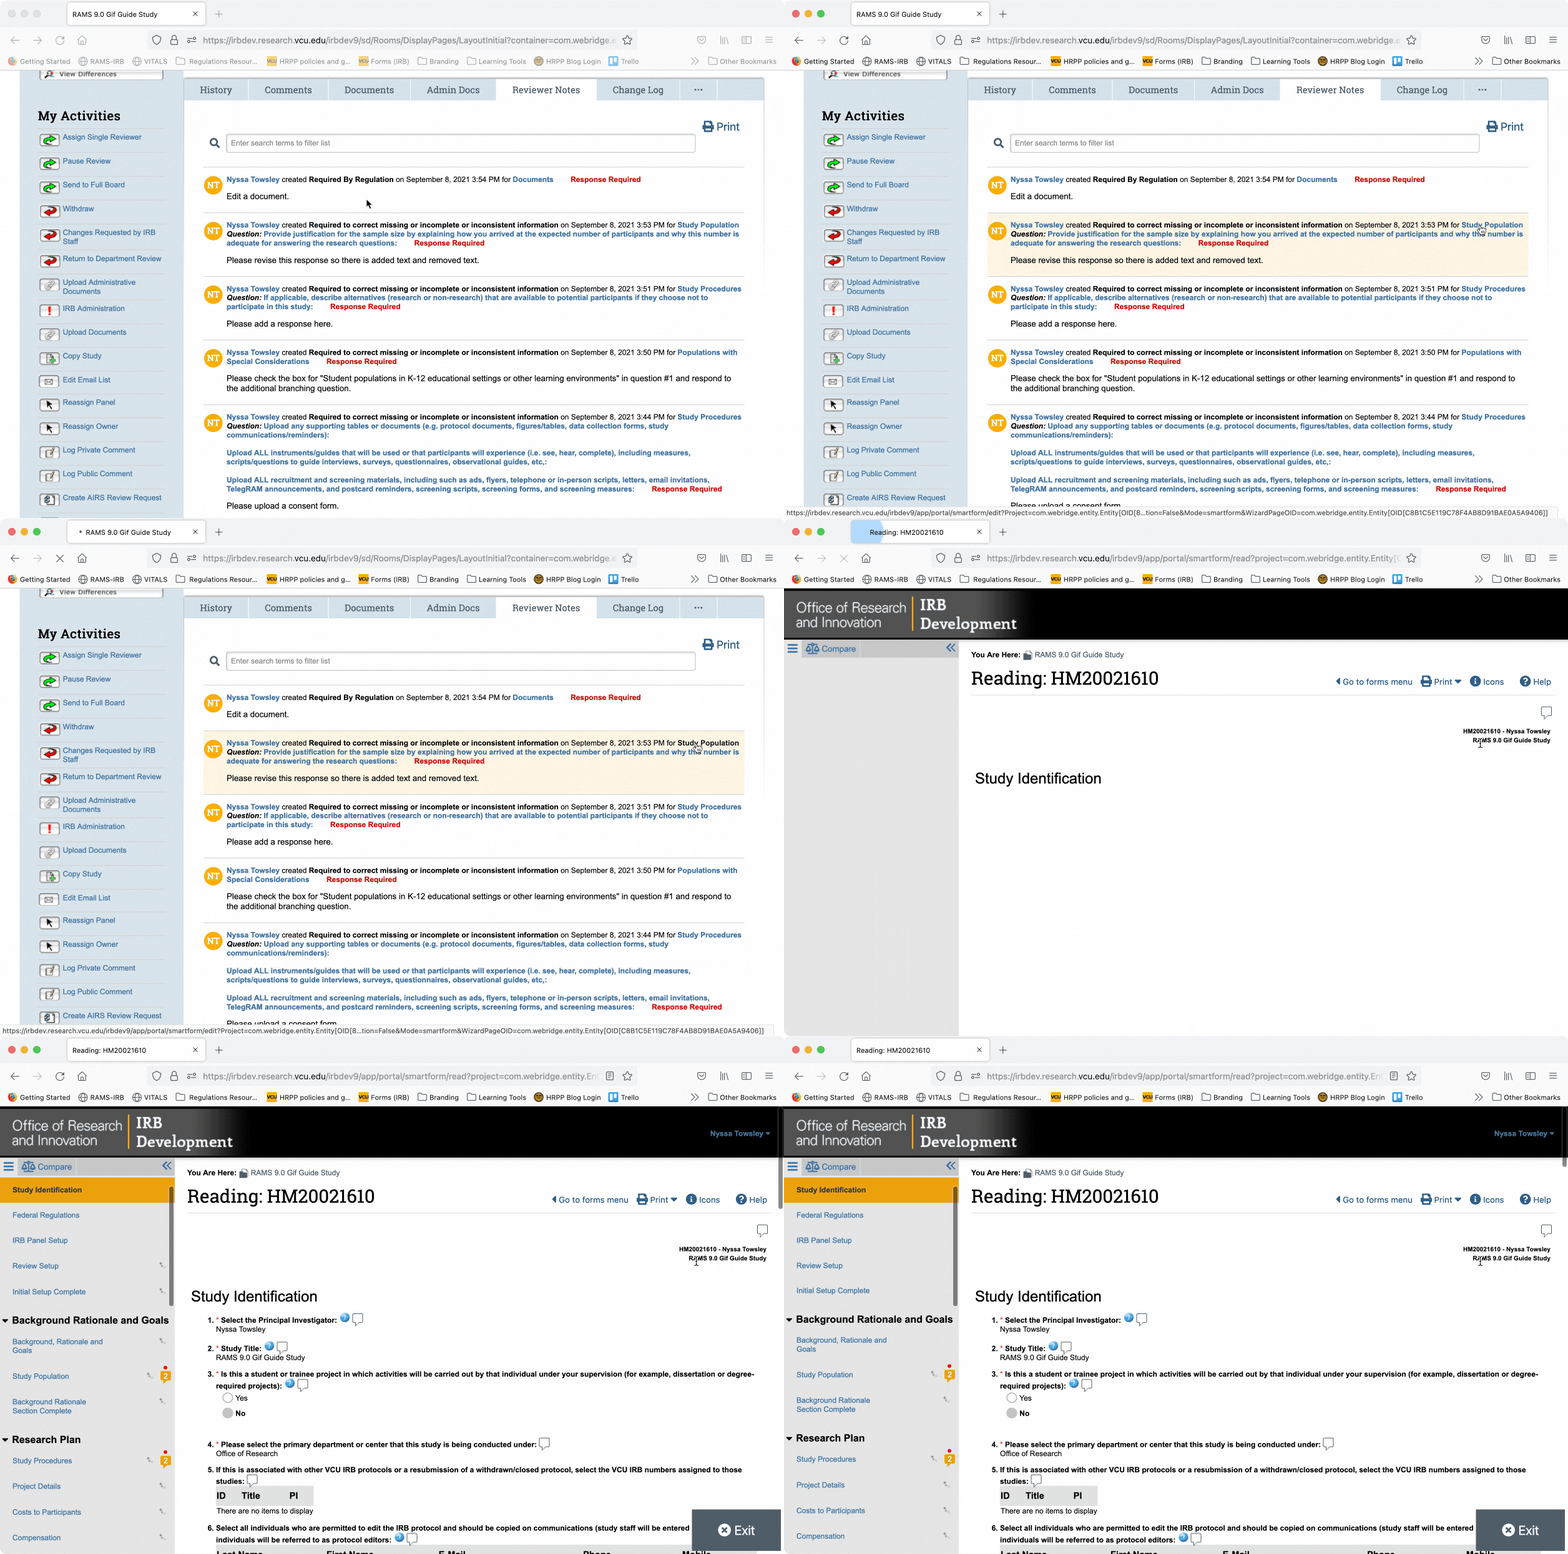
From the “Reviewer Notes” tab, you may also jump to the SmartForm page that the note is logged on. Click the hyperlinked page title or the hyperlinked question text in the reviewer note to automatically open the SmartForm and be taken to the page/question where the note is logged.
Viewing Documents
There are two ways to view documents: within the SmartForm and using the documents tab in the study workspace
Viewing Documents in the SmartForm
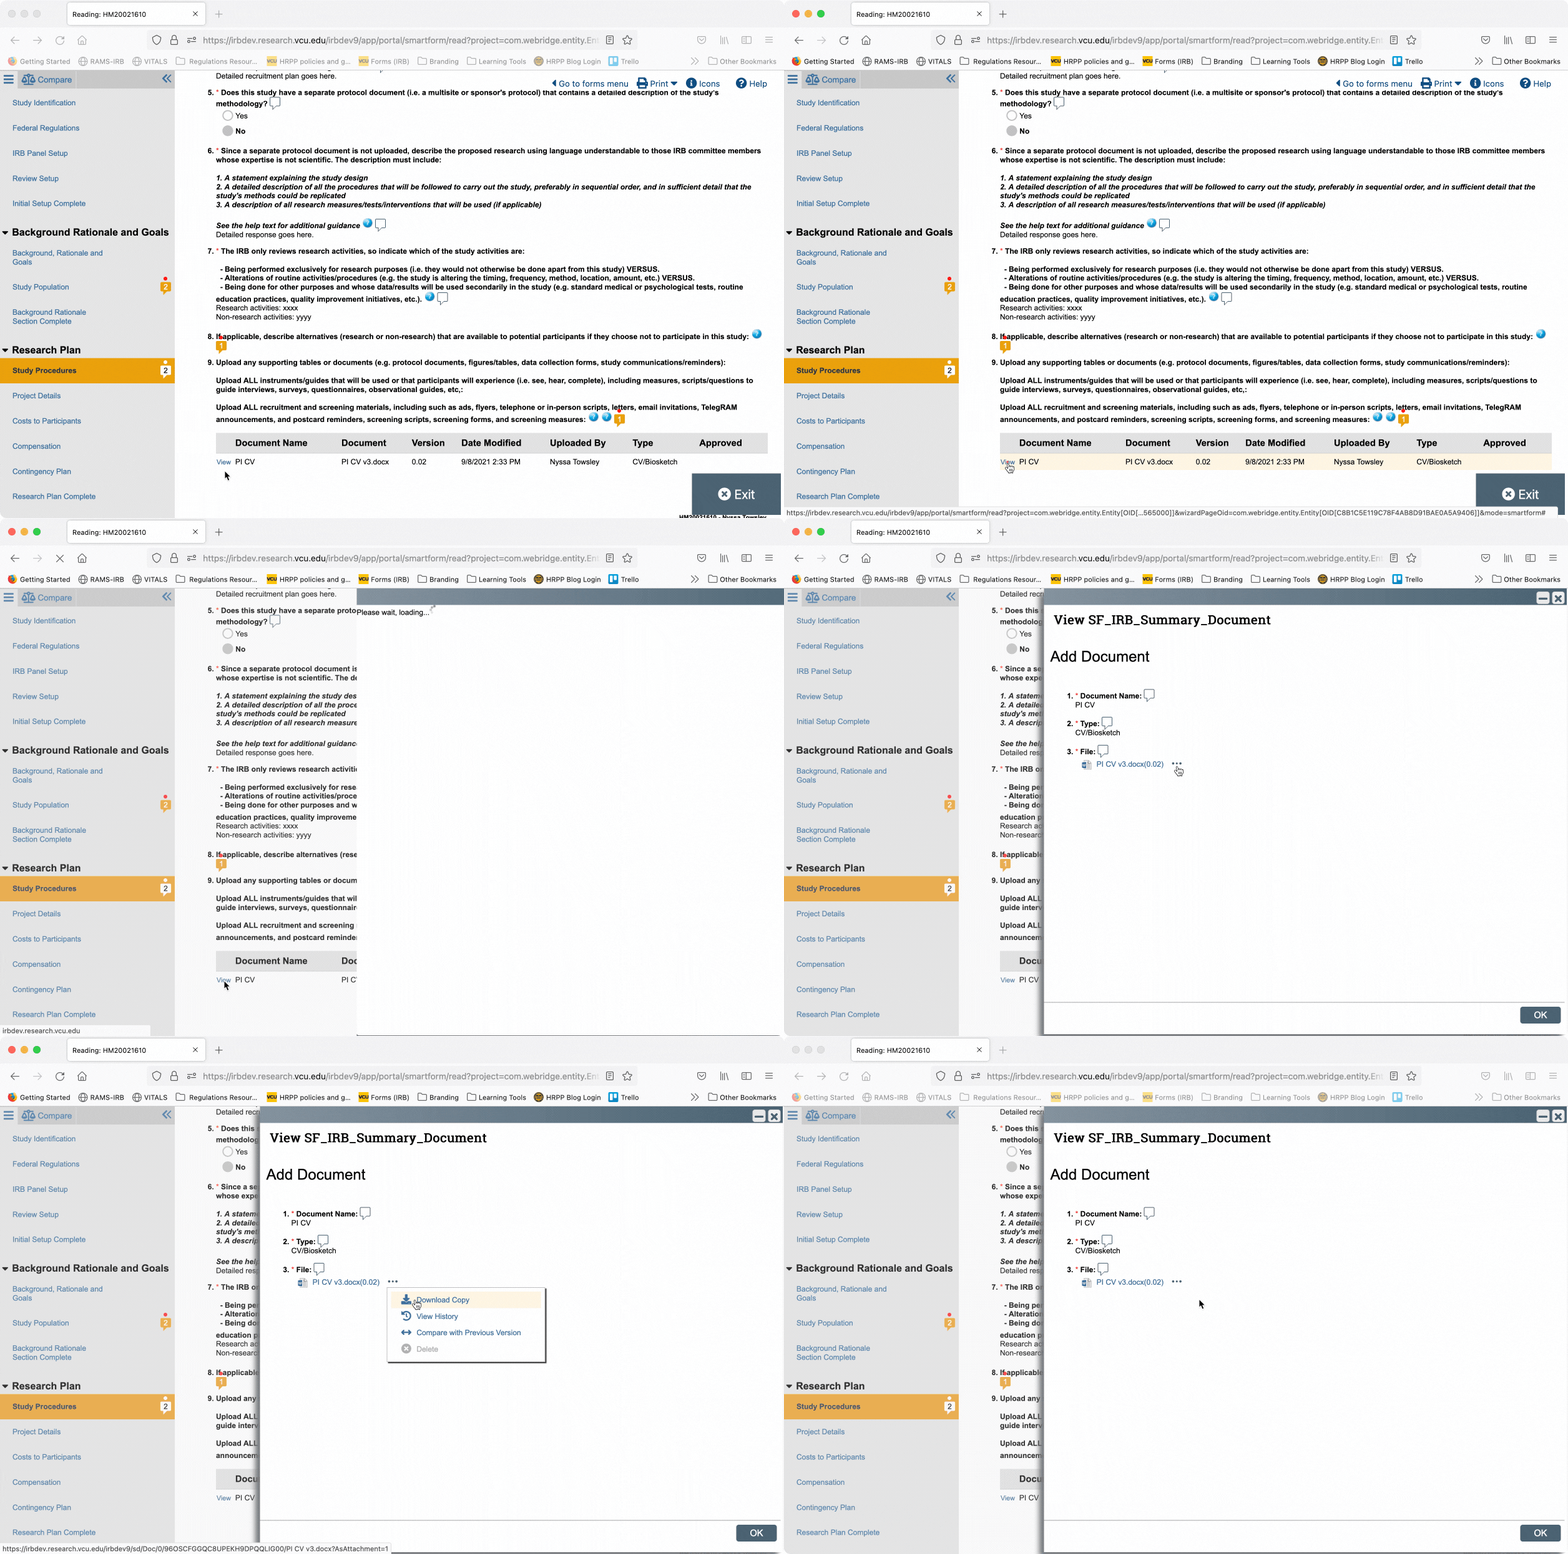
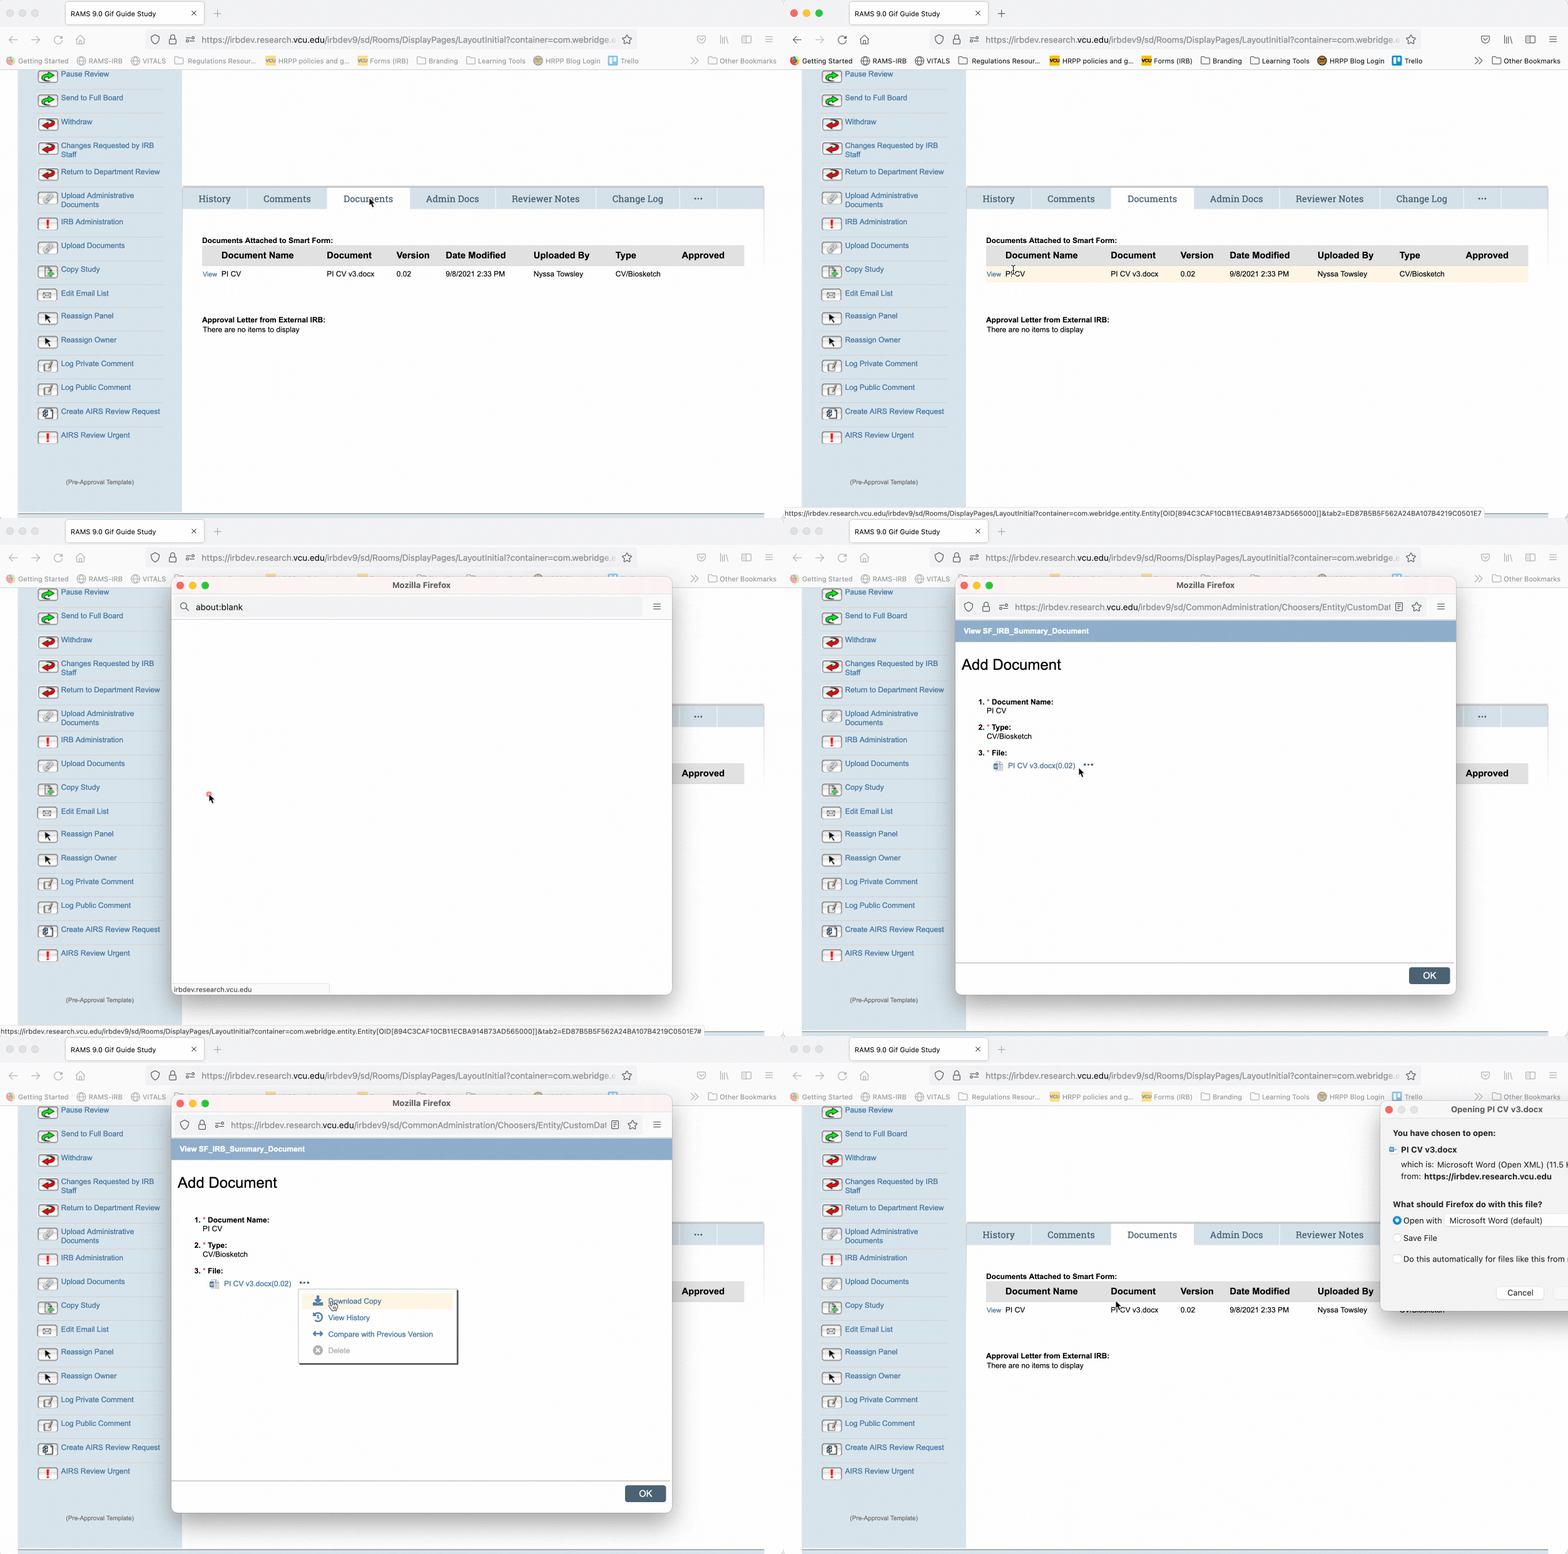
To view documents while in the SmartForm, first navigate to a page with a document upload section, such as the Study Procedures page, the Consent Process page, or the Documents page. Locate the document you wish to view, and then click the “view” link to the left of the document title. This will open a pop-up window. Click on the hyperlinked document file name, or click on the three dots to the right of the file name and select “download copy” from the drop-down menu, to download the most recent version of the document. This will open a system dialogue on your computer prompting you to open or save the file on your computer (in a Mac environment), or will download the document to your browser, where you can click on the file at the bottom of the browser to open it (in a PC environment).
Viewing Documents Using the Documents Tab
You can also view a list of all the documents uploaded to a submission by using the “Documents” tab in the main study workspace.
Click the “Documents” tab, which will display a list of all the uploaded documents. The process to download a document from this view is the same as within the SmartForm.
Logging Comments
Logging comments within a study workspace is a good way to document your questions to the PI/study team and to share information with other reviewers and/or HRPP Staff. There are two types of comments: public and private.
Public Comments
Public comments display in the study’s “History” tab, and are viewable by IRB members, HRPP Staff, and PIs/study teams. Public comments can be used to communicate with PIs/study teams, for example, to ask for information or clarifications necessary to complete your review.
To log a public comment, click the “Log Public Comment” button under the “My Activities” menu on the left side of the screen. This will open a pop-up window, where you will first select the intended recipient of the comment. To contact the PI/study team, select “PI and Editors.” Enter the text of your comment in the text box, and then click “OK.”
The public comment will then appear in the study’s history. The recipients selected in the pop-up window will also receive an email notifying them of the comment.

Private Comments
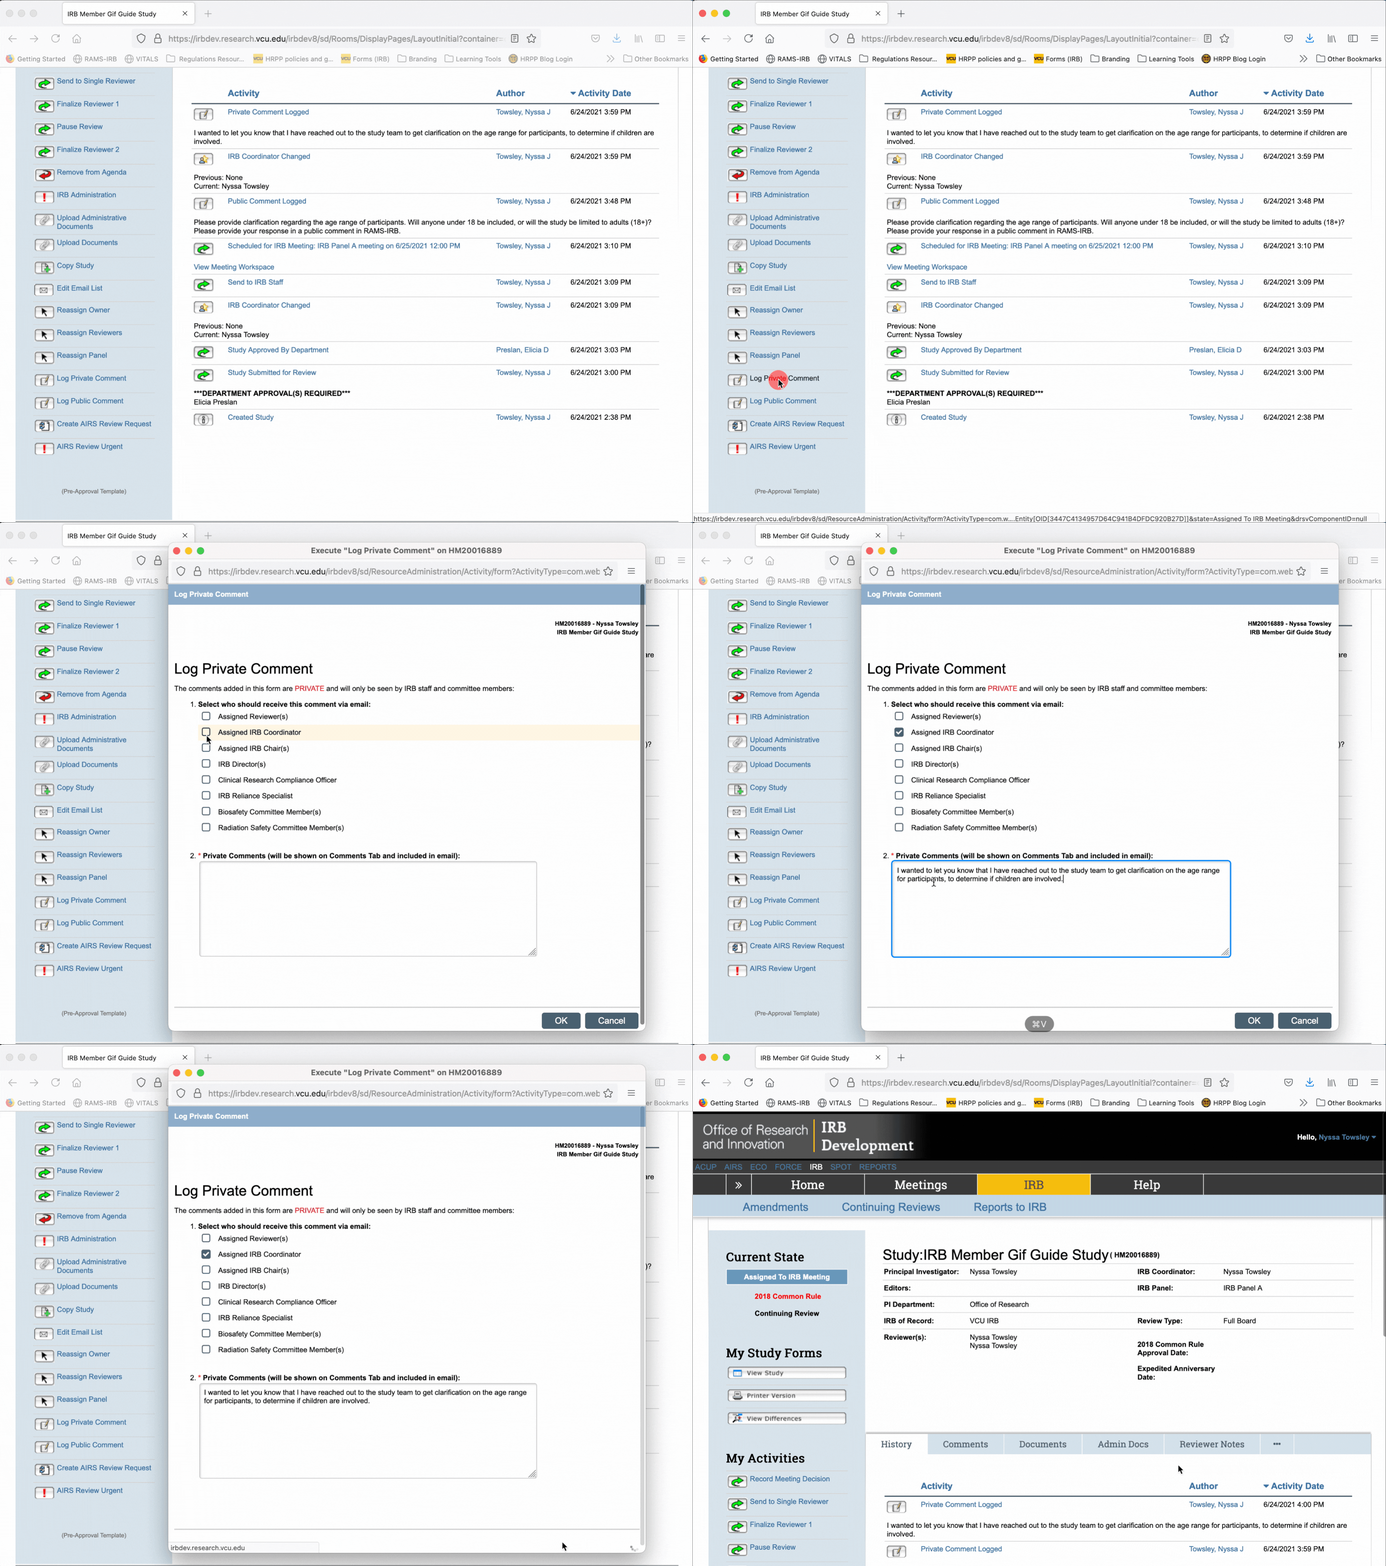
Private comments will also display in the study’s history, but are only viewable by IRB members and HRPP Staff. PIs/study teams will not be able to see private comments. (NOTE: if the PI or an editor is also an IRB member, they will be able to see the private comment.) Private comments are most commonly used for IRB members and HRPP Staff to communicate with one another, or for documentation purposes. For example, if you reach out to a PI/study team outside of RAMS-IRB, you may want to let your co-reviewers know that you did so, and what you asked them about, so that the other reviewers don’t reach out to the PI/study team with the same question.
To log a private comment, click the “Log Private Comment” button under the “My Activities” menu on the left side of the screen. This will open a pop-up window, where you will first select the intended recipient of the comment. To contact your co-reviewers, select “Assigned Reviewers.” To contact the HRPP staff assigned to the study, select “Assigned IRB Coordinator.” Enter the text of your comment in the text box, and then click “OK.”
The private comment will then appear in the study’s history, but, again, will only be visible to IRB members and HRPP staff. The recipients selected in the pop-up window will also receive an email notifying them of the comment.
Finalizing a Review
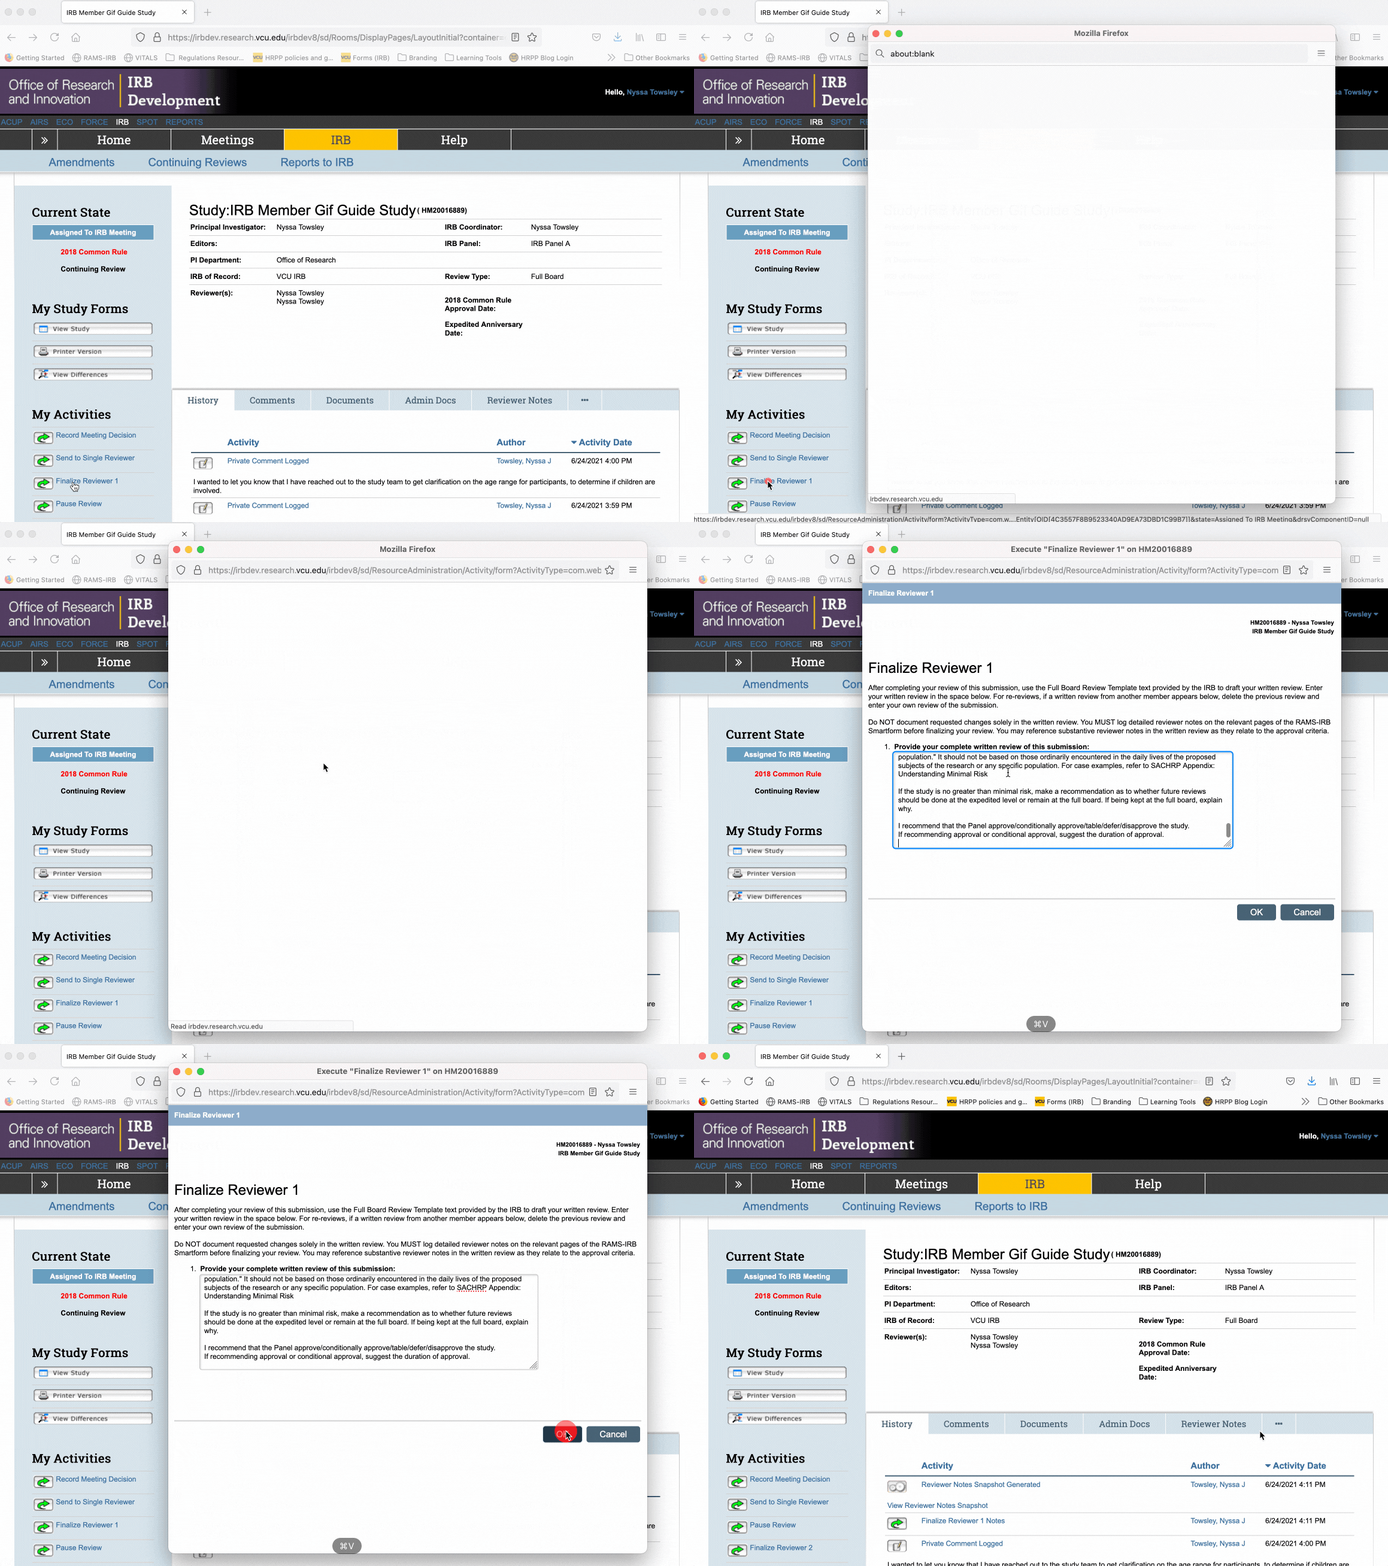
Once you have completed your review — meaning you have contacted the PI/study staff with any questions or requests for clarifications that you need, and have logged all the reviewer notes you need to request necessary changes — you will need to finalize your review of the study.
It is very important to use the review templates provided on our IRB Member Resources webpage. It is highly recommended that you type your review findings in the Word document template, and then copy/paste the full text of your finalized review into RAMS-IRB. If you work solely in RAMS-IRB, you risk the system timing out and losing your work. Be sure to fully document your findings according to the template, in a complete and thorough manner.
To finalize your review, select the “Finalize Reviewer 1” or “Finalize Reviewer 2” button (depending on your reviewer assignment), from the “My Activities” Menu on the left side of the screen. This will open a pop-up window, where you will copy and paste your finalized review from the template into the text box. Click “OK” to complete the action. Your finalized review will then be accessible from the study’s history.
