Navigating RAMS-IRB to View Changes Made to a Submission
This RAMS Gif Guide is intended for IRB members who need to conduct reviews of changes that have been made to studies/submissions that are assigned to them at a meeting. This Gif Guide covers how to view changes to the SmartForm as well as changes to documents, and how to compare various versions of the SmartForm.
You can access more RAMS Gif Guides by using the RAMS Gif Guides tag on our blog. You can access more Gif Guides specific to IRB members by using the member gif guides tag on our blog.
Opening the “View Differences” Version of the SmartForm
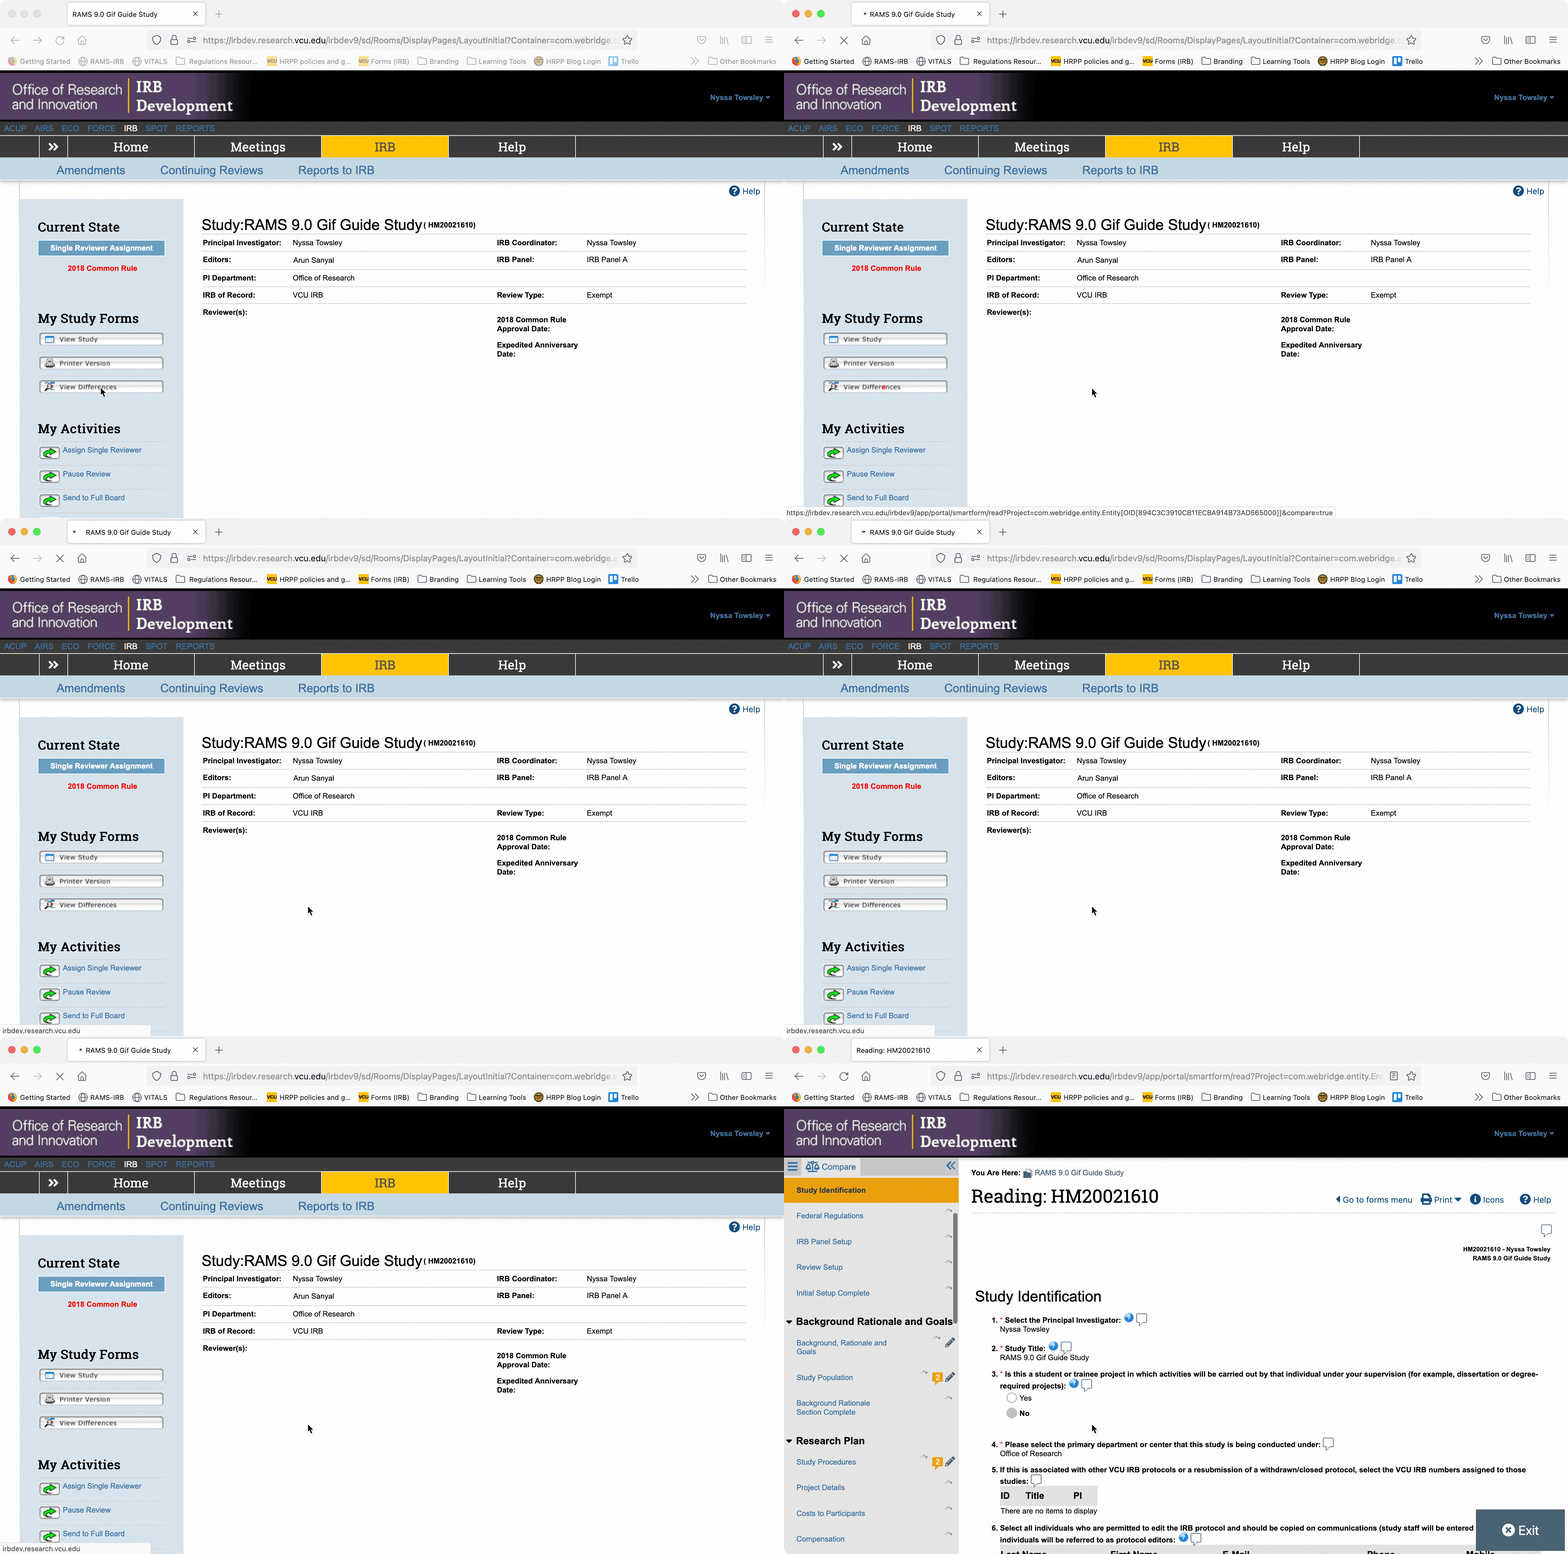
To enter the version of the SmartForm that displays changes, click the “View Differences” button under the “My Study Forms” menu on the left side of the screen. This will open a version of the SmartForm that denotes changes that have been made.
Viewing Changes
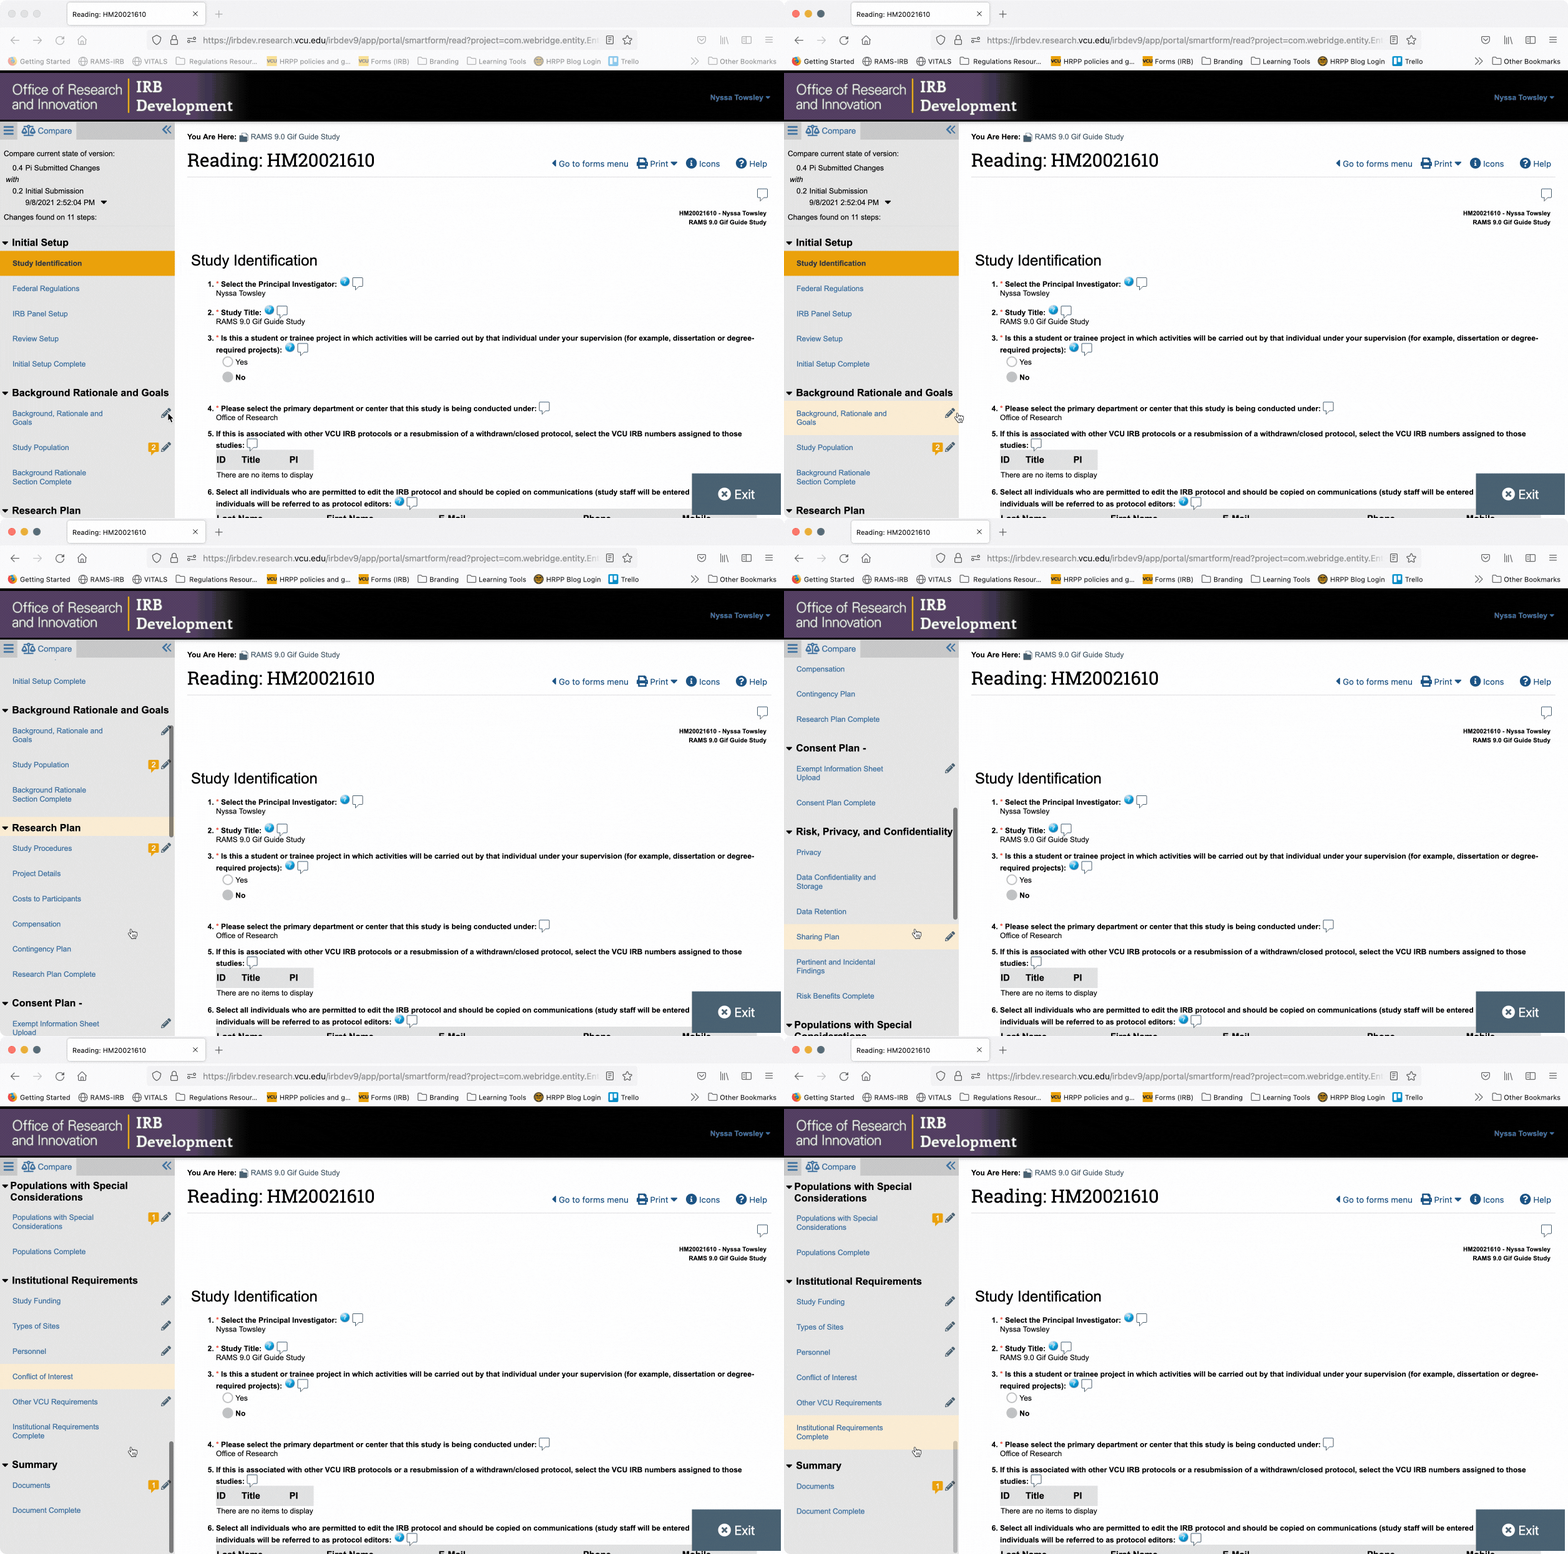
In View Differences mode, you will note that the navigation menu will display a pencil icon to the right of page names that contain changes on them. Click on those page names to be taken to the page with the change on it. You will also note that pages that contain reviewer notes also have the yellow speech bubble icon present, however, the red dot above the speech bubble icon is no longer present, indicating that the reviewer notes do not require action anymore.
Changing the Compare Version
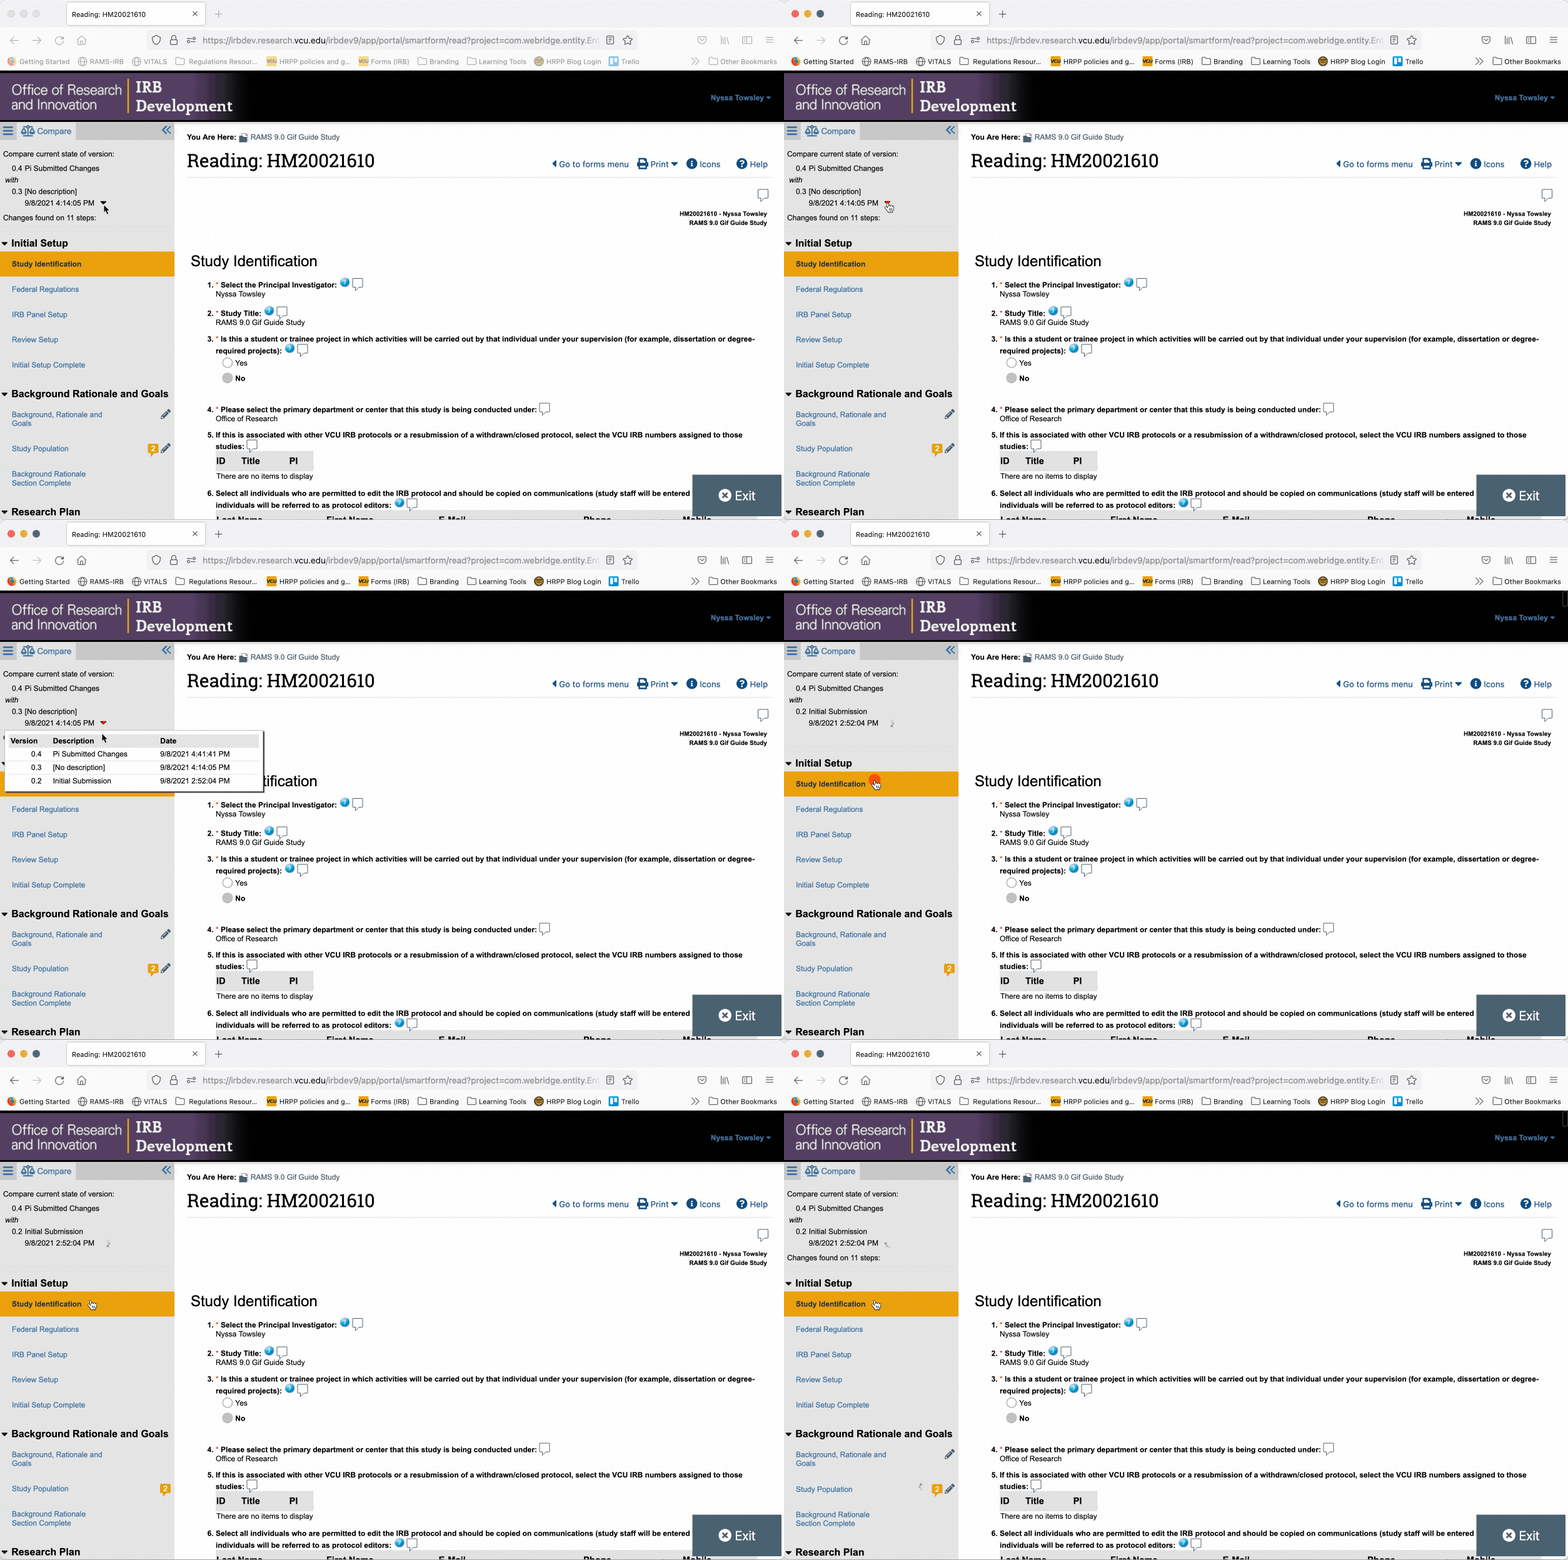
At the top of the navigation menu on the left side of the screen, the SmartForm will display first the most recent version of the SmartForm, and second will display the version of the SmartForm that is being compared against the most recent version. To change the compare version (for example, to see changes made since the creation of the study, or to see changes made from earlier rounds of revisions), click the carrot button to the left of the current compare version, then select the version you wish to compare with the most recent version from the drop-down menu.
Viewing Displayed Changes in the SmartForm
RAMS-IRB will highlight changes for you in the “View Differences” mode. Changes to different types of questions appear differently.
Changes in Text and Numerical Fields
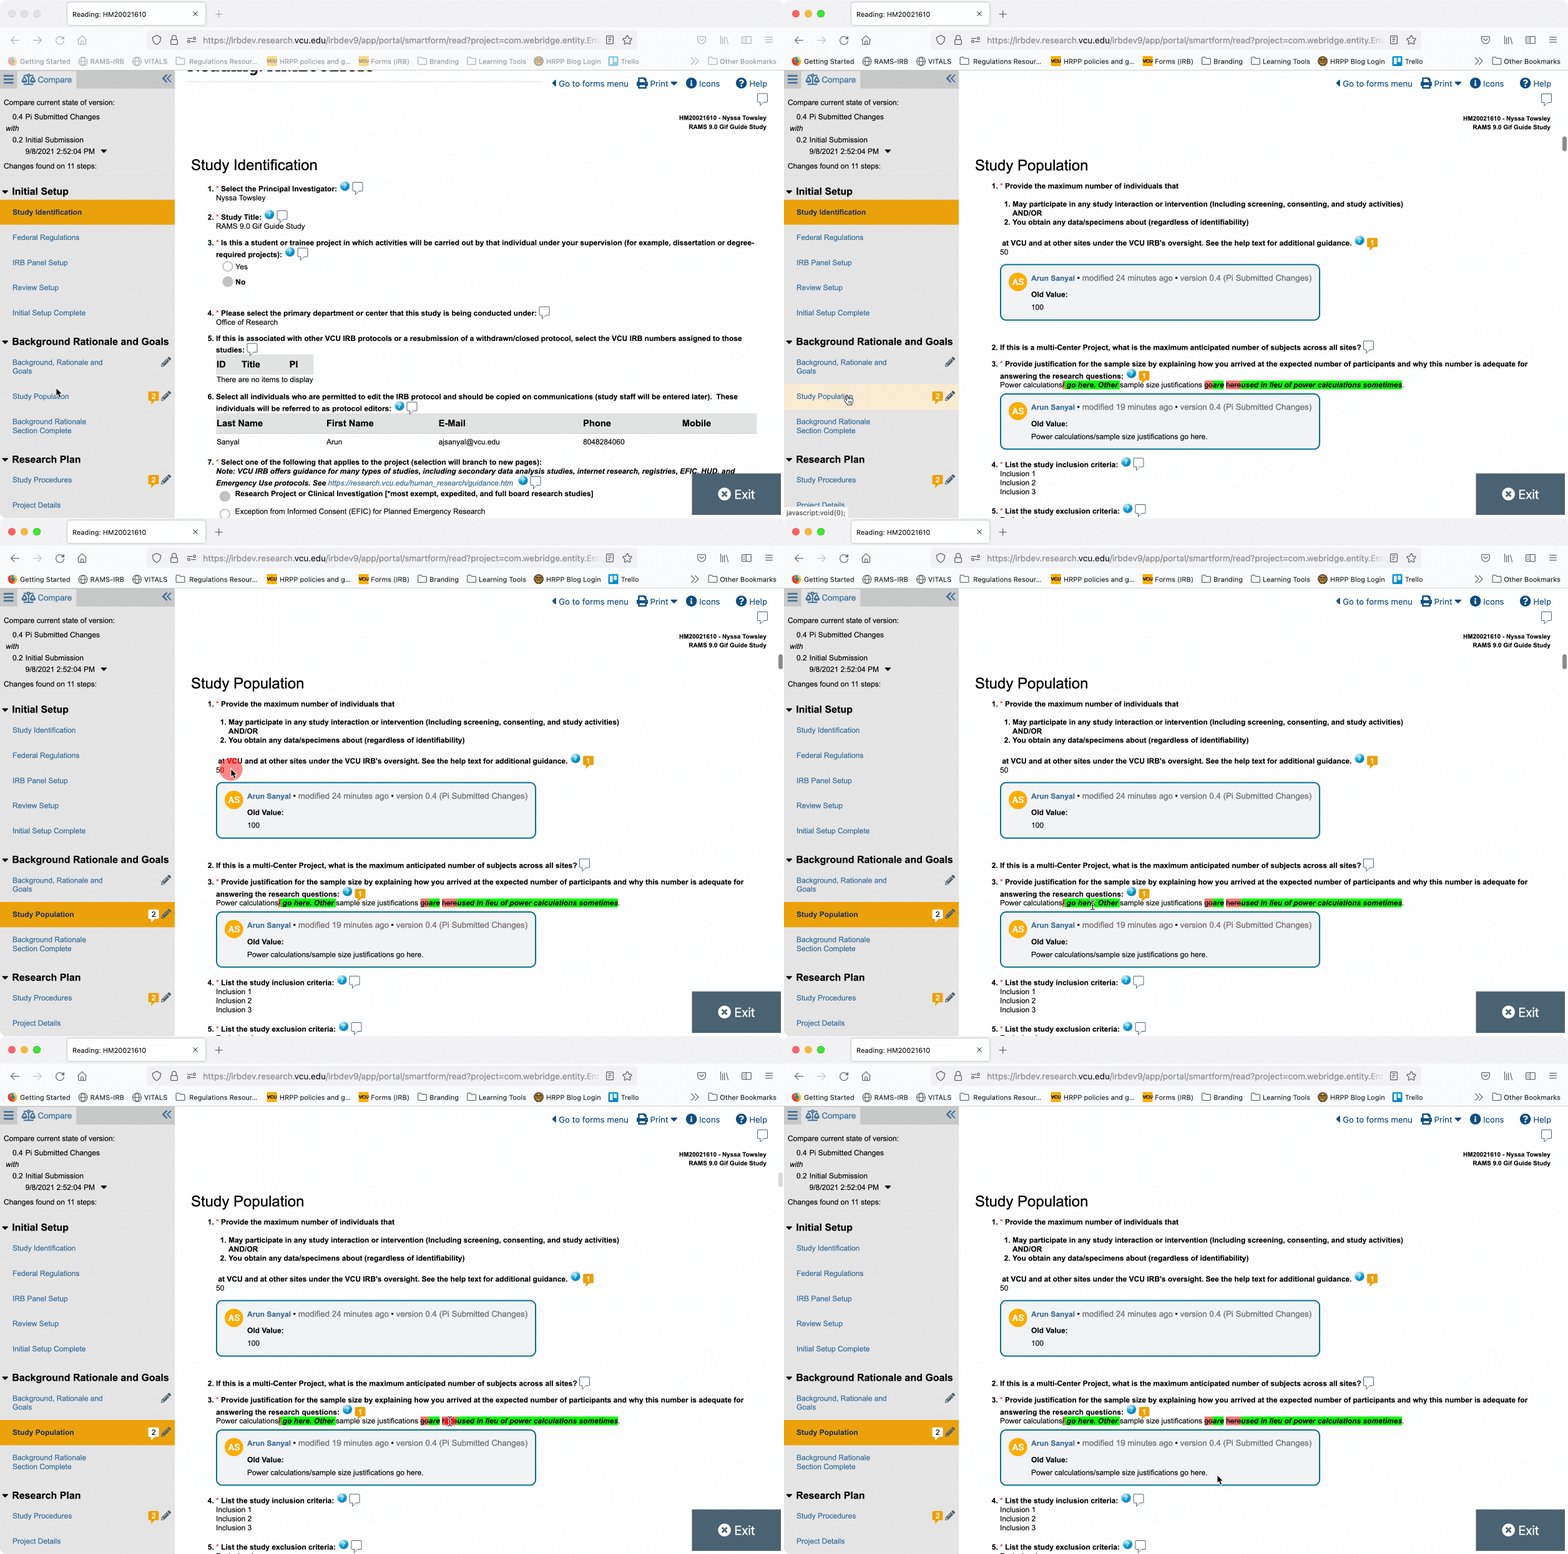
RAMS-IRB will highlight changes in text for you by providing the current response to a question and highlighting additions in green. The previous response to a question is shown immediately below, and text deletions are highlighted in red and have a strikethrough.
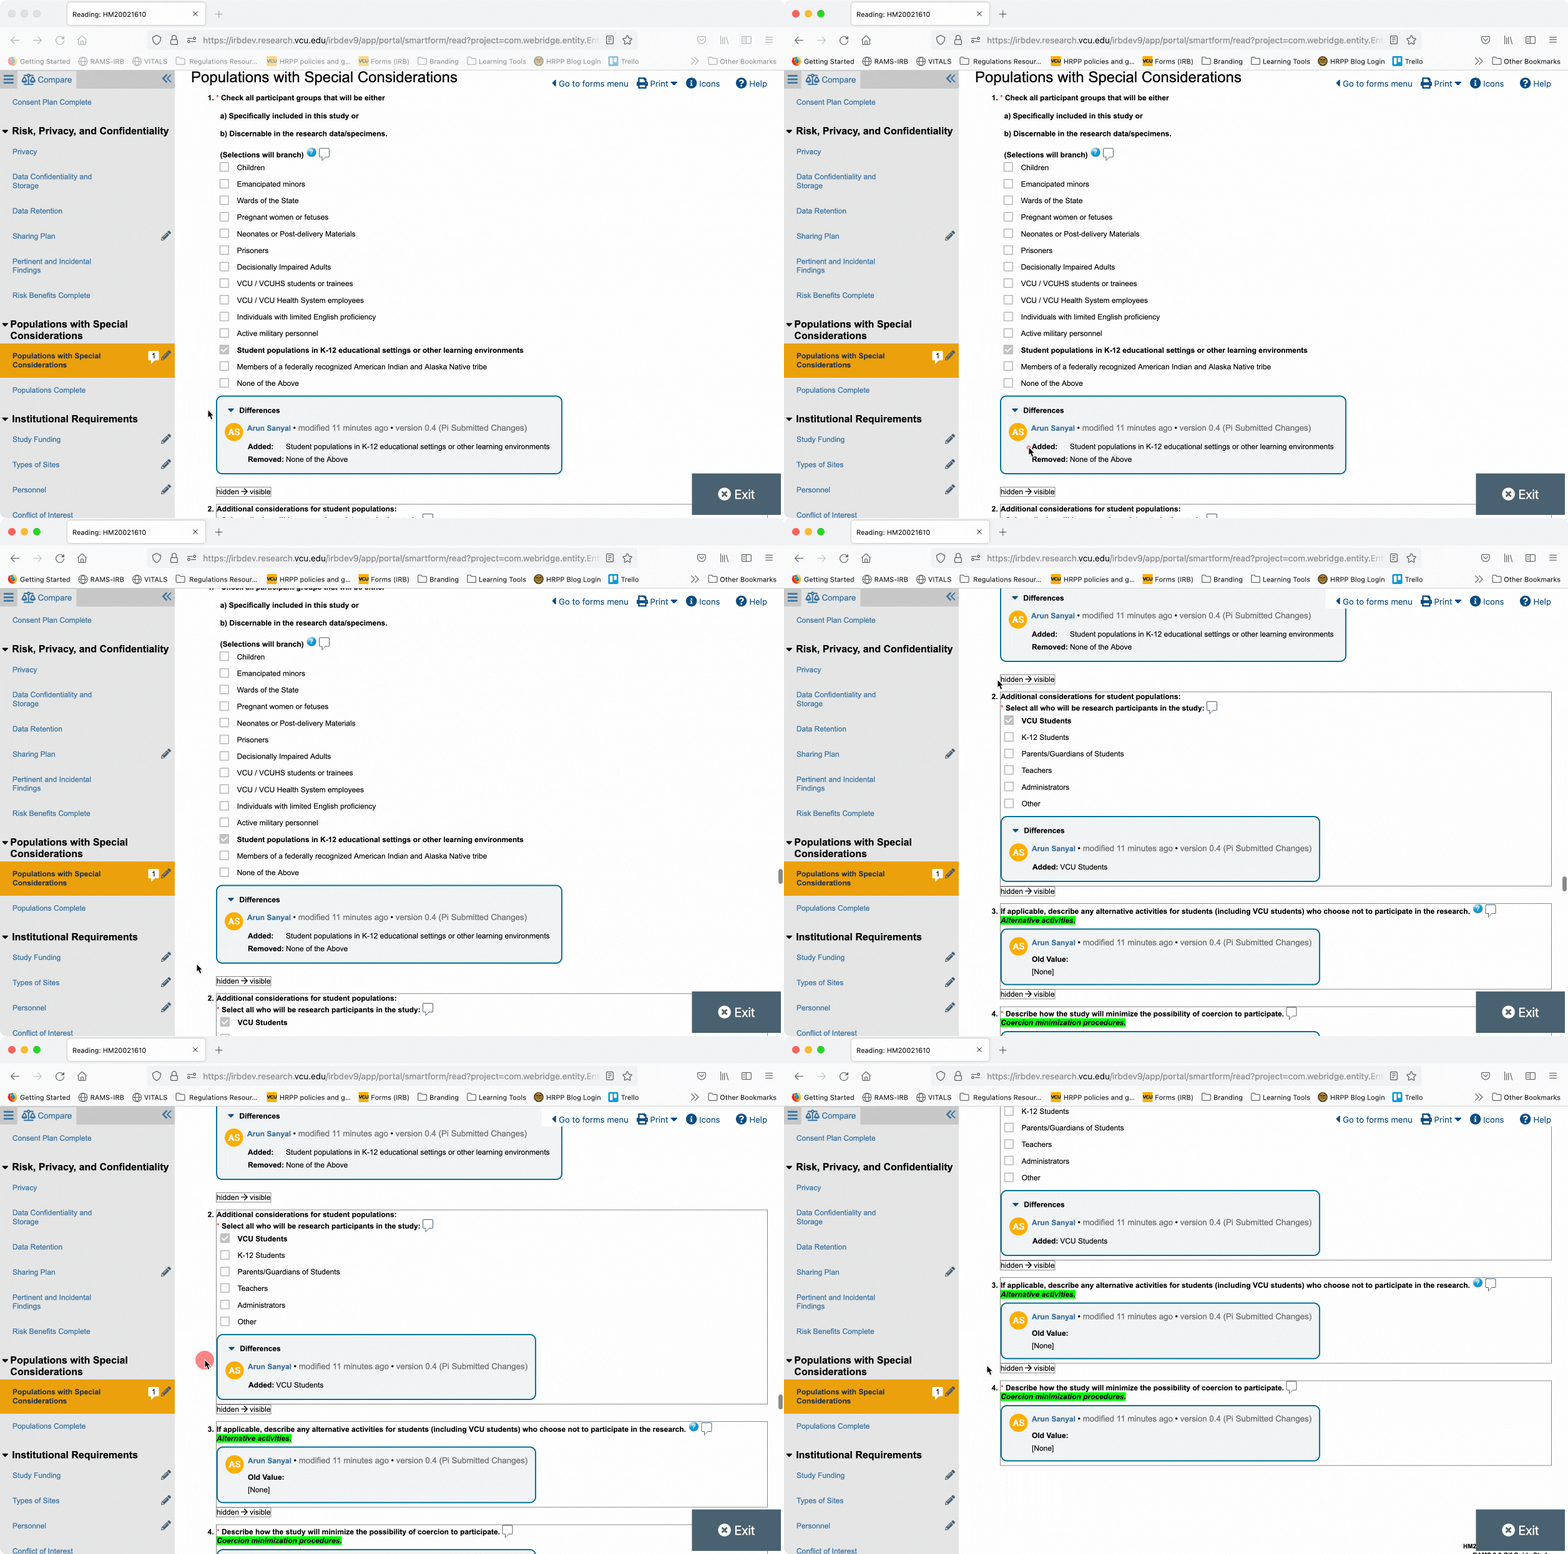
Changes in Checkbox and Hidden Fields
RAMS-IRB will highlight checkbox changes by indicating below the question response any checkboxes that were added, as well as any checkboxes that were removed. If checking any boxes cause previously hidden fields to appear, you will see the icon “hidden –> visible” above the questions that were made visible by branching logic. The new responses to those previously hidden questions will be highlighted in green.
Changes in Documents
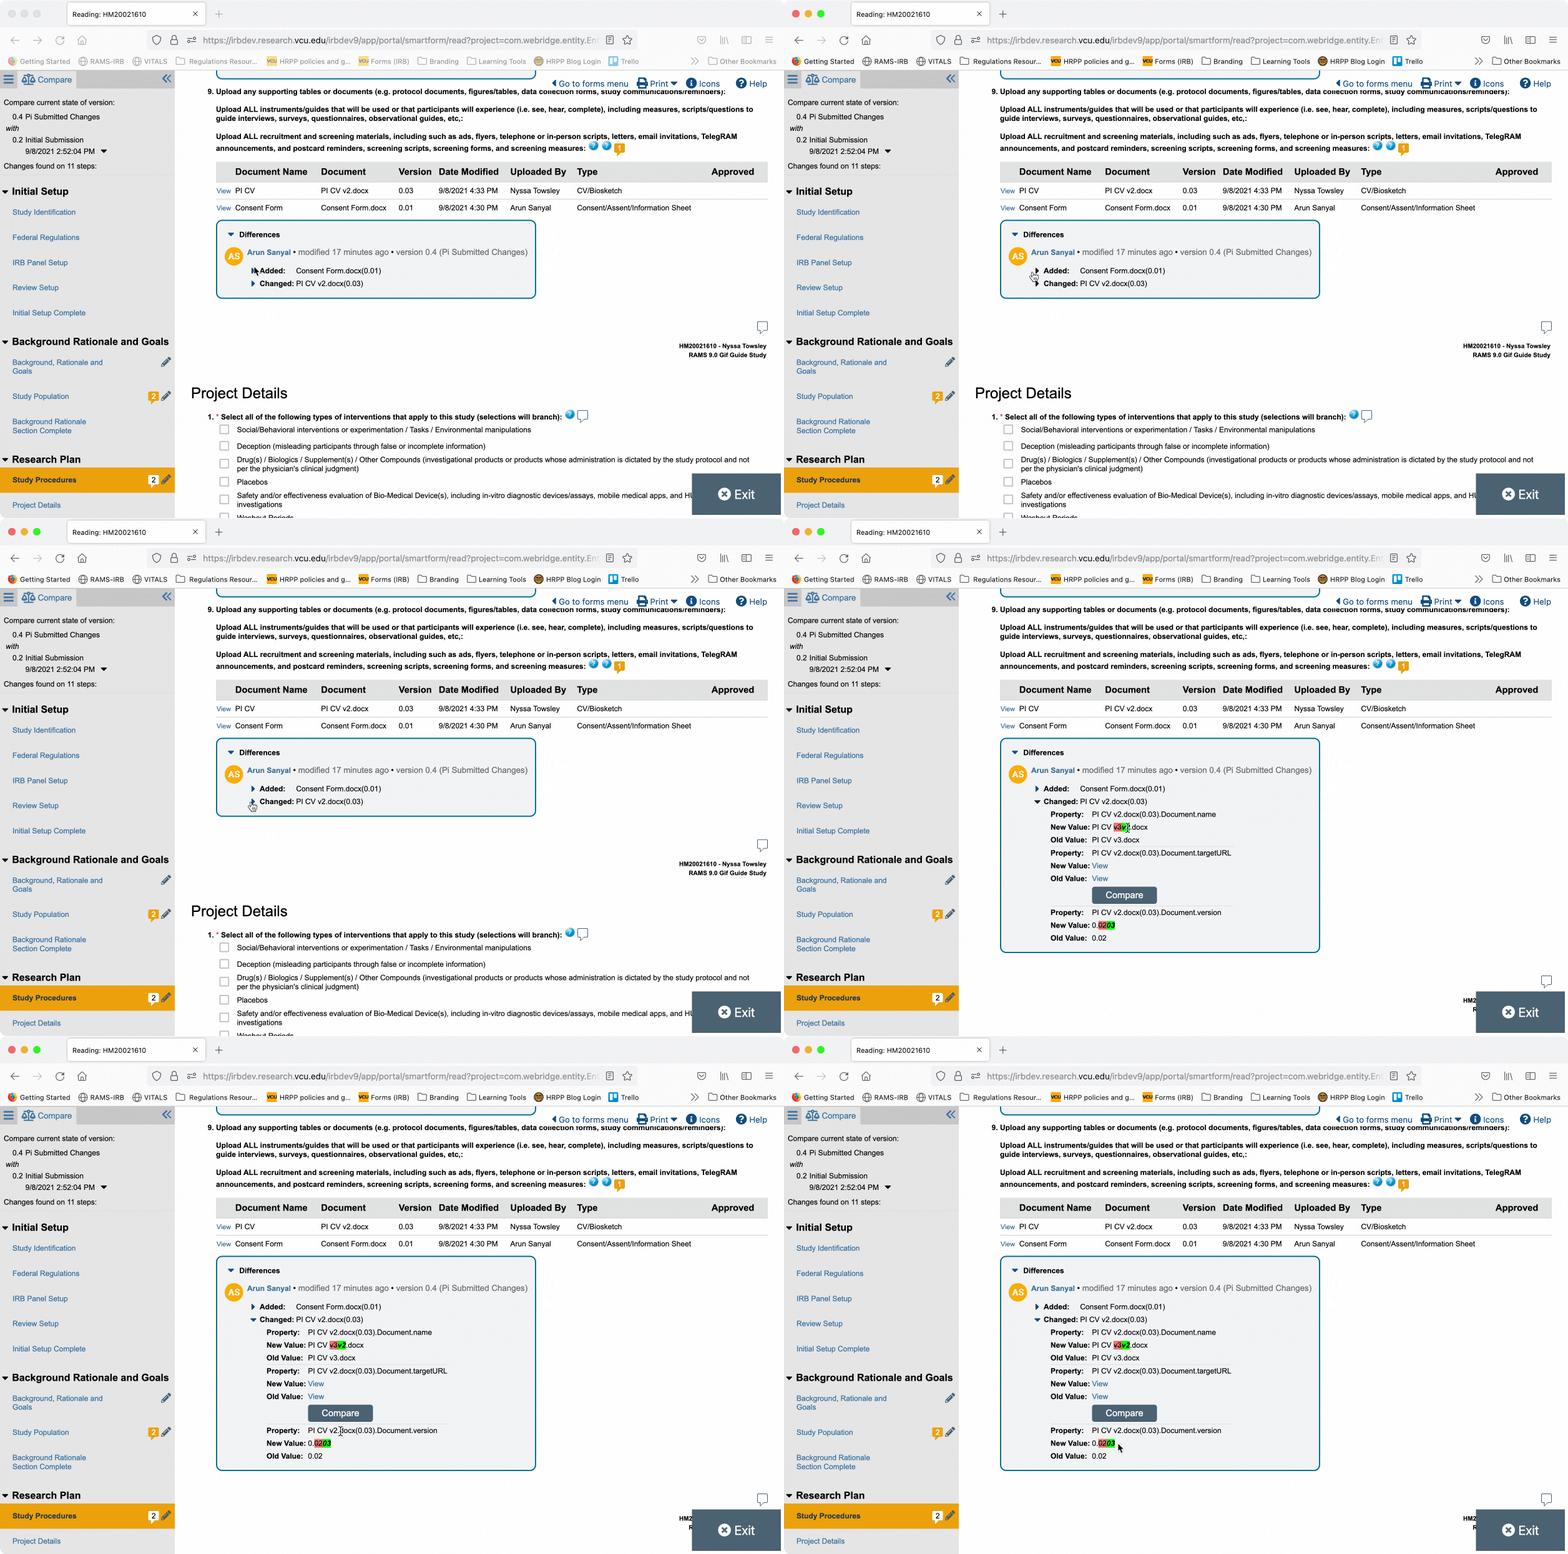
Document changes will appear on any page that has a document upload on it. Documents that were newly added will appear next to the text “Added.” Documents that were modified (had a new version(s) uploaded) will appear next to the text “Changed.” Click the carrot icon to the left of “Changed” to view more information about the changes made to that document.
Viewing Responses to Reviewer Notes
In addition to reviewing the changes made in the SmartForm, it will be important to view the responses investigators/study teams provide in response to reviewer notes. There may be additional information present in those replies that warrants review.
Viewing Reviewer Note Responses
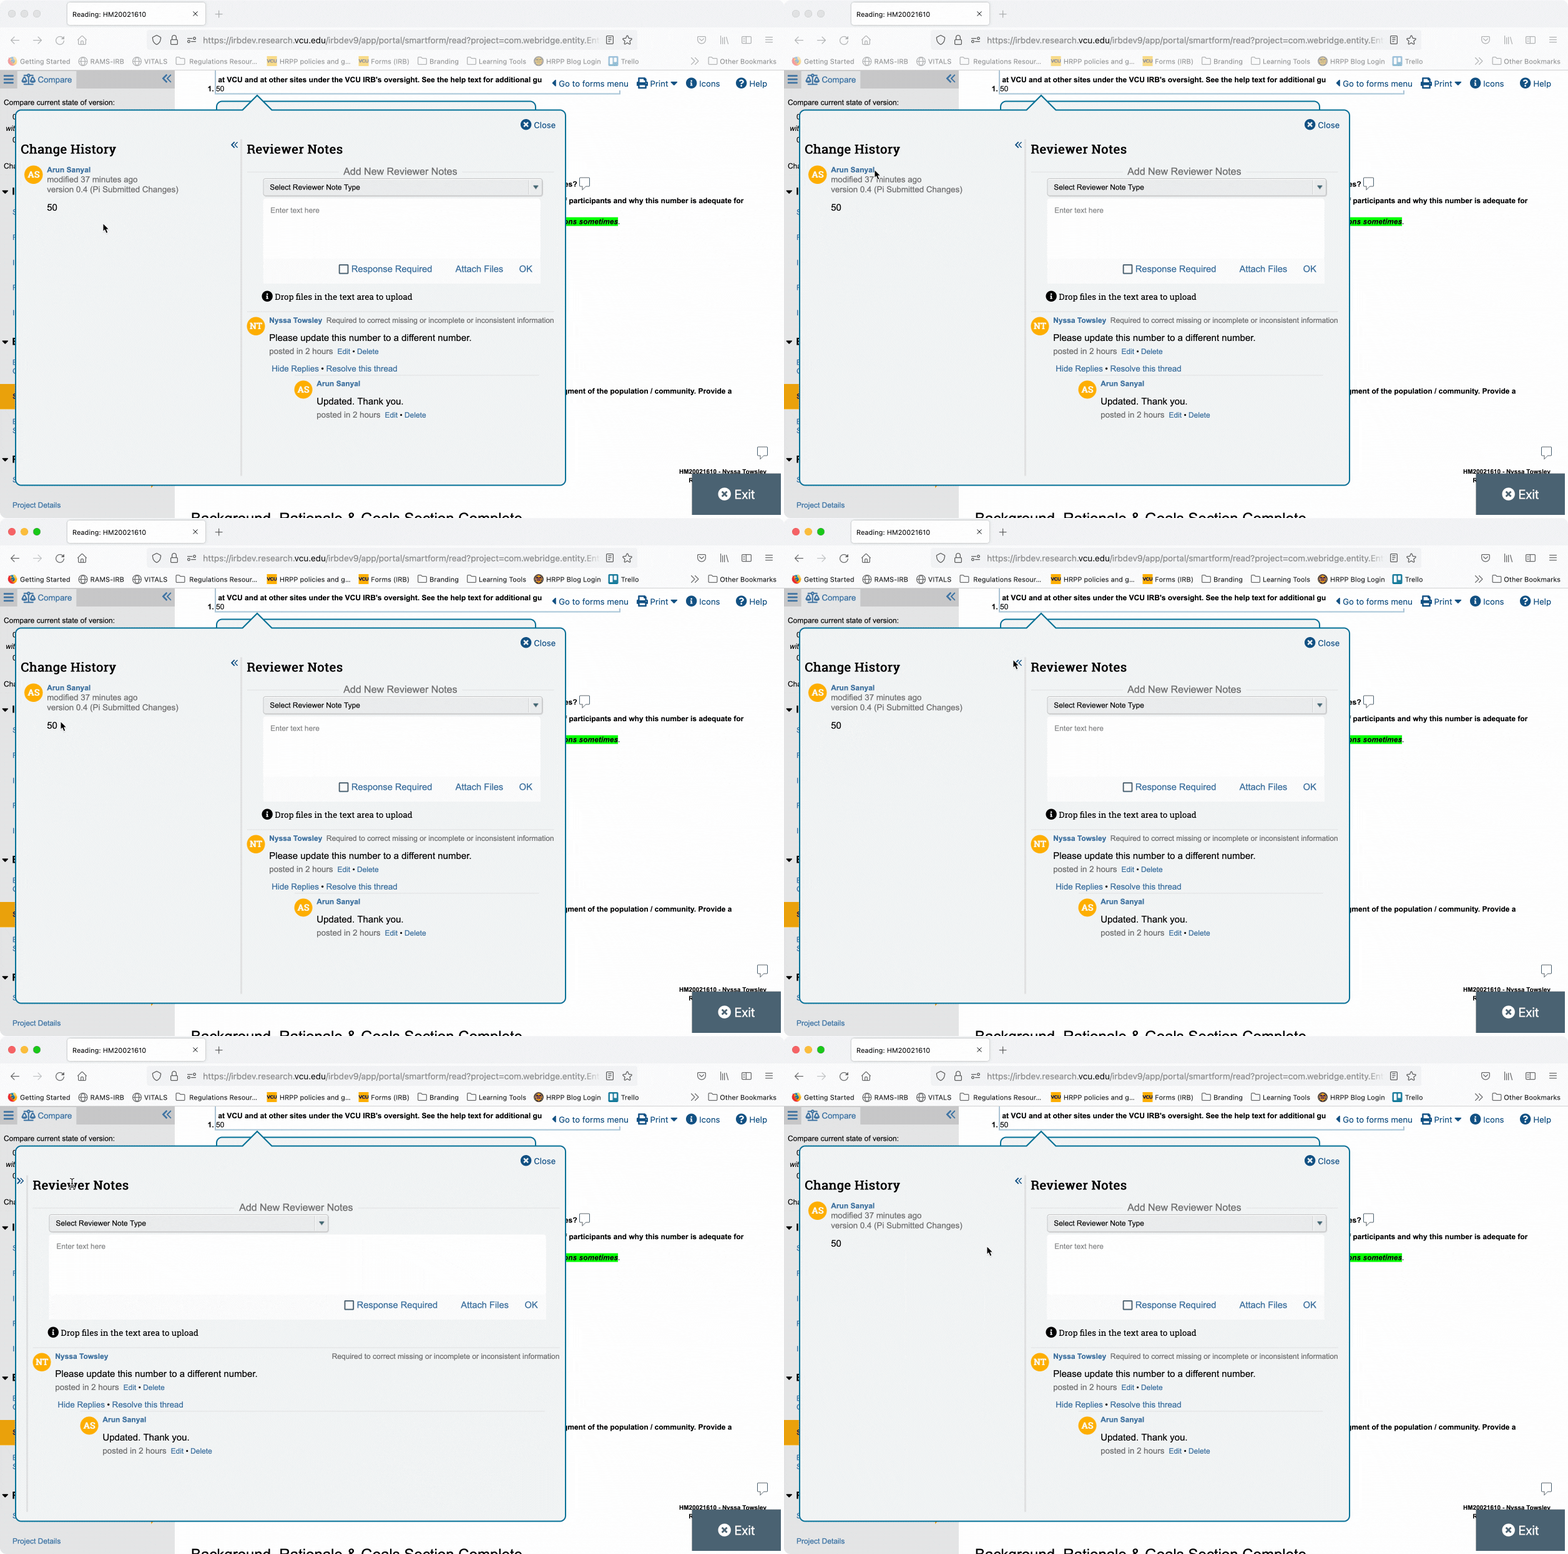
To view reviewer note responses, open the reviewer note dialogue by clicking on the speech bubble icon at the end of the question text where the reviewer note was logged. In the dialogue, click “Show Reply” underneath the reviewer note text, and any replies to the reviewer note from the investigator will appear as a thread beneath that reviewer note.
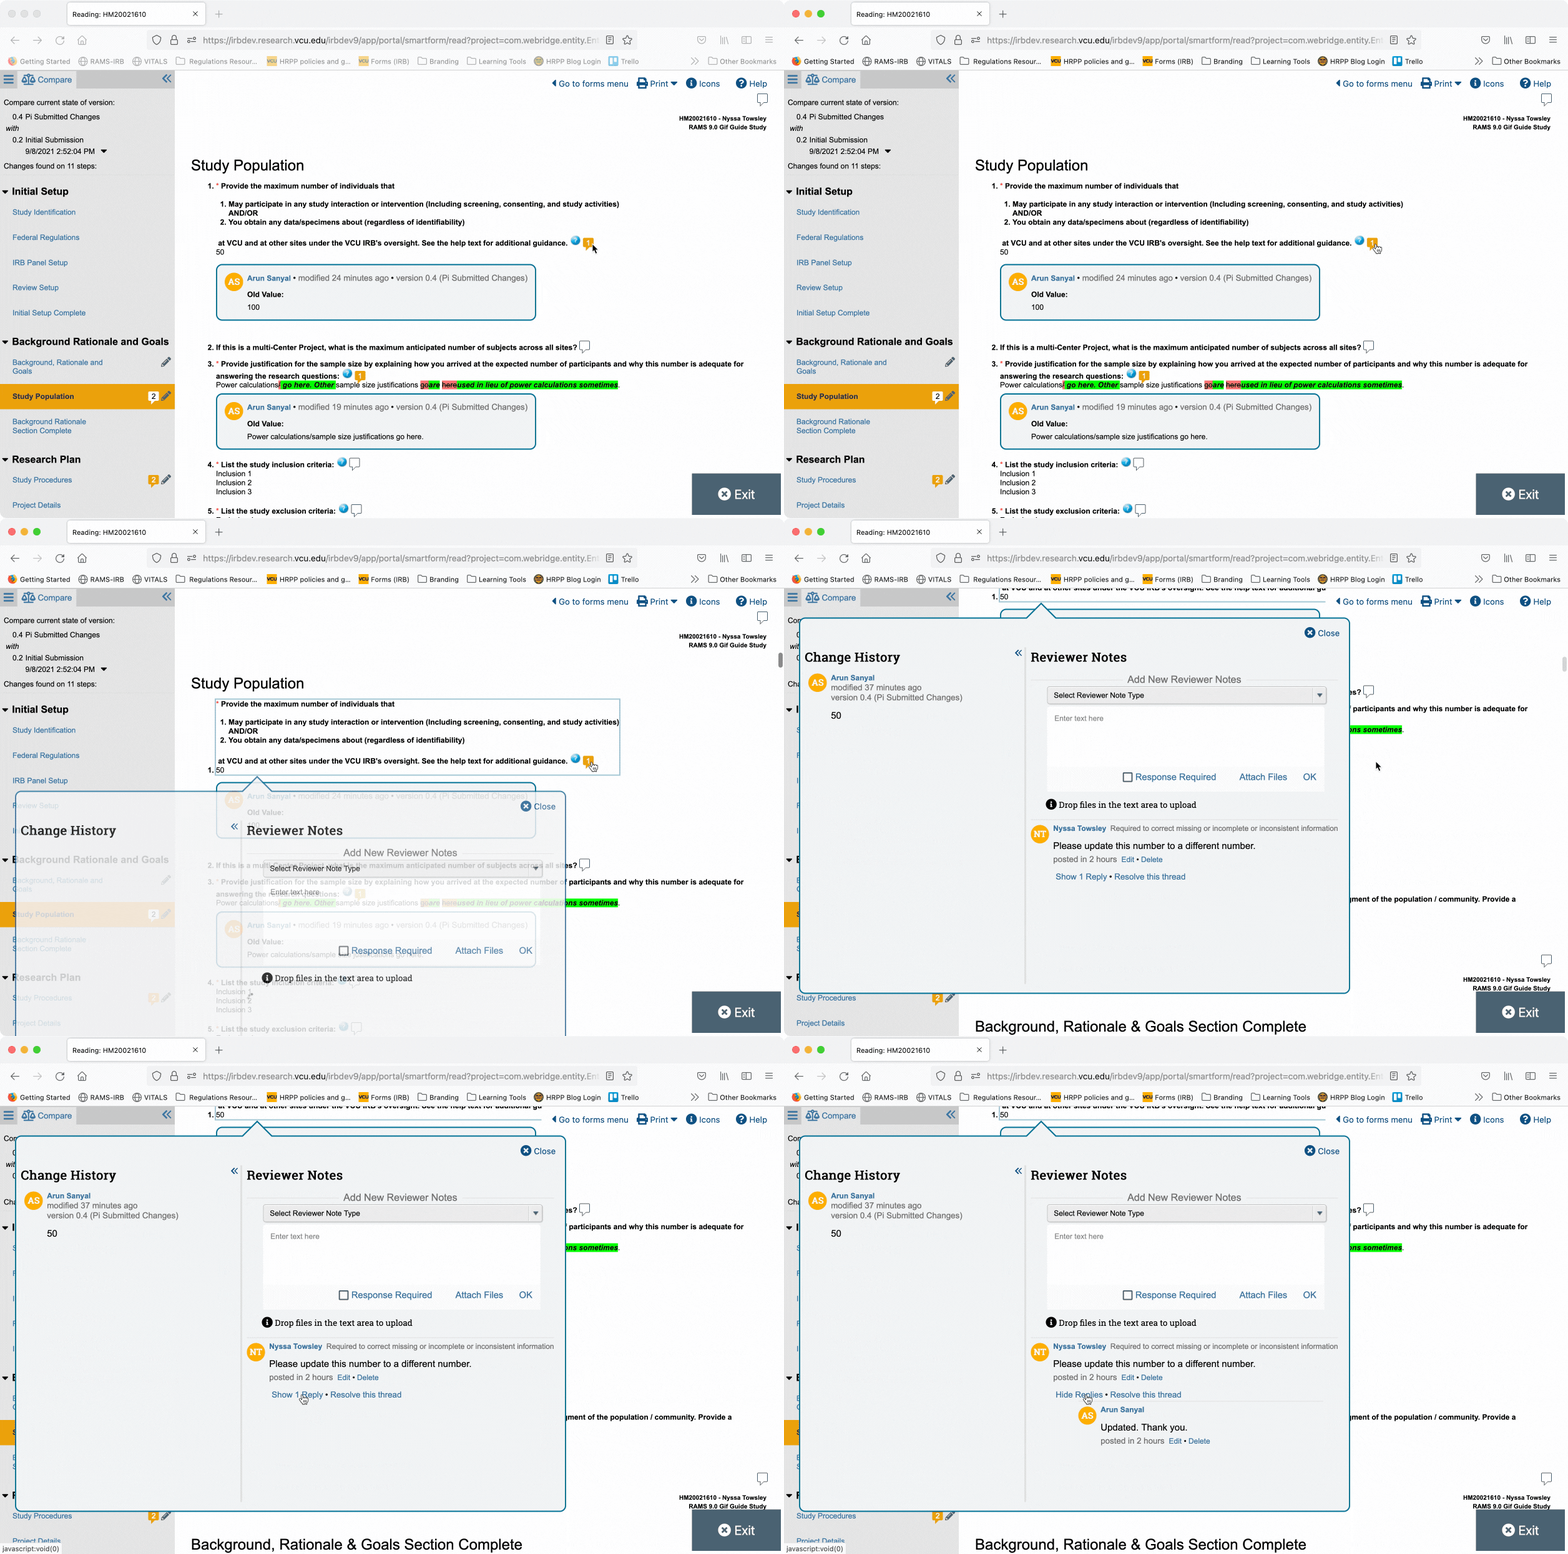
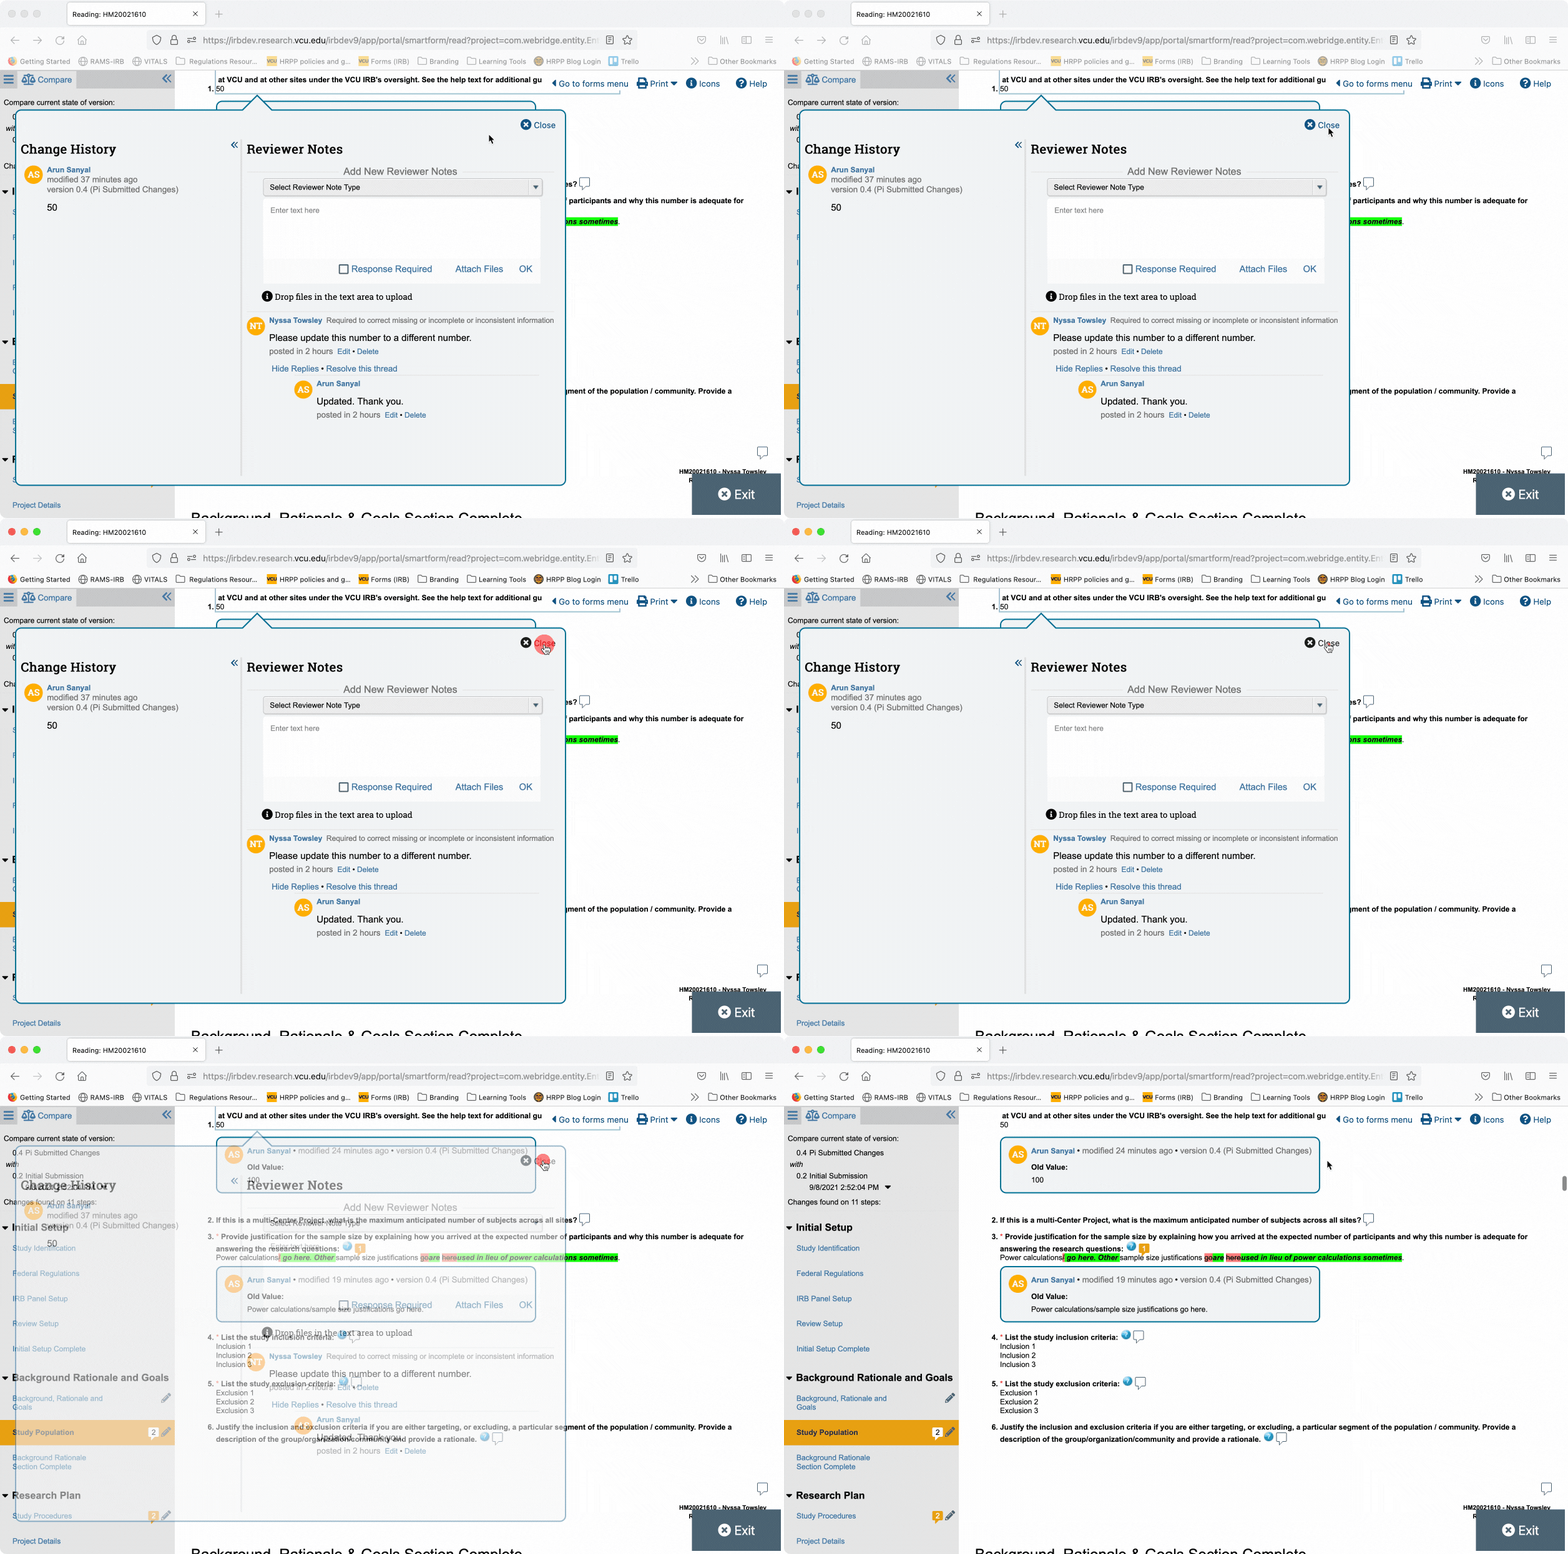
To close the reviewer note dialogue, click the “close” button in the upper right corner of the dialogue.
Change History Log
Within the reviewer note dialogue, you will note that to the left of the reviewer notes interface, is a section called “Change History.” Changes that were made to the question the reviewer note was logged on will appear here. You can hide the Change History section by clicking the “<<” button to the right of the “Change History” heading. You can re-expand the Change History section by clicking the “>>” button in the upper left corner of the reviewer note dialogue. This is another way to view changes made to a specific question.
Resolving Reviewer Note Threads
Once a reviewer note has been responded to, and the relevant changes were made and confirmed by you, the department reviewer has the option to “resolve” a reviewer note thread. Resolving a thread has two impacts: (1) it prevents investigators from editing current reviewer note responses and prevents them from adding new responses; and (2) it changes the speech bubble icon so that it has a green checkmark above it. This symbol indicates that all reviewer notes logged on that question/page have been resolved.
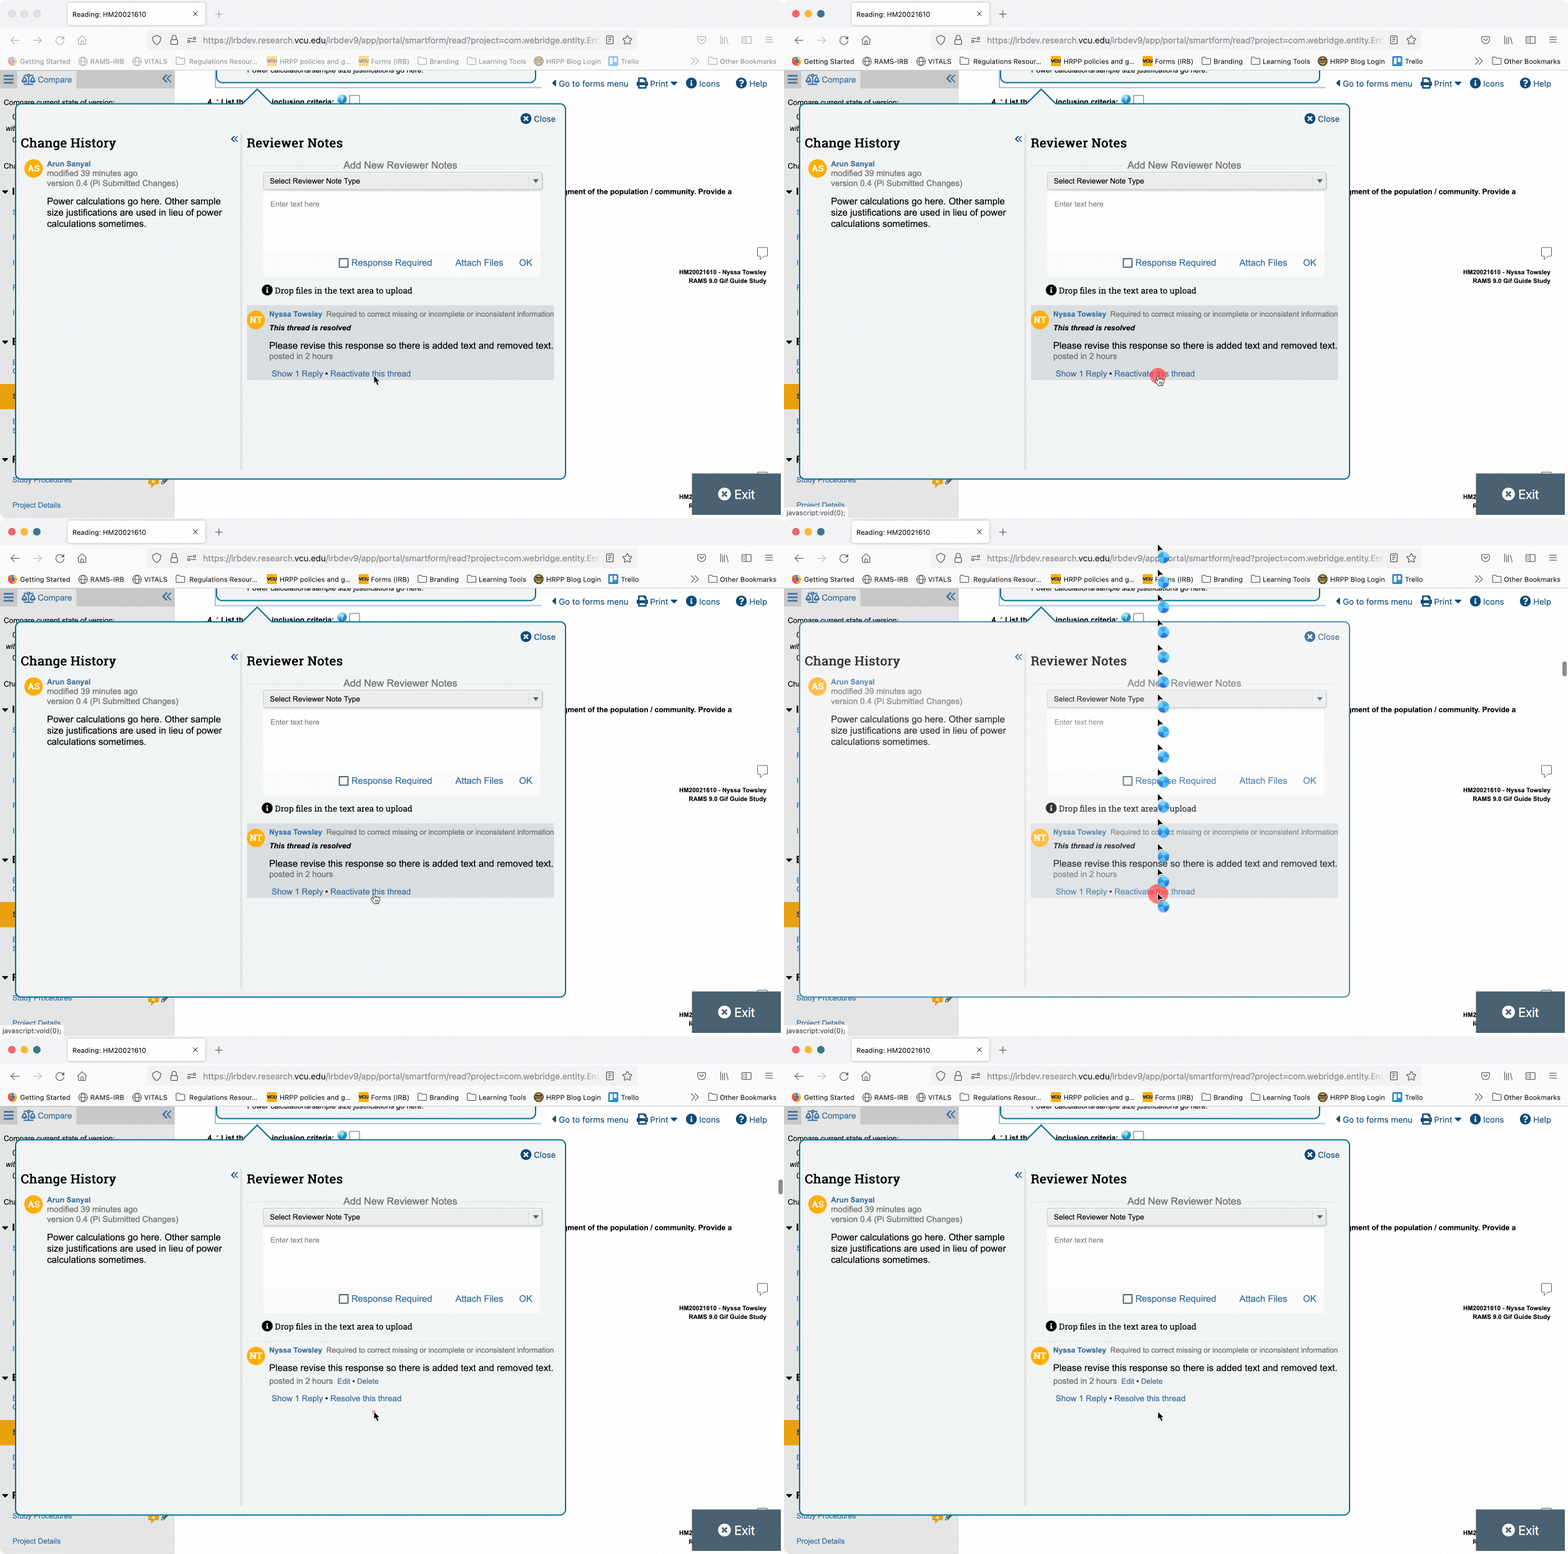
To resolve a reviewer note thread, navigate to that thread in the reviewer note dialogue, and click “Resolve this thread” below the reviewer note you wish to resolve. This will close replies, and the text “This thread is resolved” will appear within the reviewer note.

Reviewer note threads that have been resolved may be re-opened at any time by the reviewer. To re-open a reviewer note thread, open the reviewer note dialogue, and click “Reactivate this thread” beneath the reviewer note you wish to reactivate. This will re-open the reviewer note for further replies from the investigator, and the green checkmark above the speech bubble icon that corresponds to the reviewer note will disappear.
Viewing Document Versions
Sometimes documents are updated multiple times in the same round of changes. Most often, this is because PIs/study teams will upload both a “redline” (track changes) version of a document and a “clean” (track changes accepted) version of a document, so that there is both a record of the changes made (in the “redline” version) as well as a clean version that is ready to be approved by the IRB. The process of updating documents in this manner is called document “stacking.” (To see how PIs/study teams stack documents in this way, see this gif guide.)
In these cases, it is important to be able to access all version of a document, so you can view redline versions, or compare older versions of documents with new versions.
Downloading the Most Recent Version of a Document
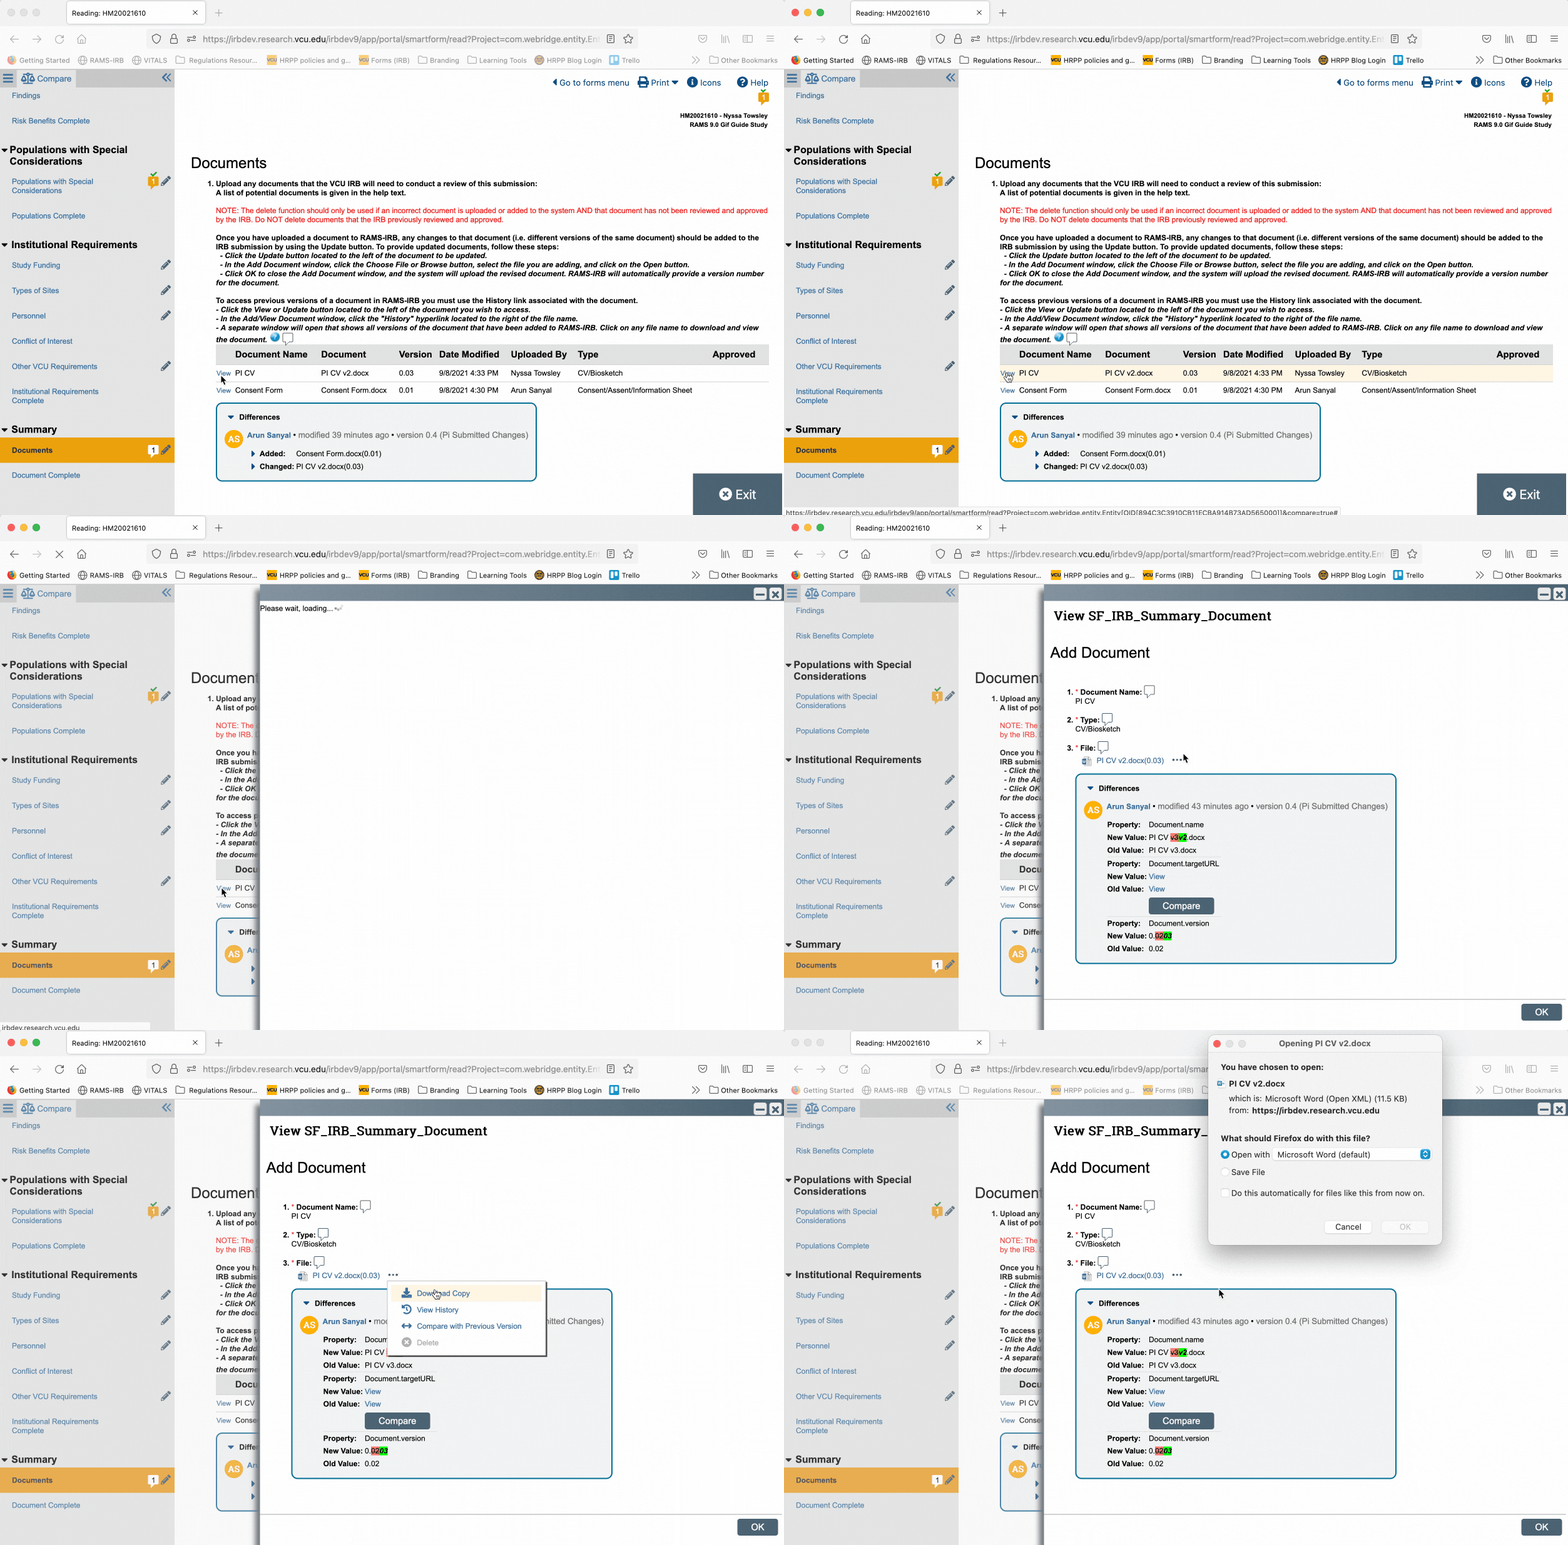
You will know that a document has multiple versions by looking under the “Version” column in the documents list. If the version listed is greater than 0.01, then there are multiple versions of that document. To download the most recent version of a document (the document at the top of the “stack”), click “View” to the left of the document name.
This will open a pop-out window. To download the most recent version of the document, either click on the hyperlinked document file name in question #3, or click the three dots to the right of the file name and click on “Download Copy” in the drop-down menu. This will open a dialogue on your computer for you to save or open the document.
Viewing Document History and Downloading Previous Document Versions
To view the history of a document, click “View” to the left of the document name. In the pop-out window, click the three dots to the right of the file name and click “View History” in the drop-down menu. This will open another pop-out window that will list each version of the document, from the most recent document on top to the oldest version on the bottom. Click the hyperlinked document file name of the version you wish to download. This will open a dialogue on your computer for you to save or open the document.

Reviewing Changes
As you review changes, you can log reviewer notes in the same manner you would normally. You can learn more about how to log reviewer notes in this gif guide.
Categories Education and Training
Comments
Comments are closed.