Navigating RAMS-IRB to Perform Department Reviews
This RAMS Gif Guide is intended for those who perform department reviews. This guide will walk users through the processes needed to perform a department review, including navigation, reviewer note functions, and accessing documents.
This guide only covers the technical aspects of navigating RAMS-IRB to conduct department reviews. If you require guidance on the scope of department reviews and what department reviewers should be looking for, please contact the HRPP’s Education & Outreach Manager.
You can access more RAMS Gif Guides by using the RAMS Gif Guides tag on our blog.
Navigating to a Study that Requires Department Review
First, log into RAMS-IRB, being sure to connect to the VPN if necessary.
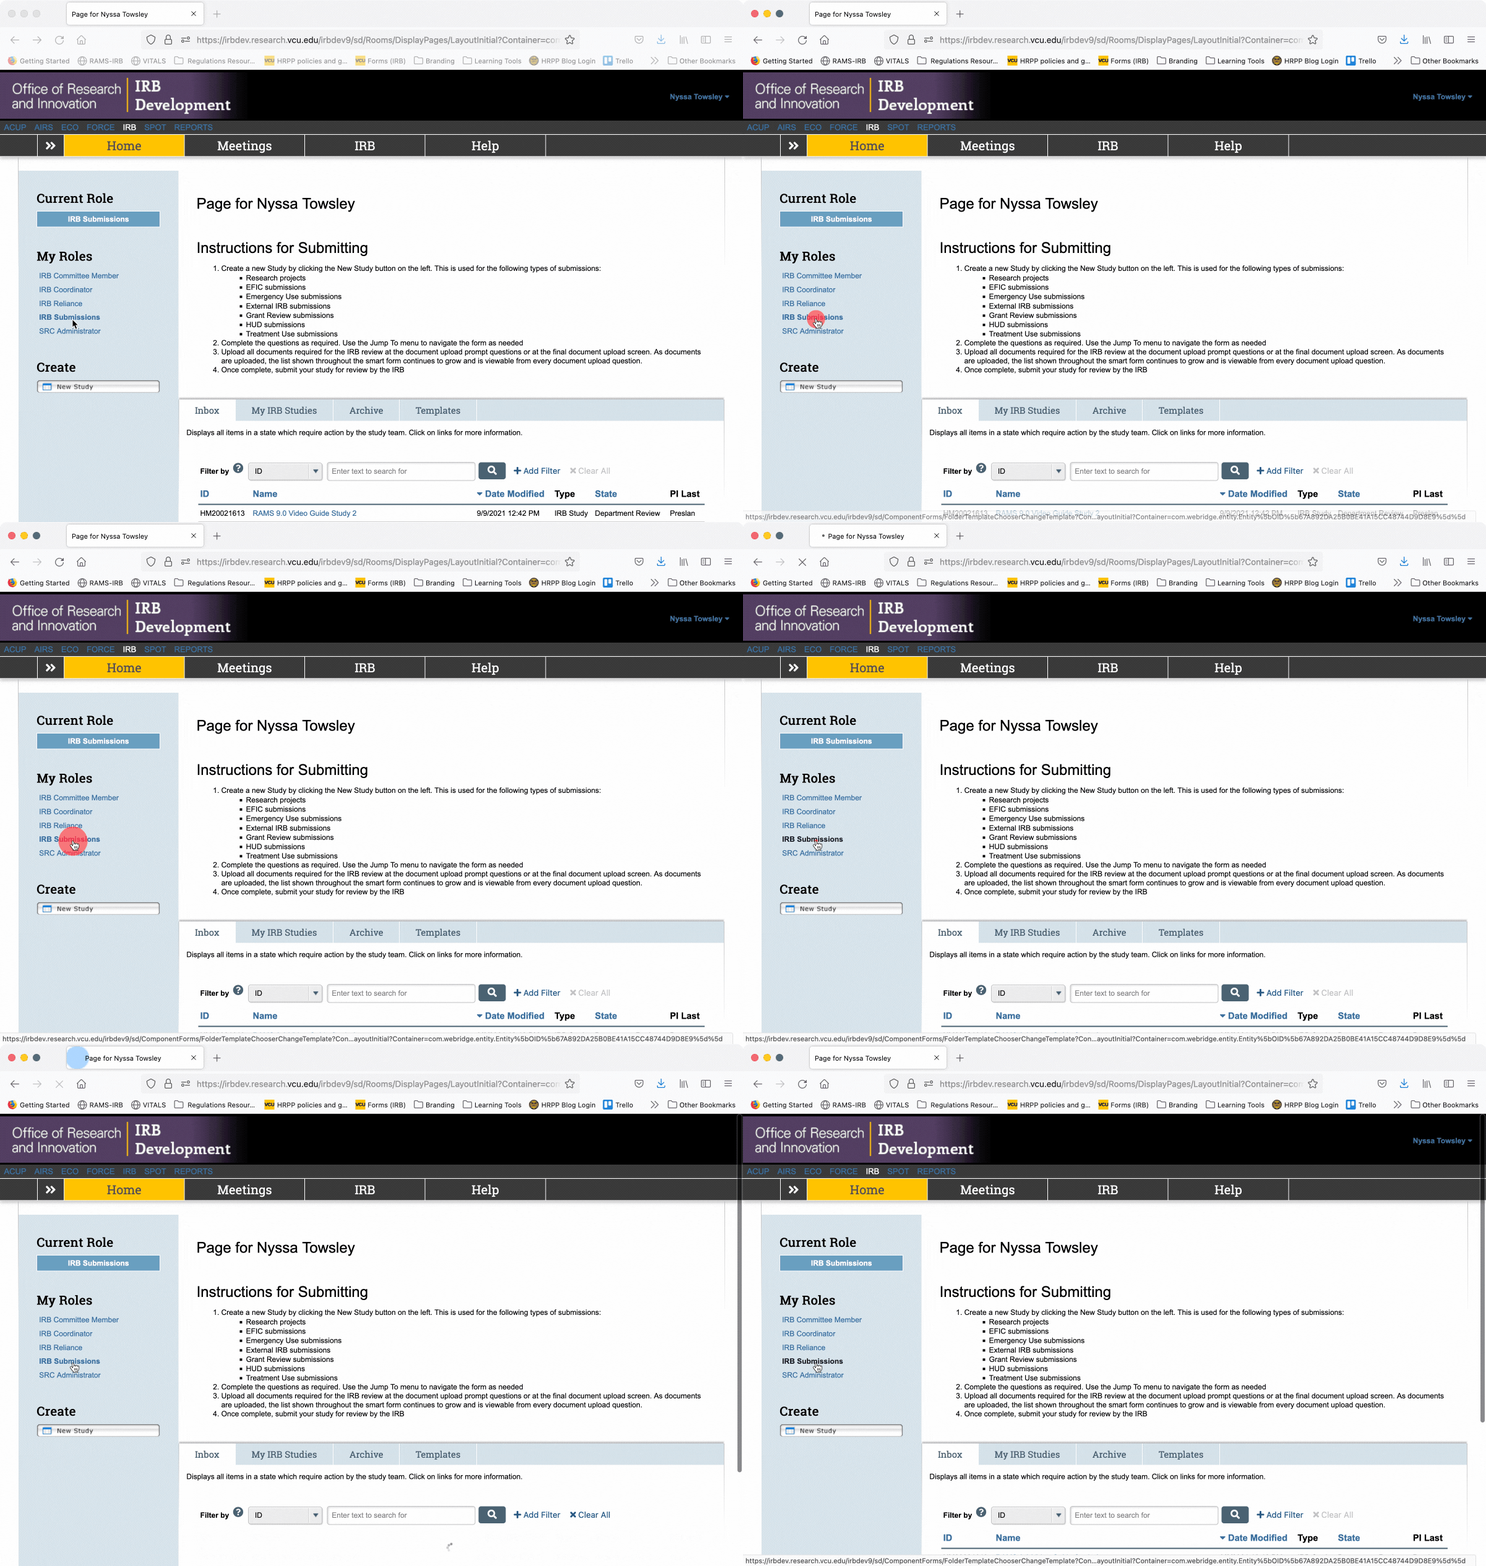
Next, ensure that “IRB Submissions” is selected under the “My Roles” menu. Most investigators will not have this many “roles” in RAMS-IRB, but if you do have more than one “role” (i.e.: IRB Committee Member), make sure that “IRB Submissions” is selected.
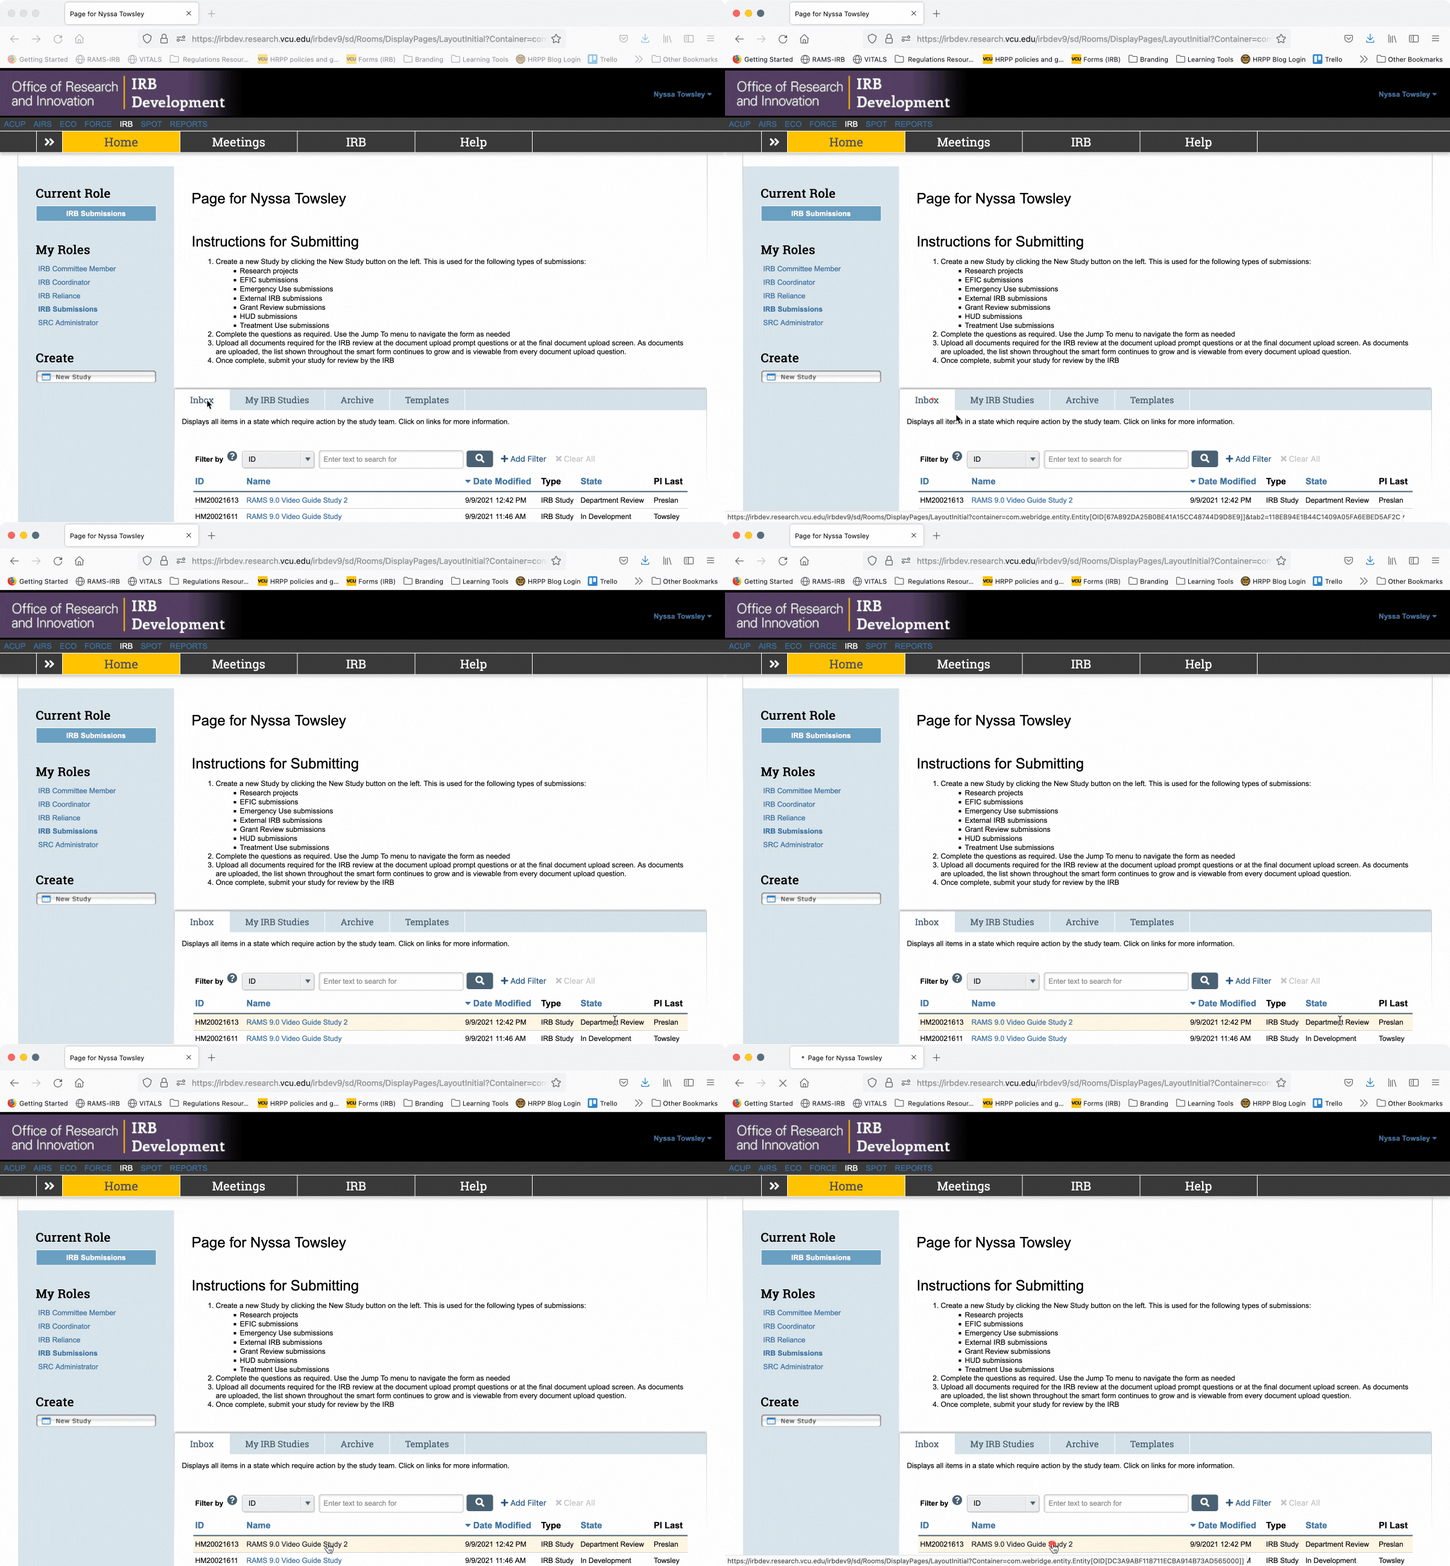
Ensure that the “Inbox” tab is selected. All studies requiring action on your part will appear under this tab. Studies requiring Department Review will say “Department Review” under the “State” column. Click on the hyperlinked title of the study to be brought to that study’s main workspace.
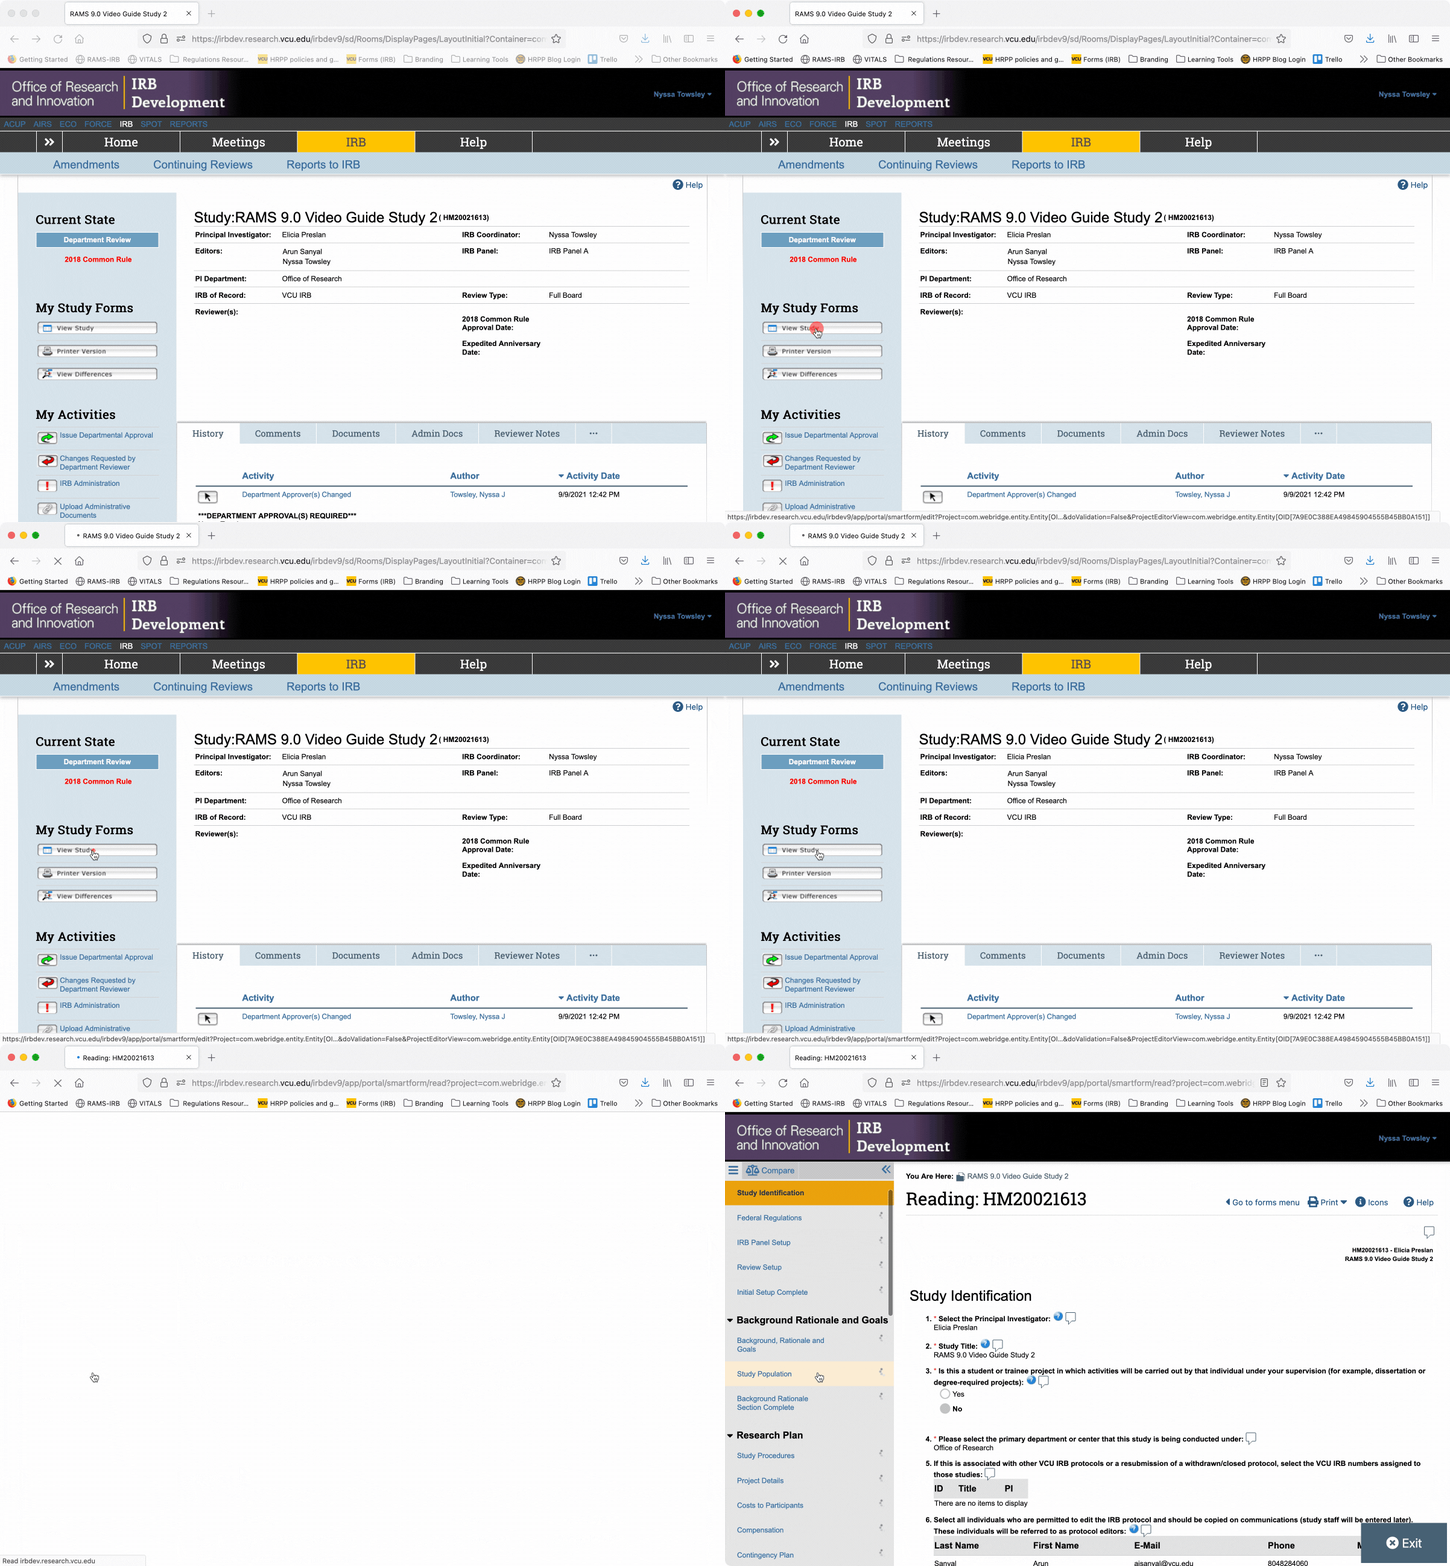
To open the SmartForm for the study, select the “View Study” button under the “My Study Forms” menu.
Navigation in the SmartForm
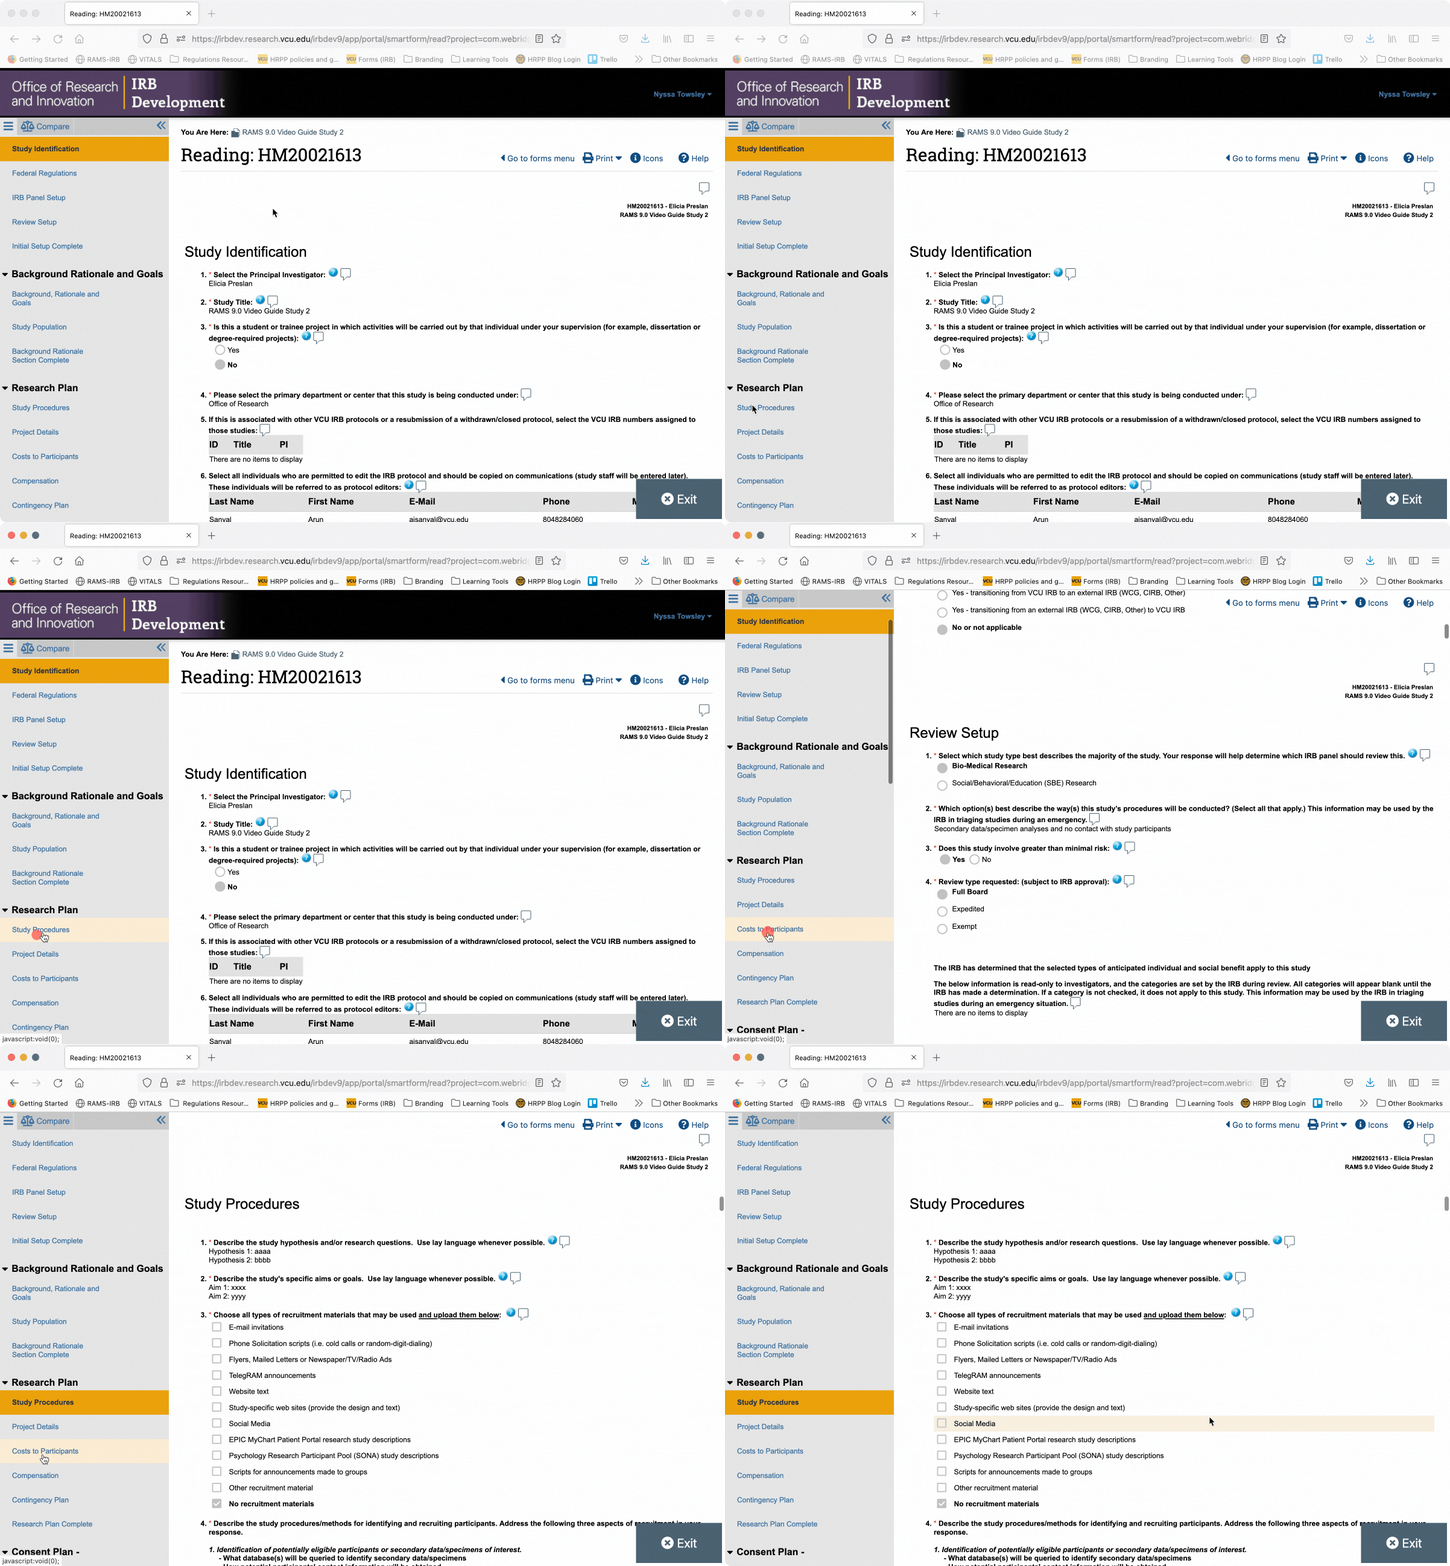
To navigate through the SmartForm, you may simply scroll down, and each page of the SmartForm will load sequentially. You can also jump to a specific page of the SmartForm using the navigation menu on the left side of the screen. Scroll through the navigation menu and click on the name of the page you wish to navigate to, and the SmartForm will jump to the selected page.
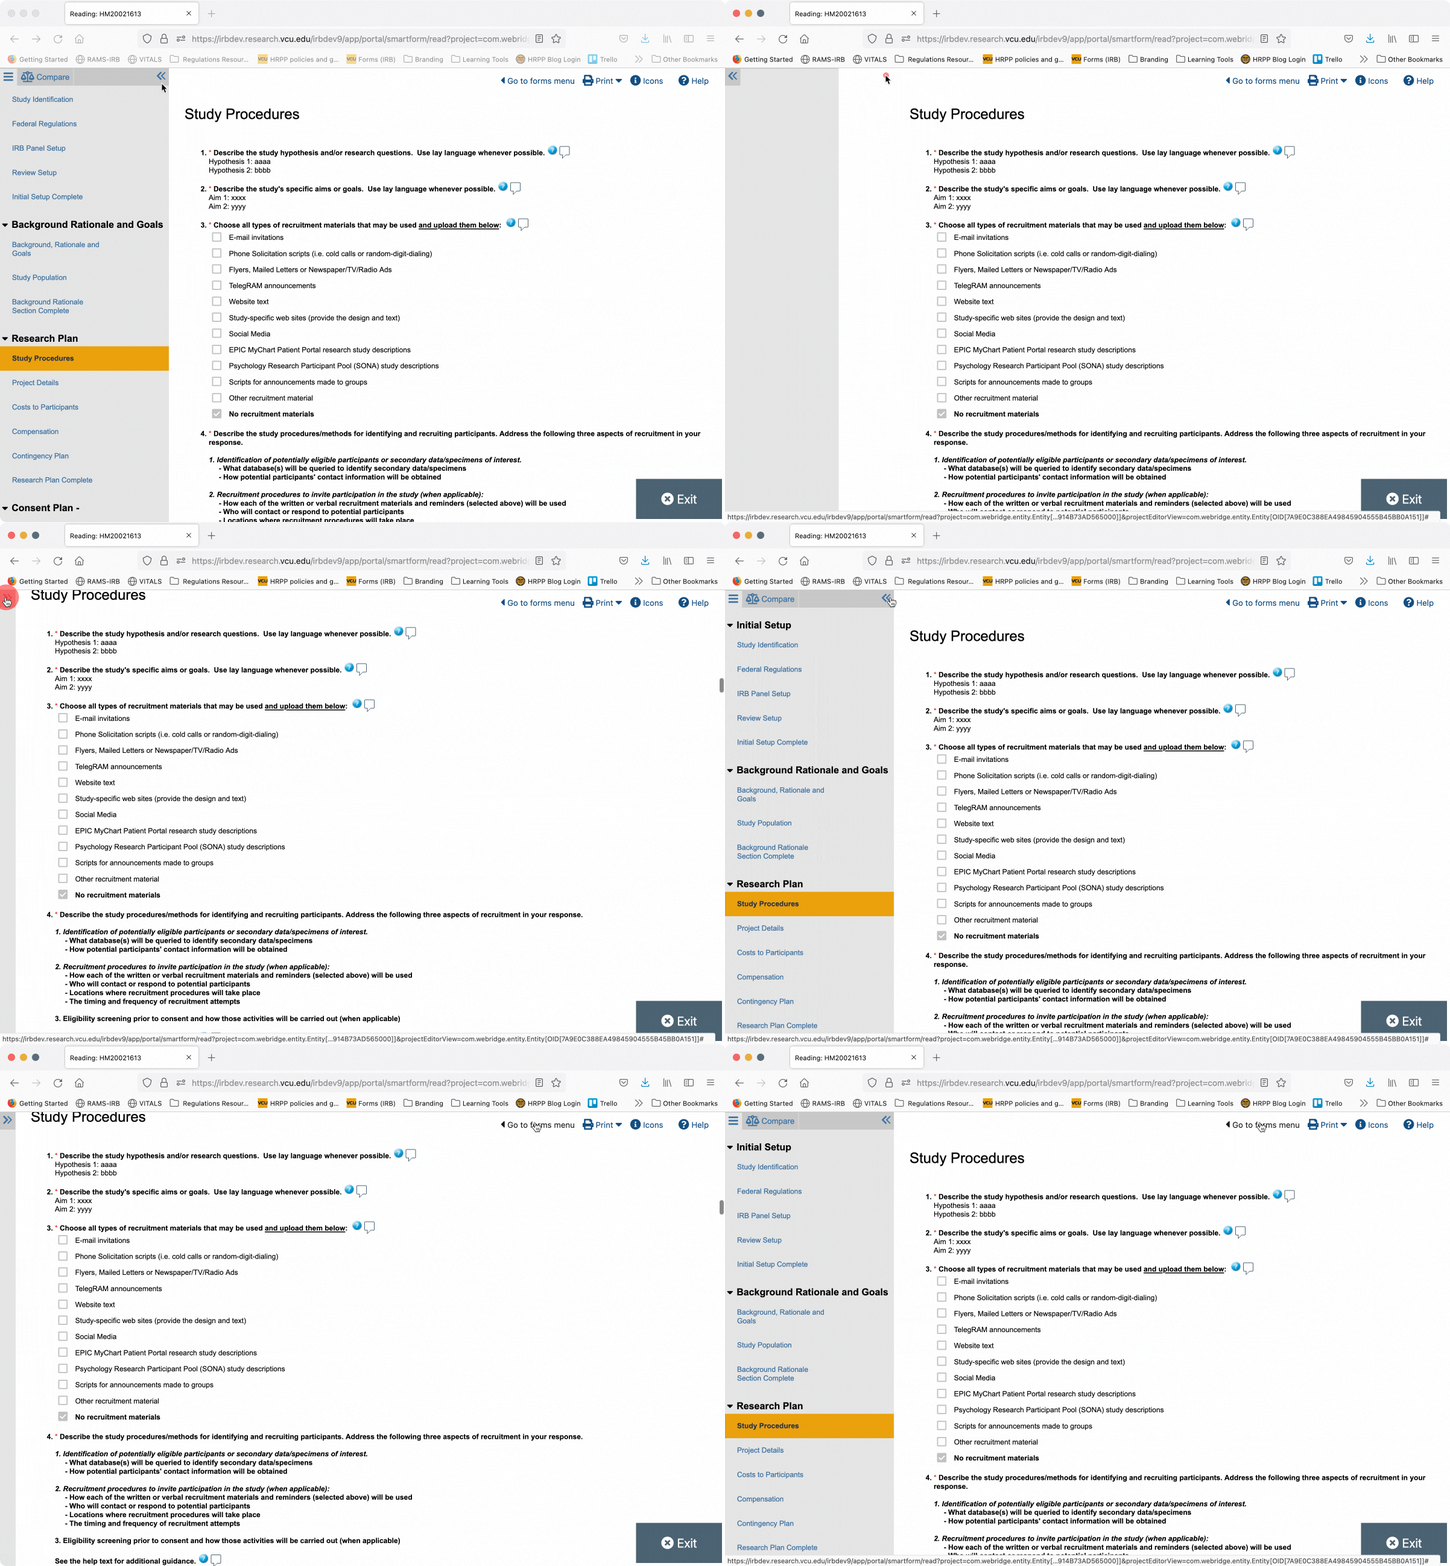
You can hide the navigation menu by clicking the “<<” button in the top right of the navigation menu. To expand the navigation menu, click the “>>” button that will appear in the upper left of the form. When the navigation menu is closed, you can also re-open the navigation menu by clicking the “Go to forms menu” button in the upper right corner of the SmartForm.
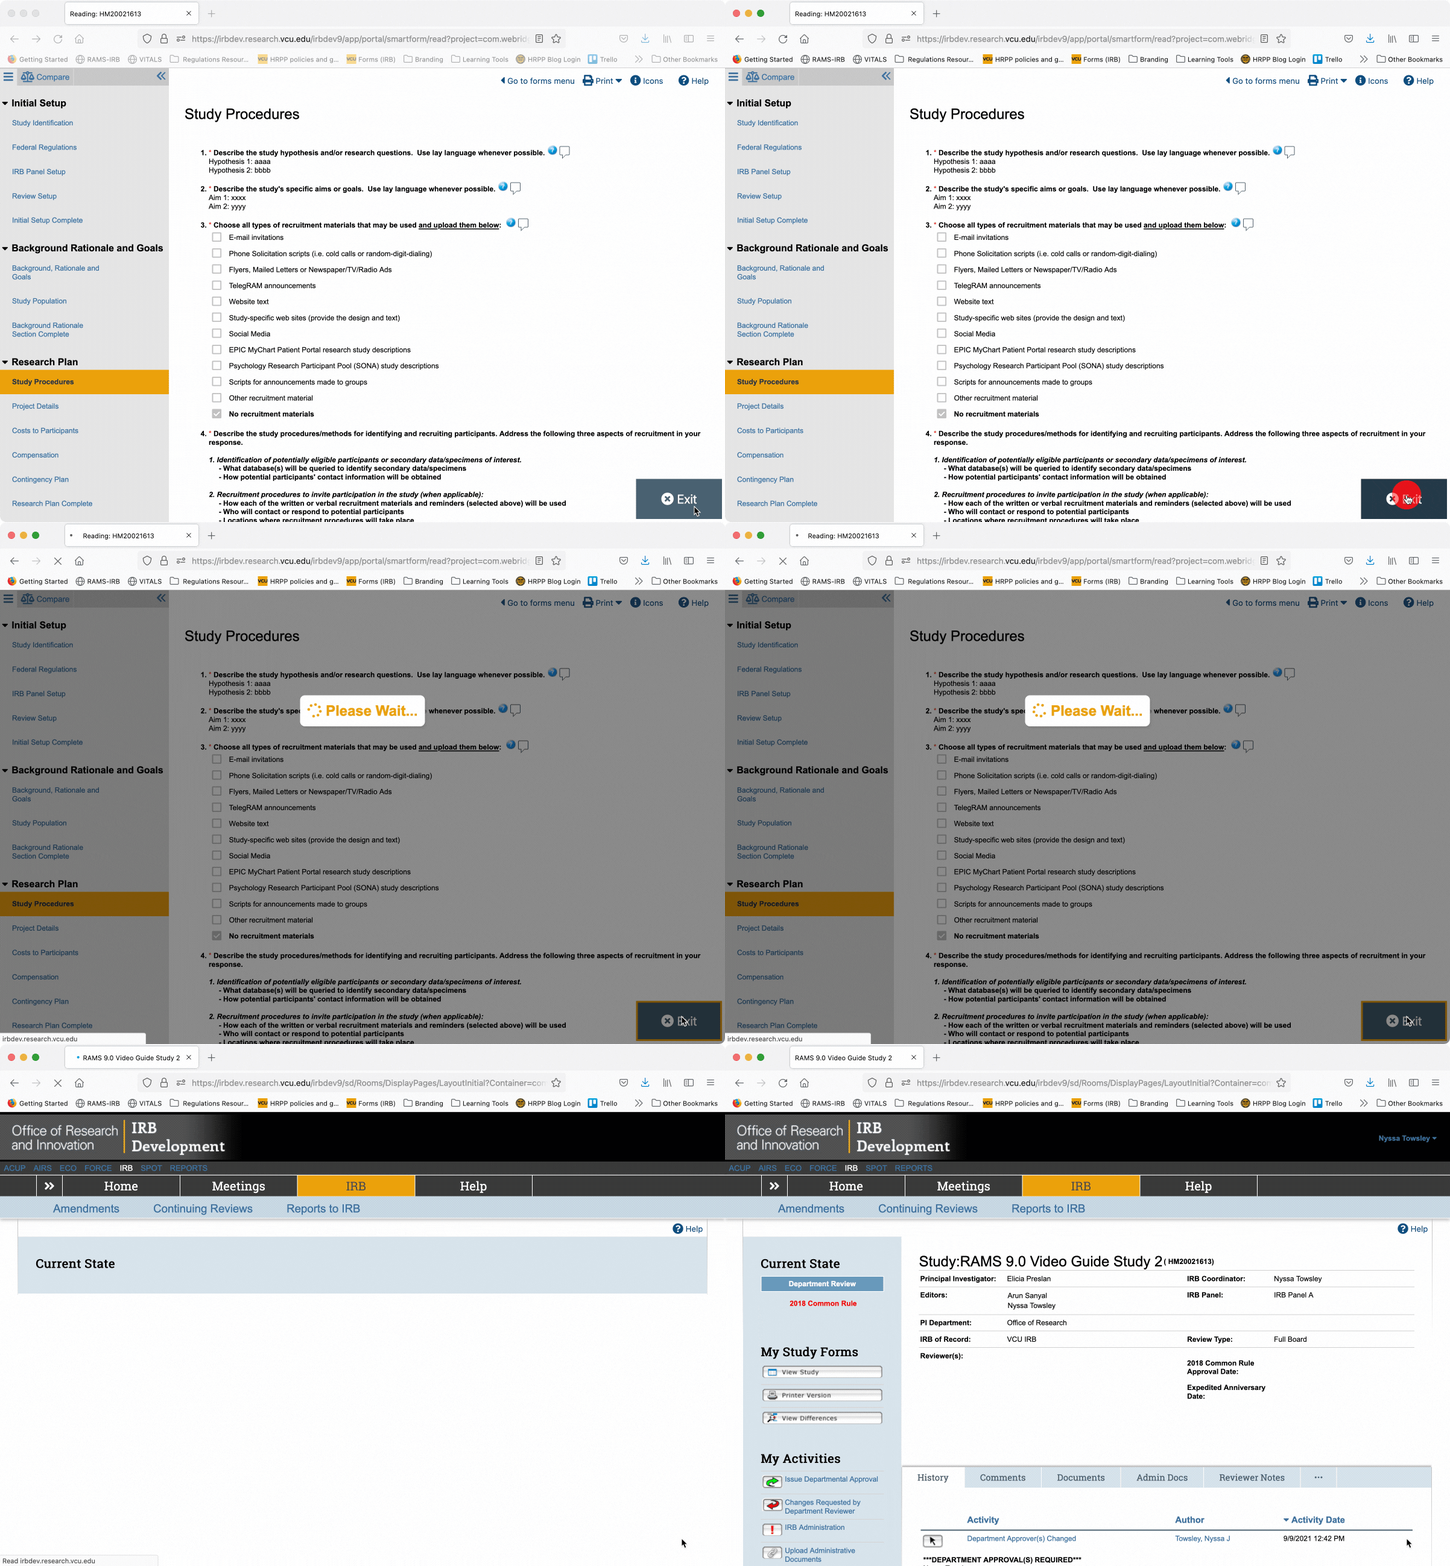
To exit the SmartForm and return to the main study workspace, click the “Exit” button.
Adding, Editing, Deleting, and Navigating Reviewer Notes
Reviewer notes can be added either at the question-level or at the page-level. For the most part, it will be more useful to log a reviewer note at the question-level, as this will make it clearer to the investigator where the change is being requested. However, there may be circumstances where a page-level reviewer note makes more sense.
Additionally, any existing reviewer notes that were logged on a study prior to 9/15/2021 (the date RAMS-IRB was updated to 9.0, resulting in changes to the reviewer notes function) will appear as page-level notes, so it is important to know how to navigate page-level notes if you are conducting department review of a study that had reviewer notes logged on it prior to 9/15/2021.
Question-Level Reviewer Notes
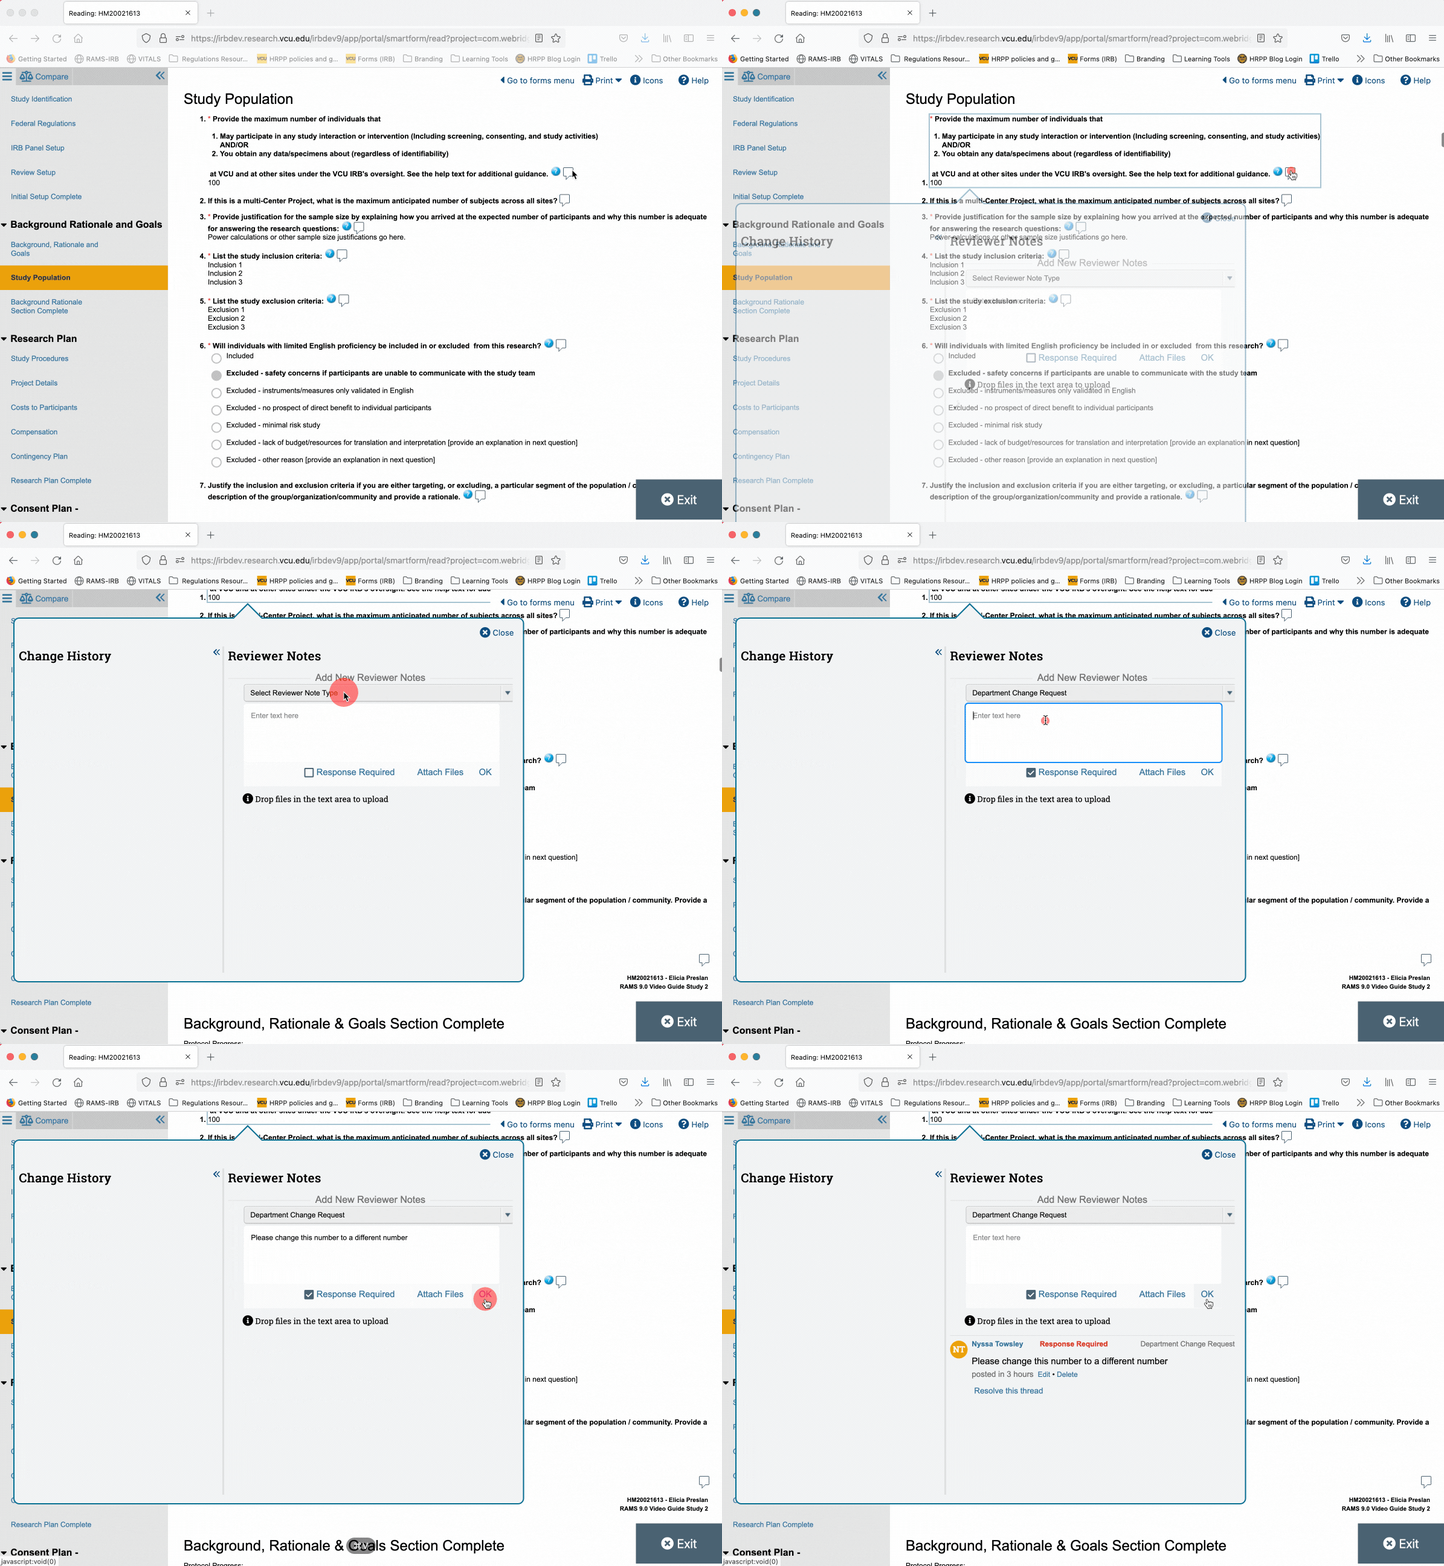
To log a question-level reviewer note, find the question in the SmartForm that corresponds to where you would like to see a change made. At the end of the question text, there will be a small icon in the shape of the outline of a speech bubble. Click on that icon, and the reviewer notes dialogue will open.
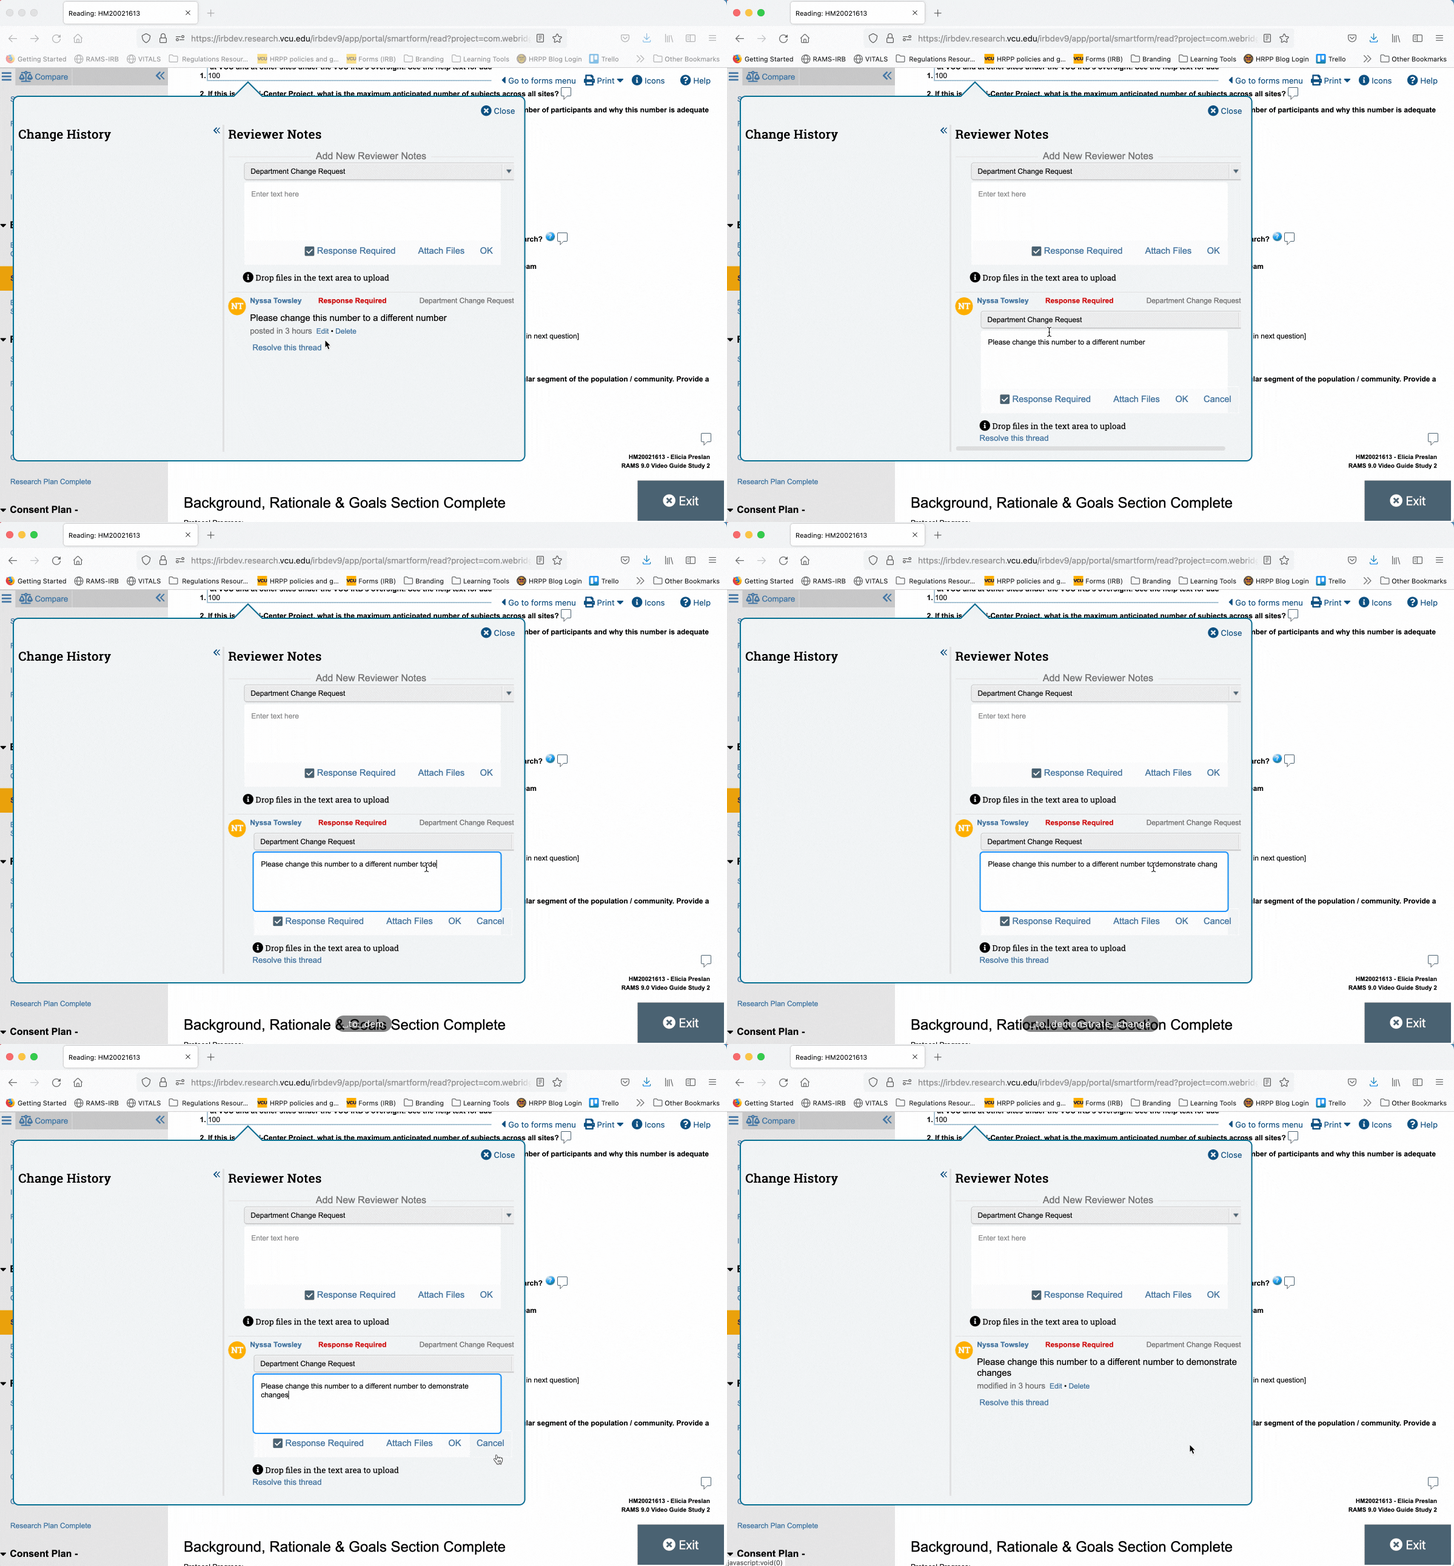
In the dialogue, select “Department Change Request” from the drop-down menu, enter the text of your reviewer note into the text box, ensure that “Response Required” is checked (this should be done by default), and then click “OK.” The reviewer note will then appear within the reviewer note dialogue.
To edit a reviewer note, open the reviewer note dialogue by clicking the speech bubble icon at the end of the question text (if you have not done so already). Then, click “edit” underneath the text of your reviewer note. This will open the text box of the reviewer note and allow you to edit the text. Once you have finished editing, click “OK” and the revised reviewer note will populate.
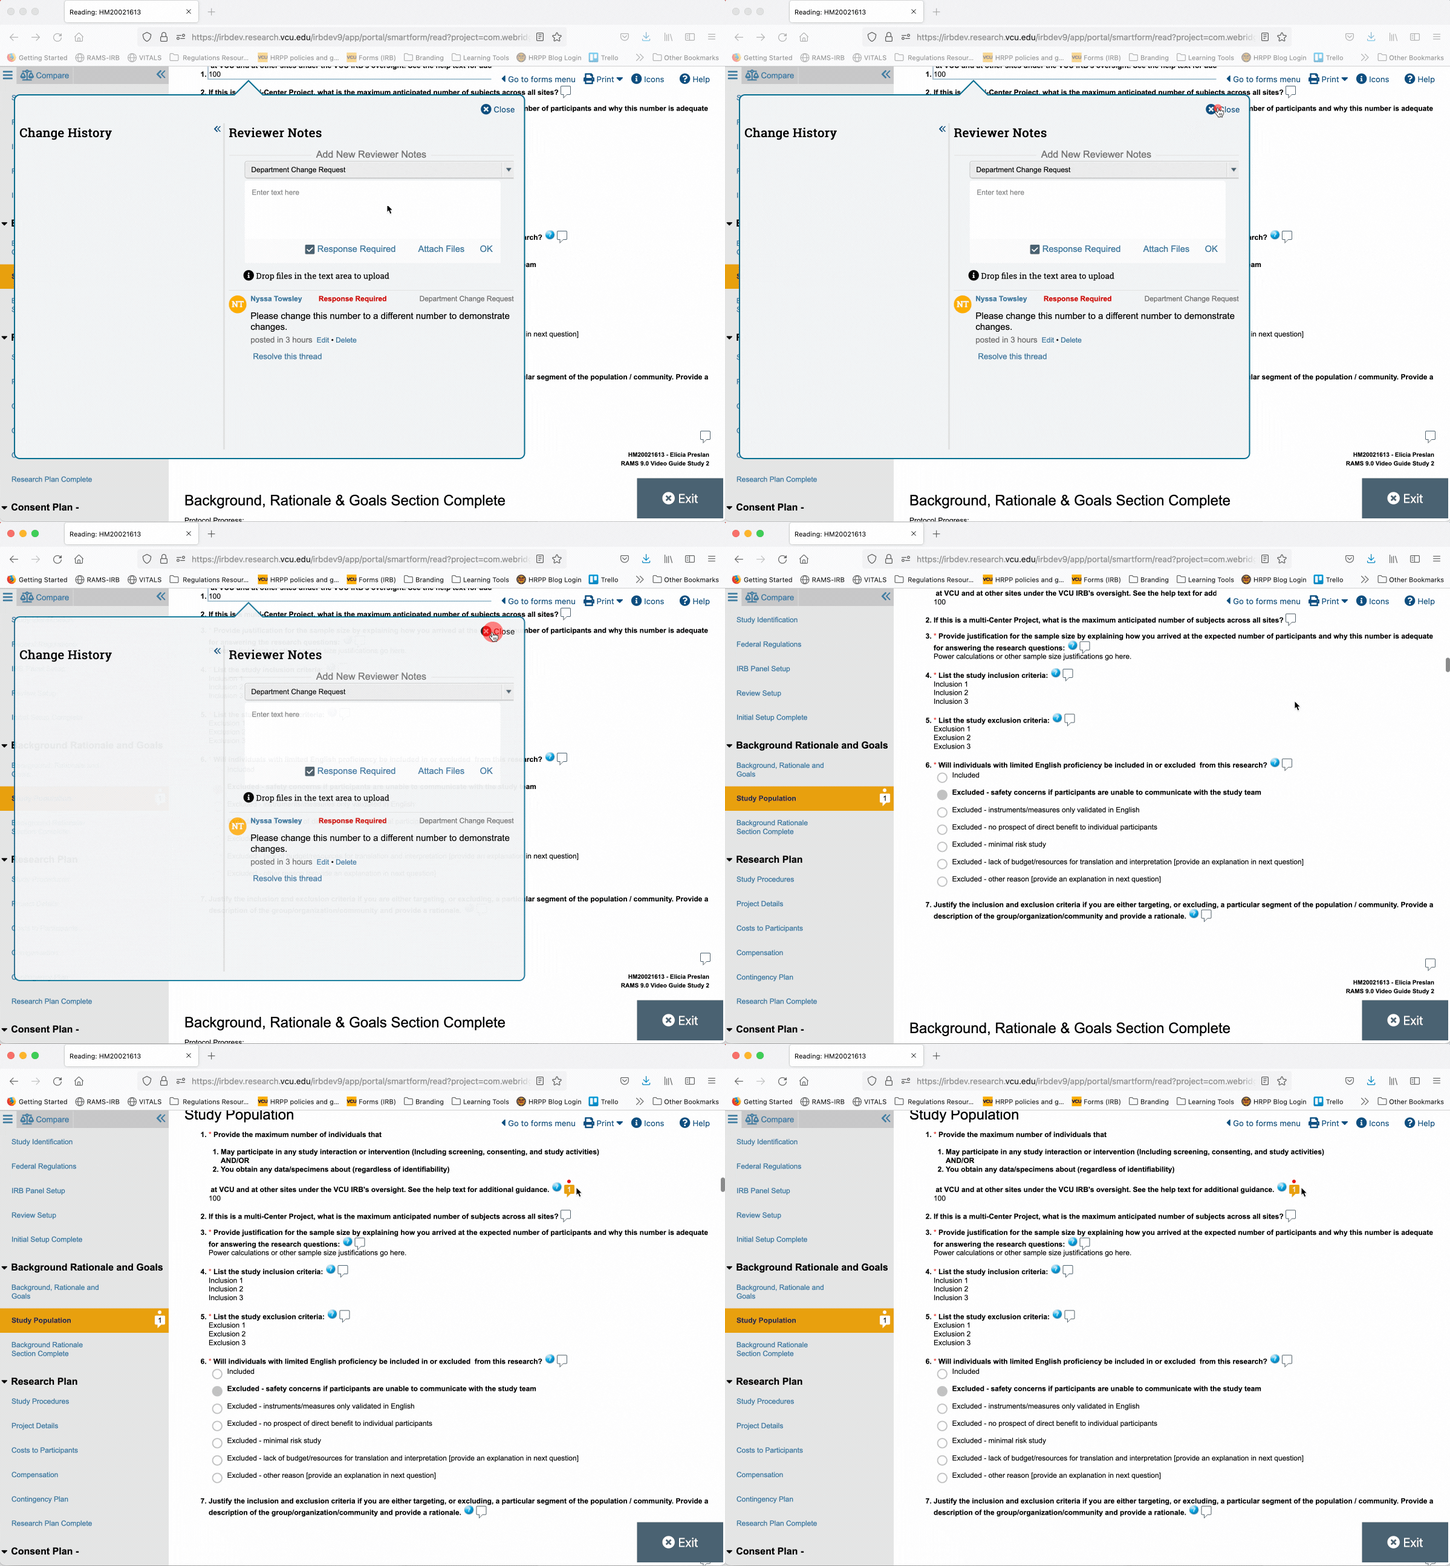
To close the reviewer notes dialogue, click the “Close” button in the upper right corner of the dialogue. When you close the reviewer notes dialogue, you will note that the speech bubble icon following the question text now appears in solid yellow with a number inside, indicating the numer of notes logged on that question. There is also a red dot above the speech bubble icon, indicating that at least one reviewer note associated with that question requires action on the part of the investigator.
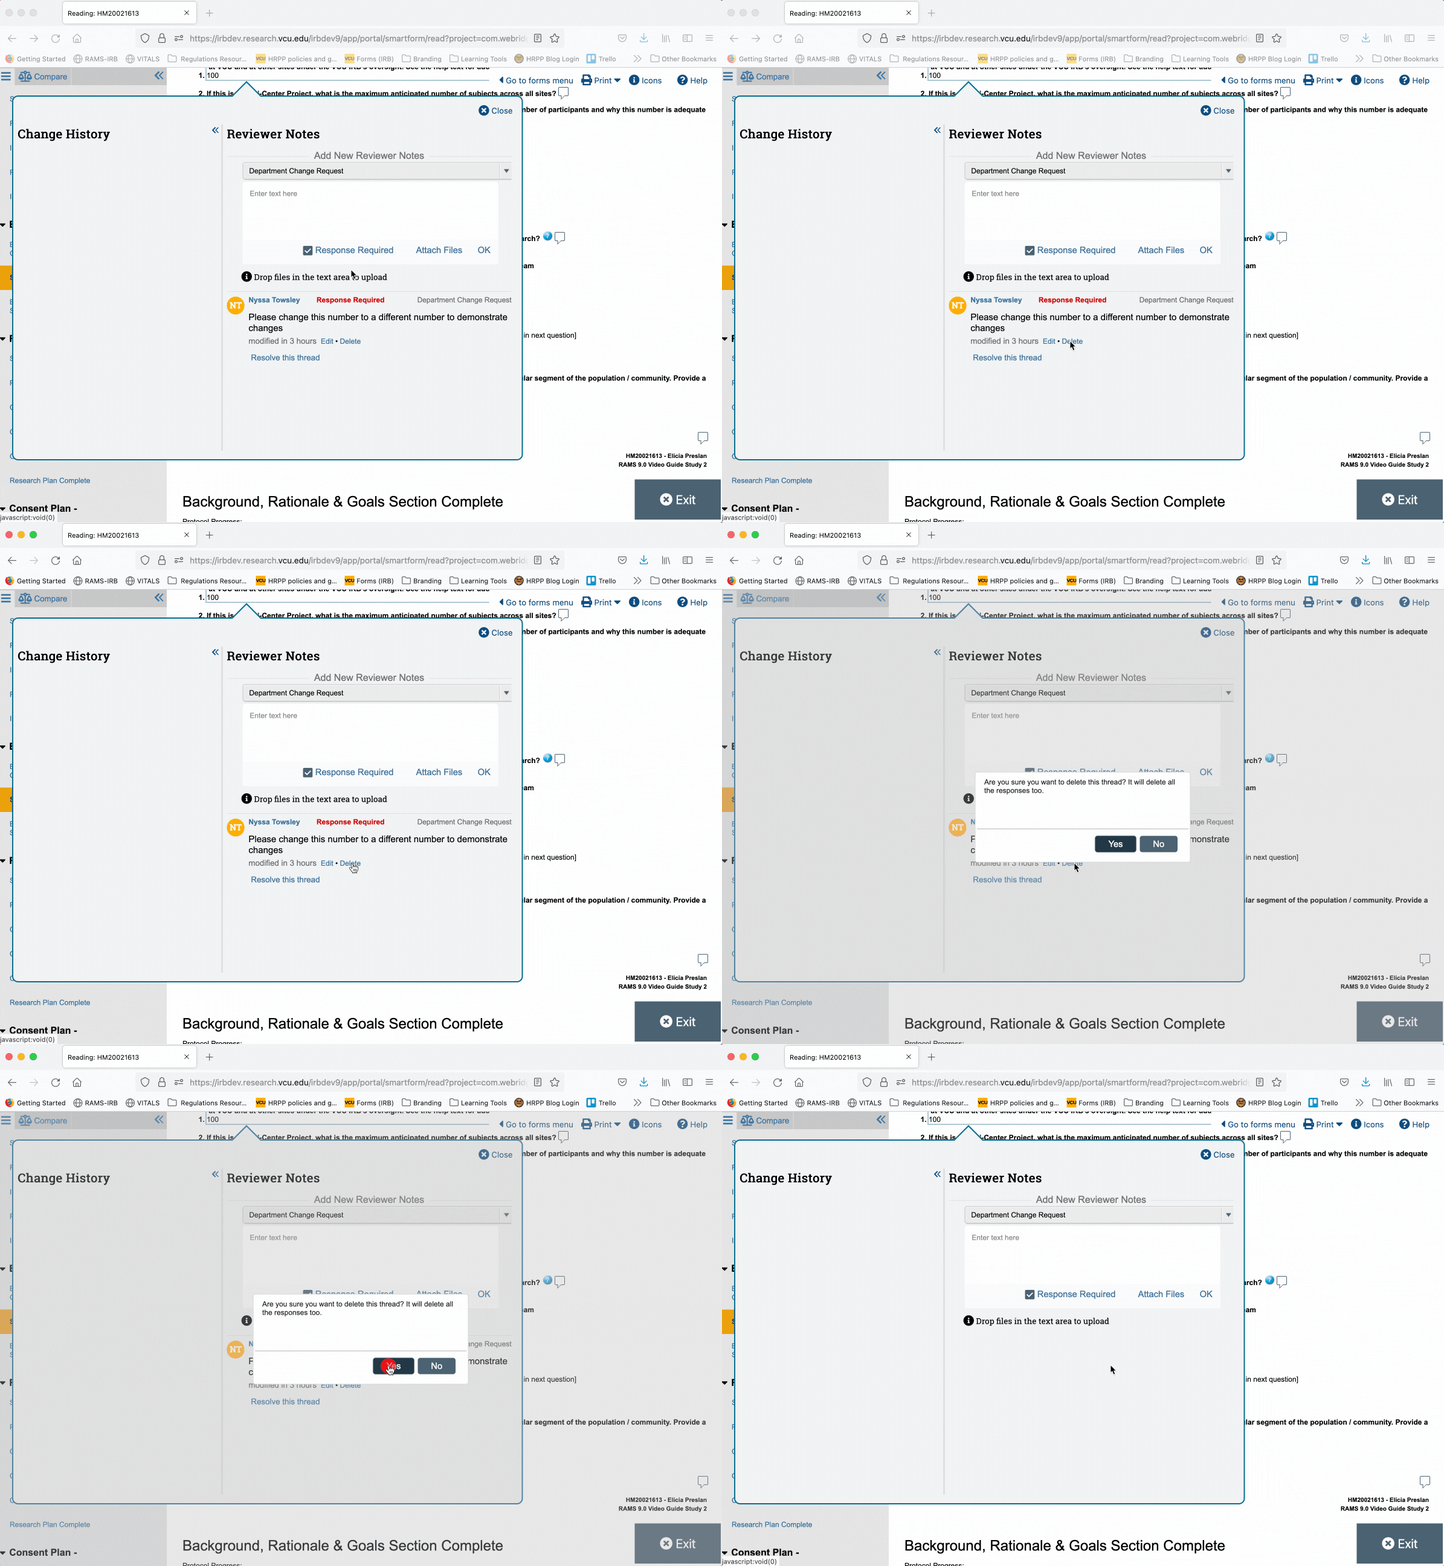
To delete a reviewer note, open the reviewer note dialogue by clicking the speech bubble icon at the end of the question text (if you have not done so already). Then, click “delete” underneath the reviewer note you wish to remove. A dialogue will pop up asking if you are sure you wish to delete the note. Click “Yes” in the dialogue to confirm deletion. Note that deleting a reviewer note will also delete any replies to that note.
Page-Level Reviewer Notes
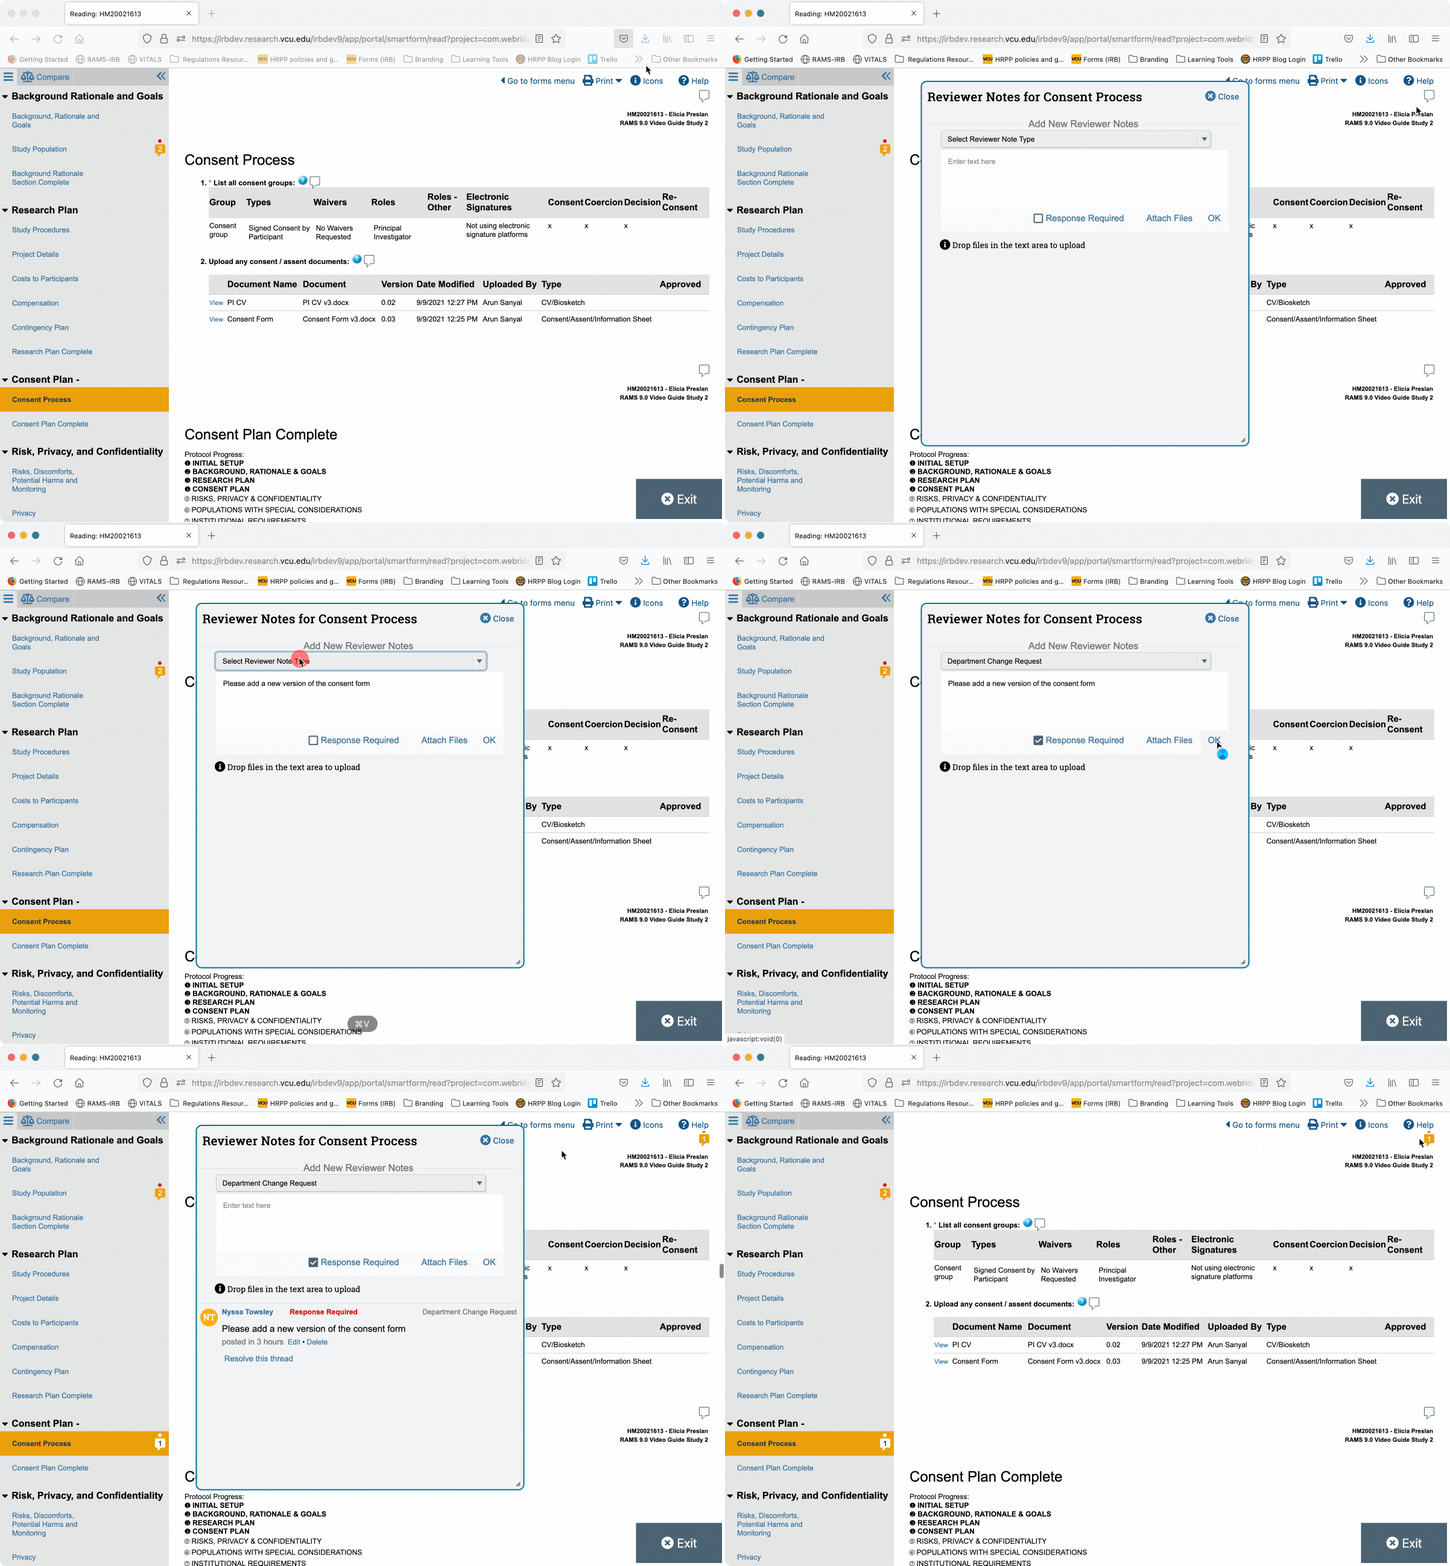
Logging a page-level reviewer note will be the same as logging a question-level note, except that the speech bubble outline icon will appear at the top of the SmartForm page. Navigate to the page you wish to leave the note on, and click the outline of the speech bubble to open the reviewer note dialogue.
From there, log a note as you would in a question-level reviewer note. Once you close the page-level reviewer note, you will see that the outline of the speech bubble icon has now changed to a filled speech bubble icon, containing a number to indicate the number of reviewer notes logged at the page-level for that page, and will have a red dot above the icon, to indicate to the investigator that at least one note at the page-level requires action on their part.
Reviewer Notes in the Navigation Menu
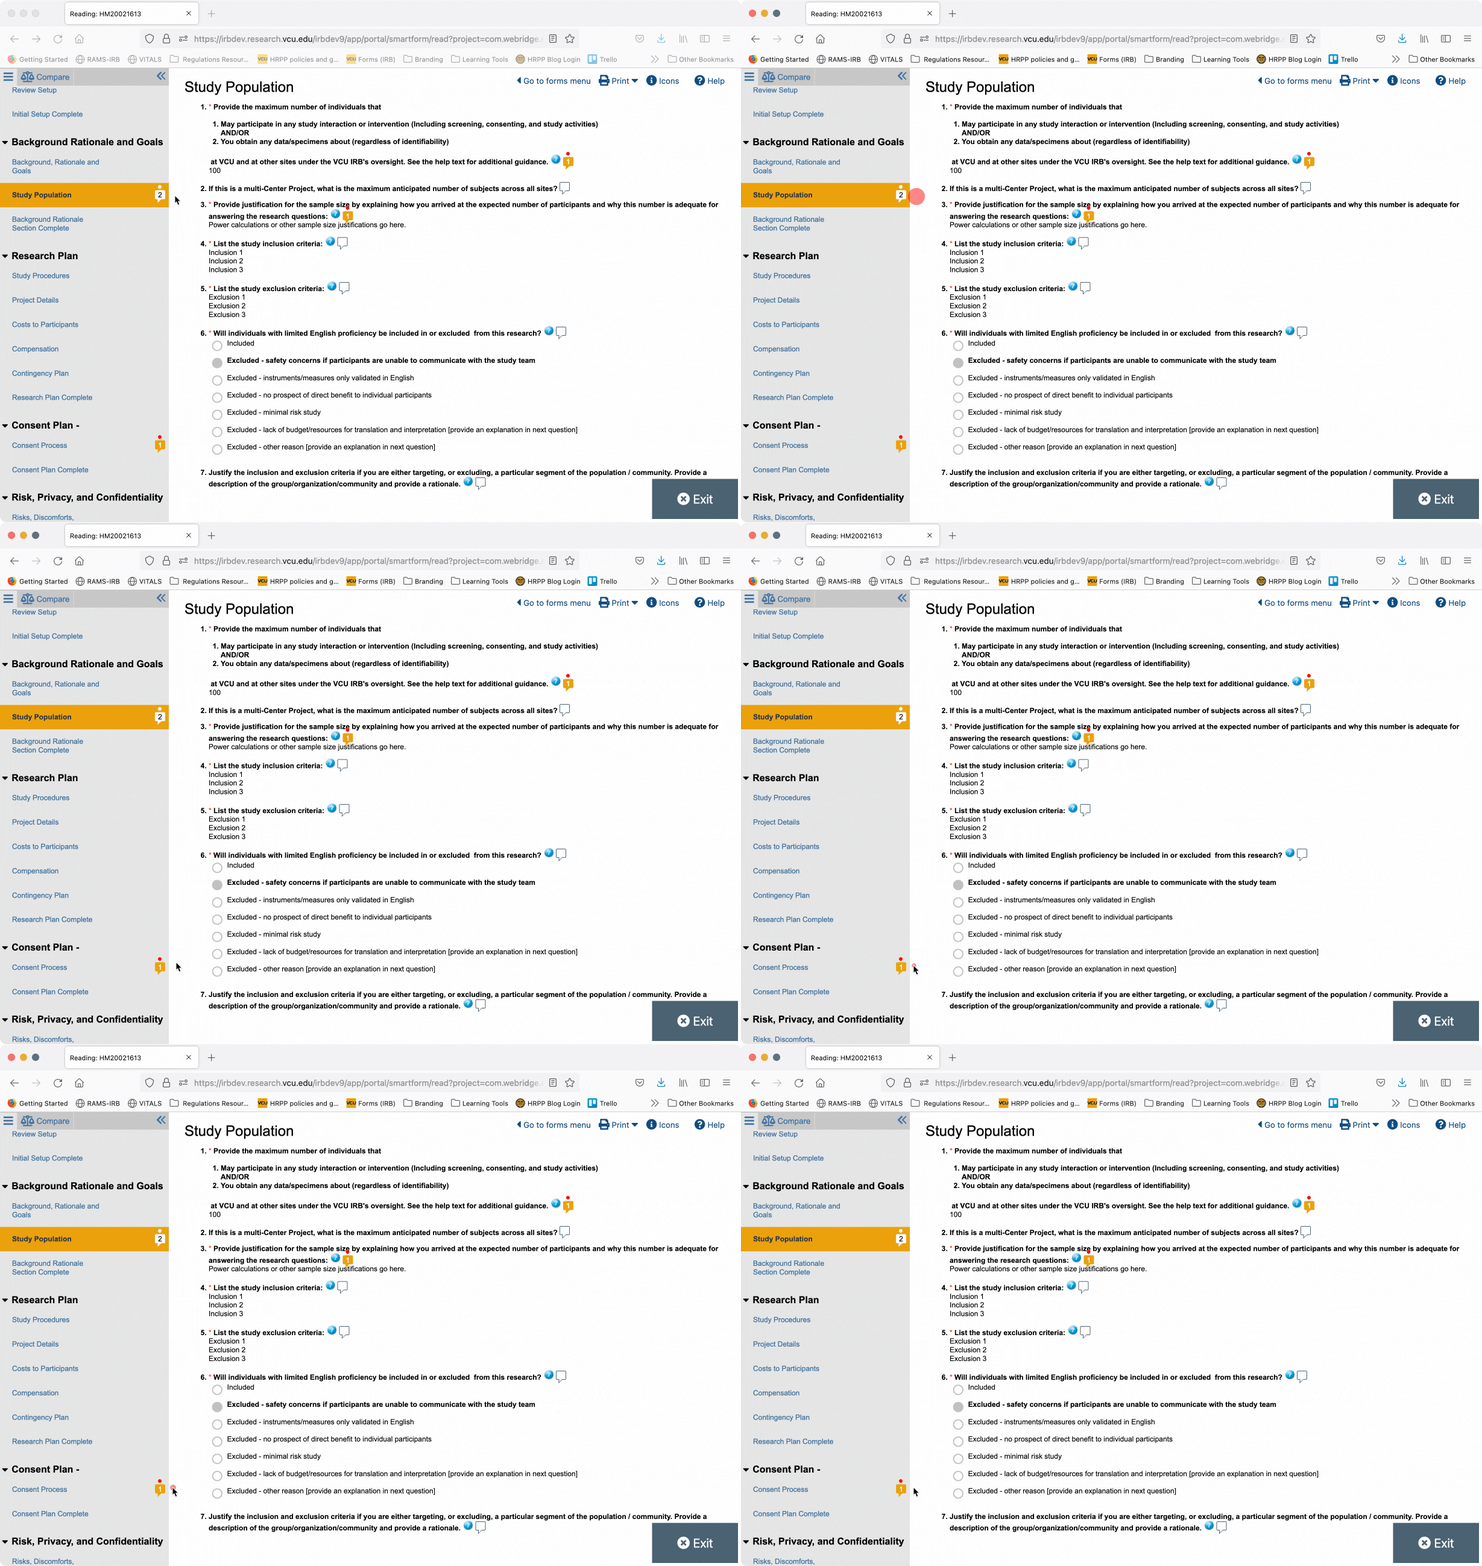
Once you have logged reviewer notes either at the question- or page-level, you will note that within the navigation menu, yellow speech bubble icons with red dots above them will appear to the right of page names that contain reviewer notes. This is how investigators will know which pages have reviewer notes on them and which reviewer notes require action.
Reviewer Notes Tab
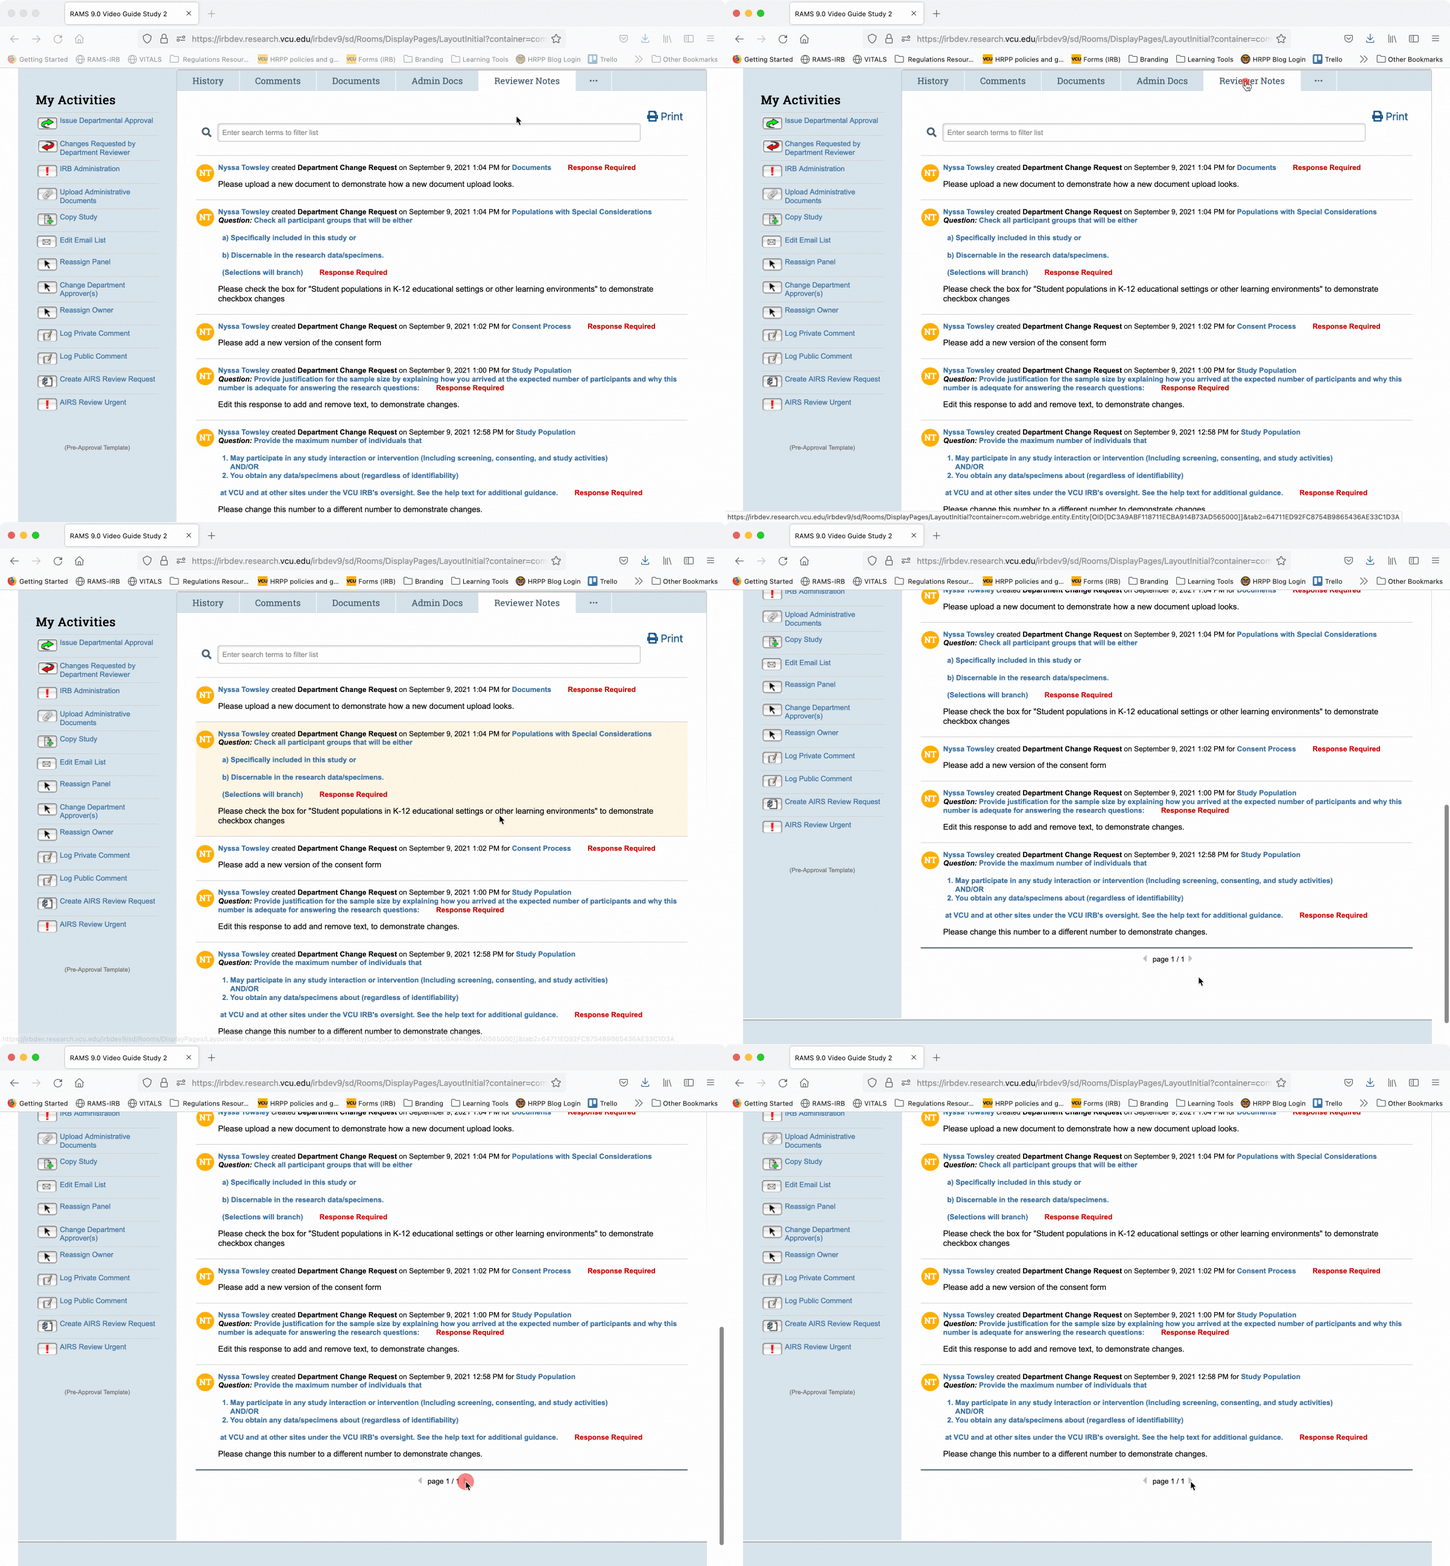
To view all reviewer notes together, navigate to the main study workspace and click the “Reviewer Notes” tab. There you will be able to see all of your reviewer notes. Click the forward and back icons at the bottom of the page to navigate to additional pages containing more reviewer notes.
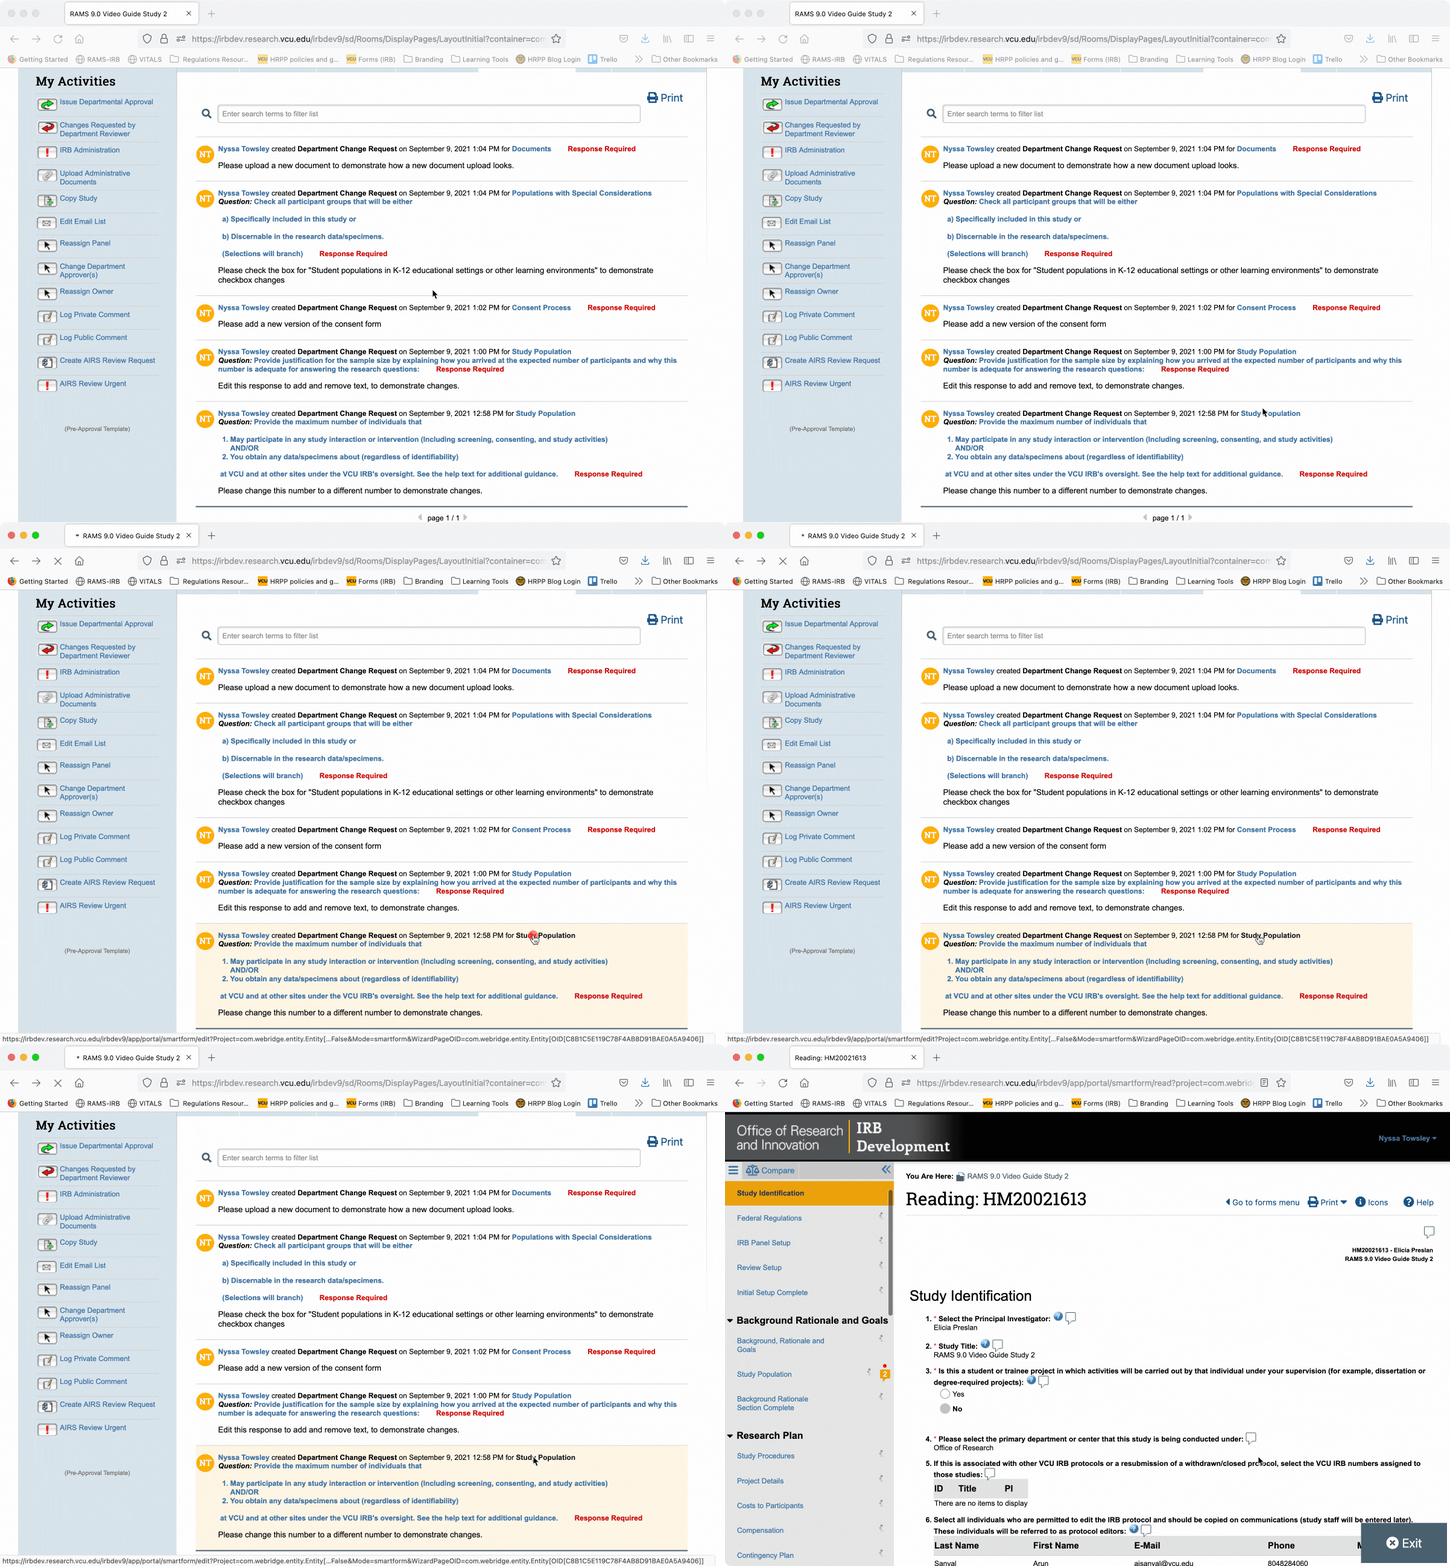
From the “Reviewer Notes” tab, you may also jump to the SmartForm page that the note is logged on. Click the hyperlinked page title or the hyperlinked question text in the reviewer note to automatically open the SmartForm and be taken to the page/question where the note is logged.
Accessing Documents
There are a couple ways to access documents: from the Documents tab in the main study workspace, or within the SmartForm itself.
Using the Documents Tab
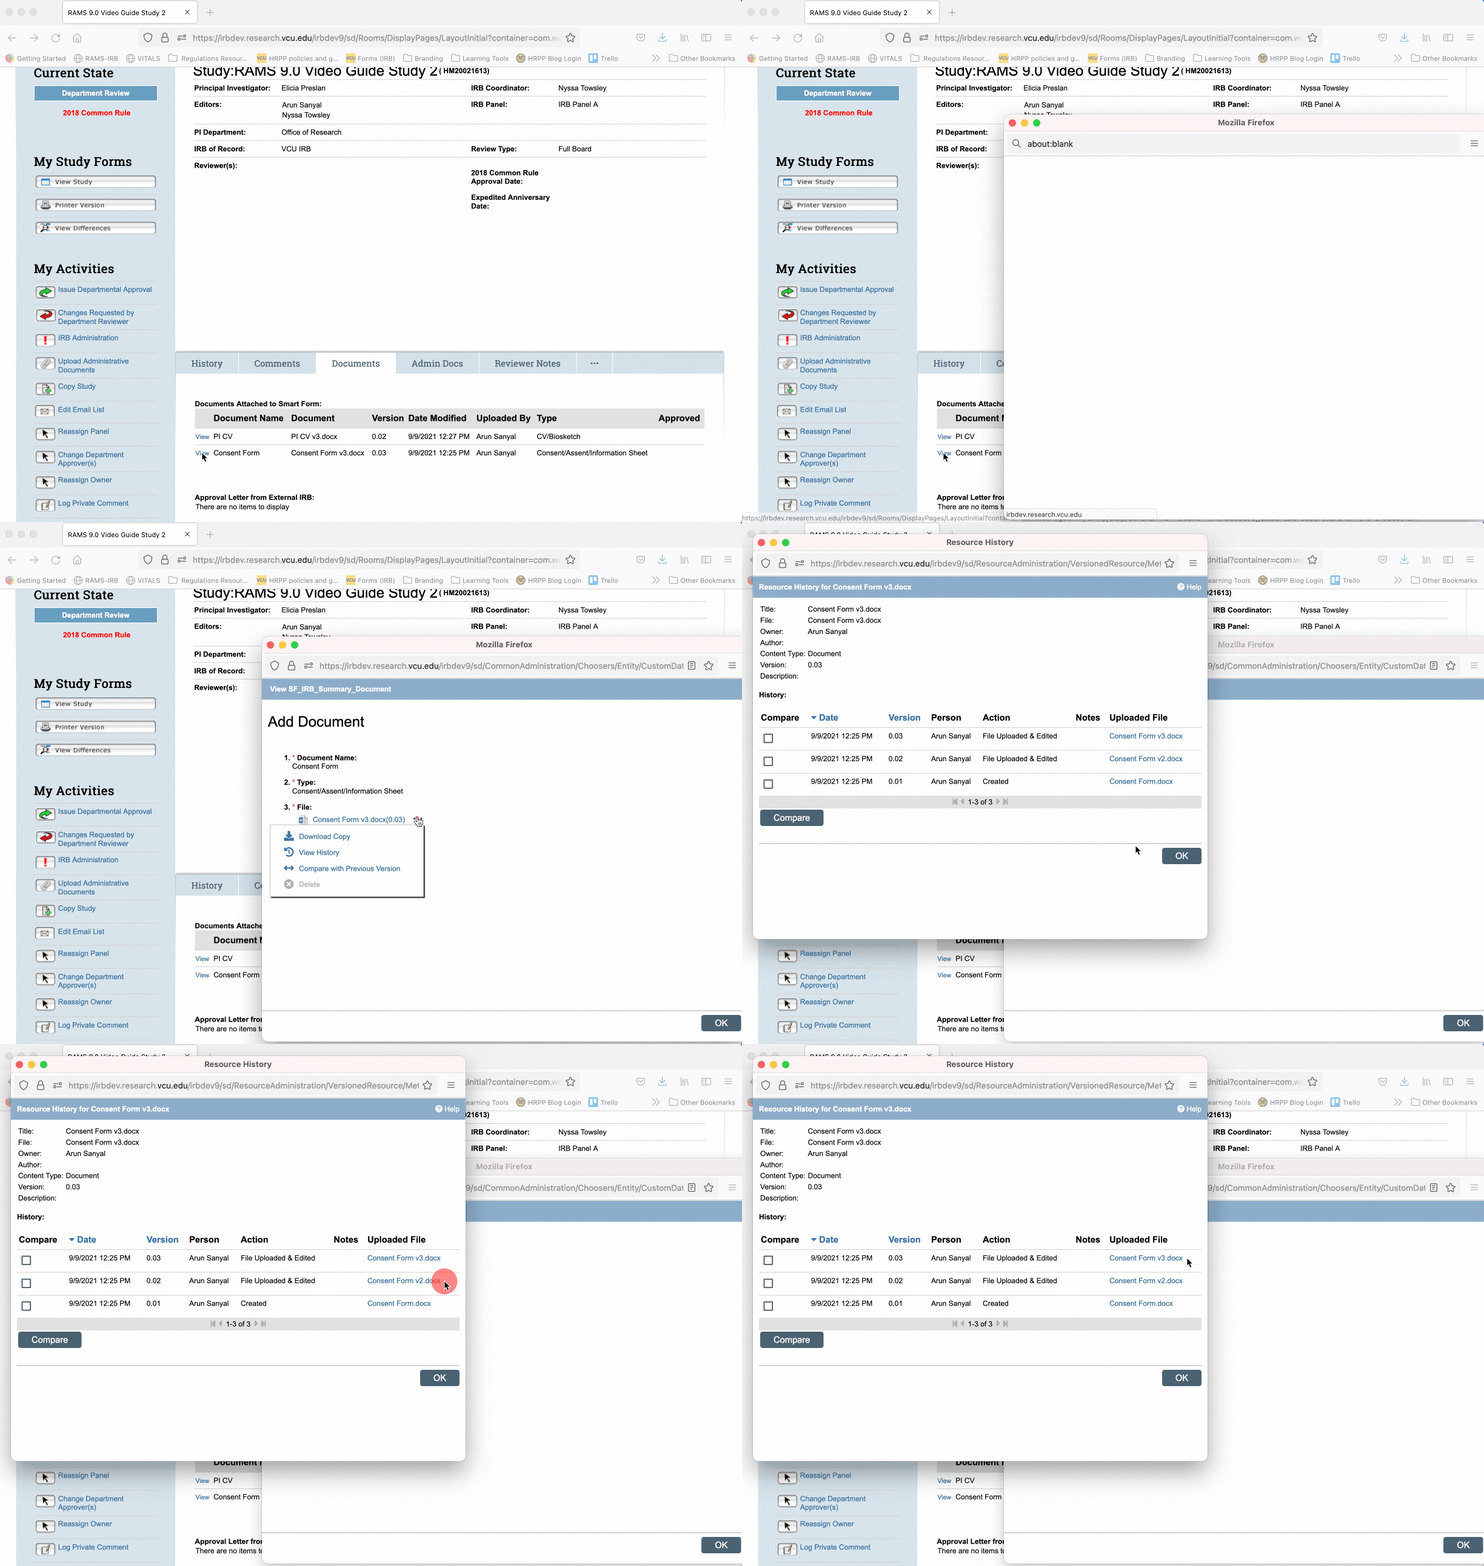
From the main study workspace, select the “Documents” tab. Scroll down to the document you wish to access, and click “View.” In the pop-out window, click the hyperlinked title of the document to open or download the most recent version of the document.
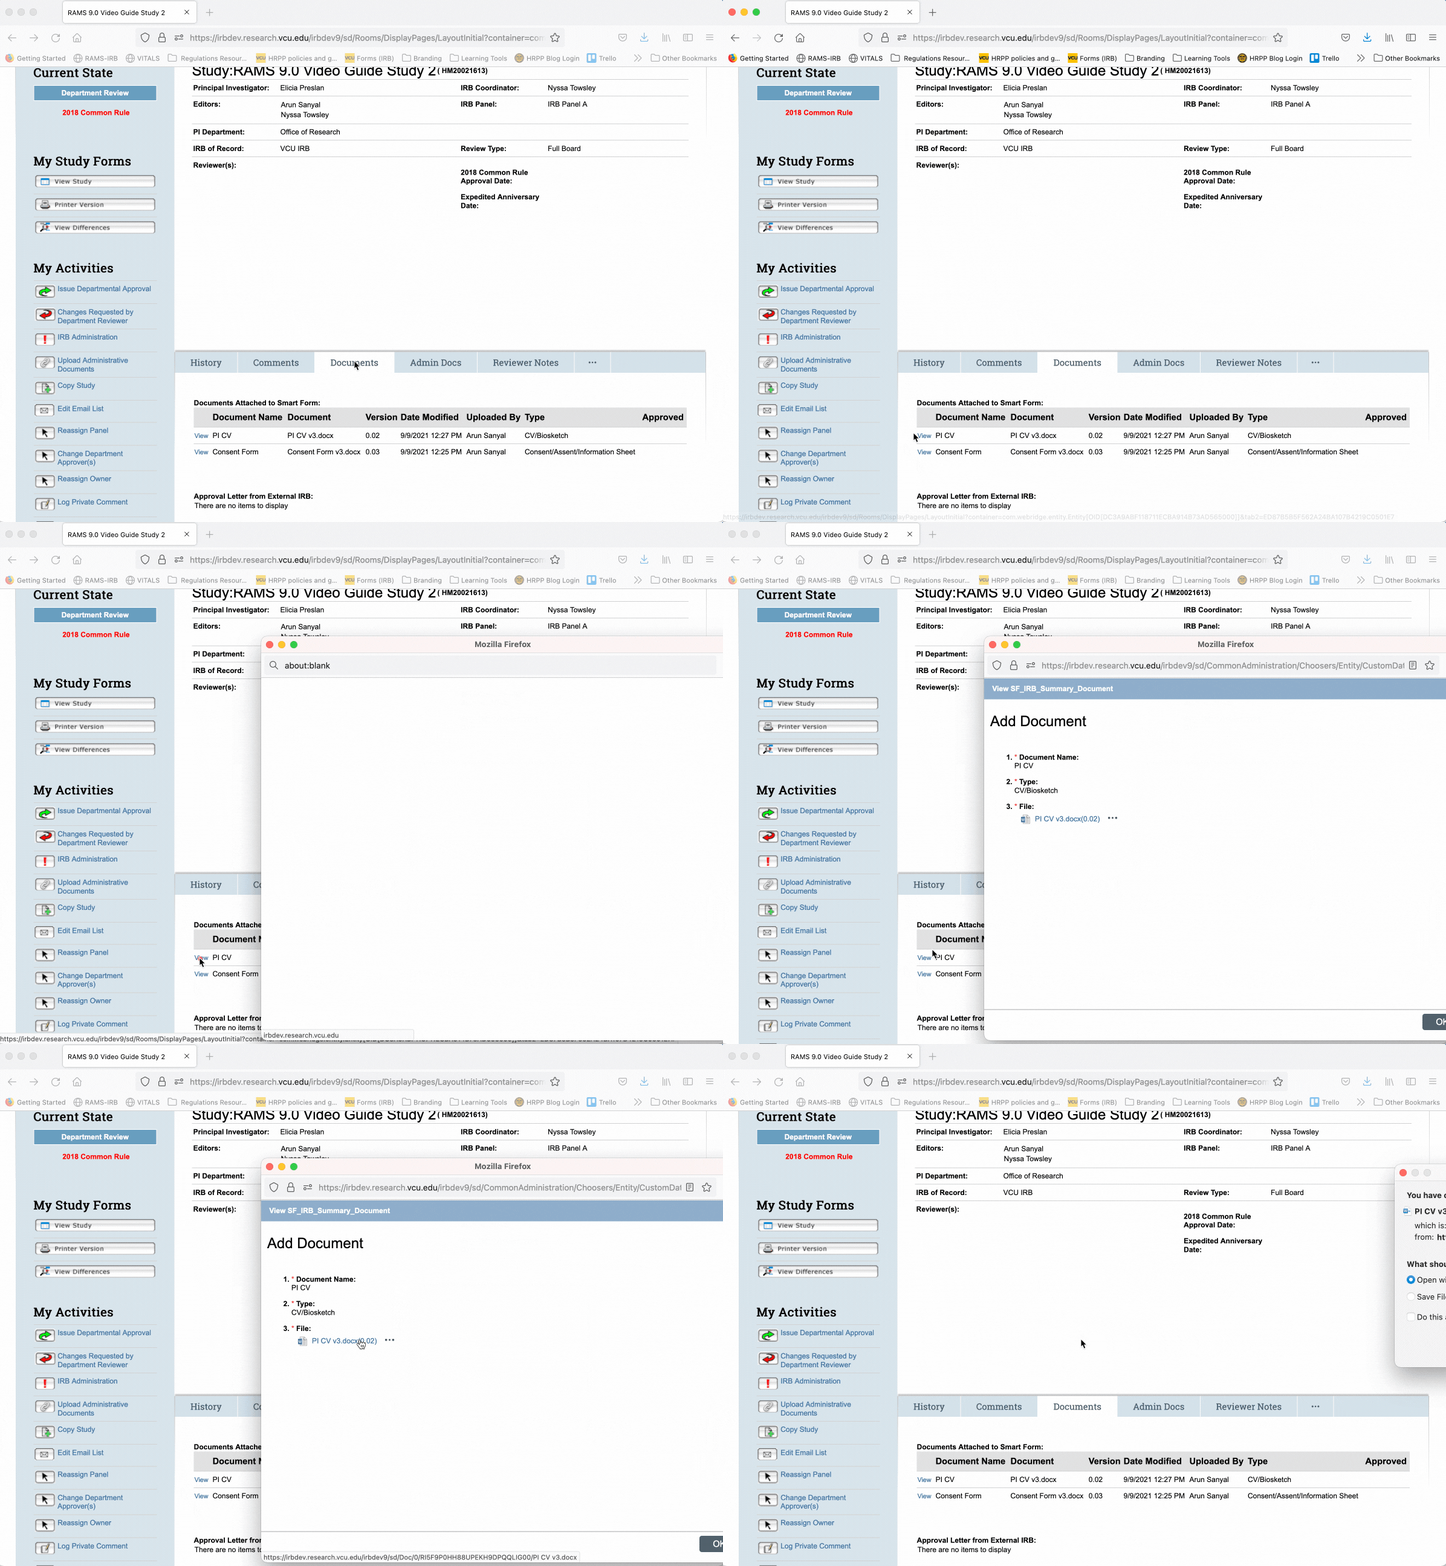
Some documents may have multiple versions, and you may wish to view previous versions of a document. To do so, click “View” to the left of the document, then in the pop-out window, click the three dots that follow the file name. From that drop-down menu, select “View History.” Another pop-up window will appear, which will show each version of the document uploaded so far. Click on the document filename of any version to download a copy of that version of the document.
Viewing Documents in the SmartForm
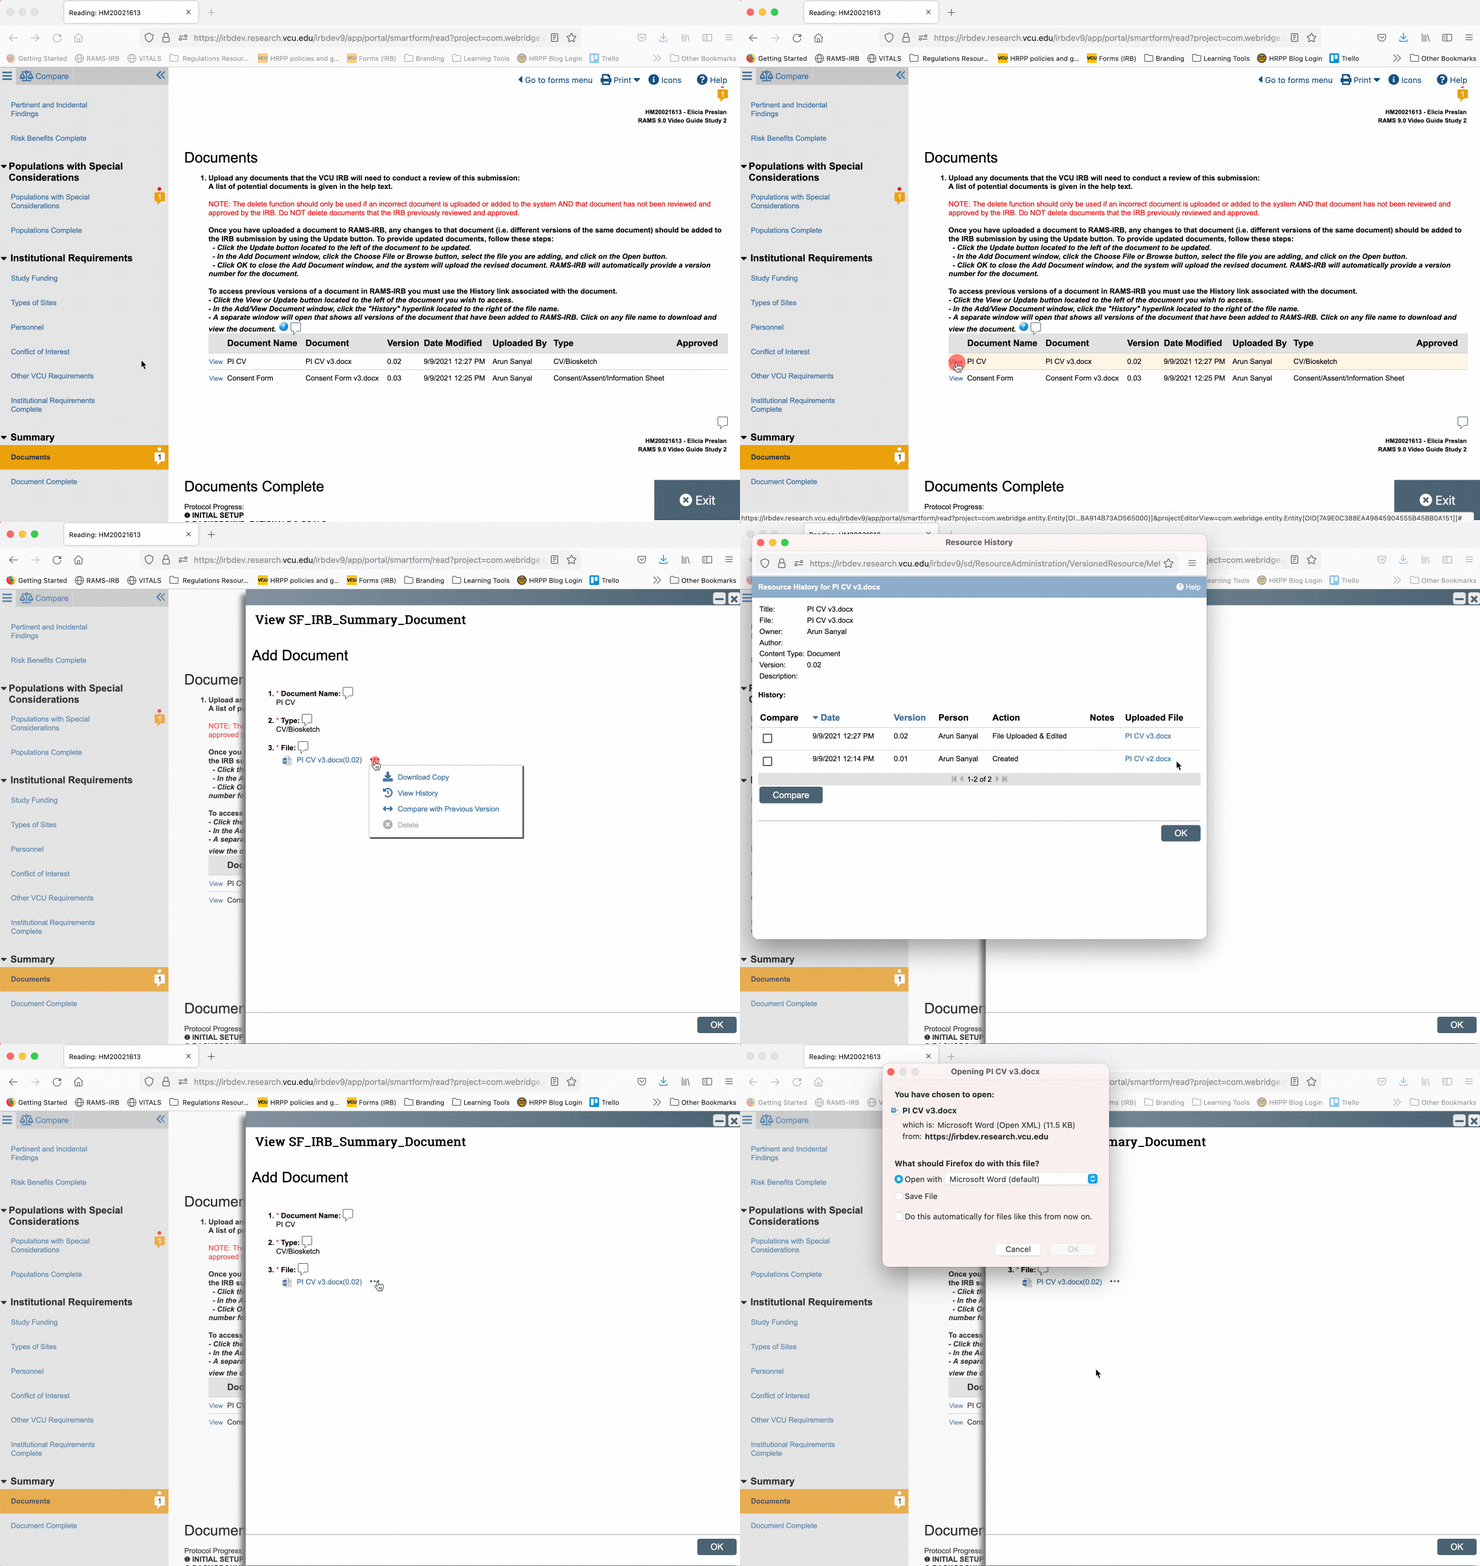
Documents can also be accessed within the SmartForm. Navigate to any page that contains a document upload spot, such as the Study Procedures or Documents pages. Scroll down to the document you wish to access and click “View.” In the pop-up window, click the hyperlinked document title to open or download the most recent version of the document, or click the three dots following the file name and click “View History” to view all versions of the document. You can download any of those versions by clicking on the filename for the version you wish to download.
Requesting Changes
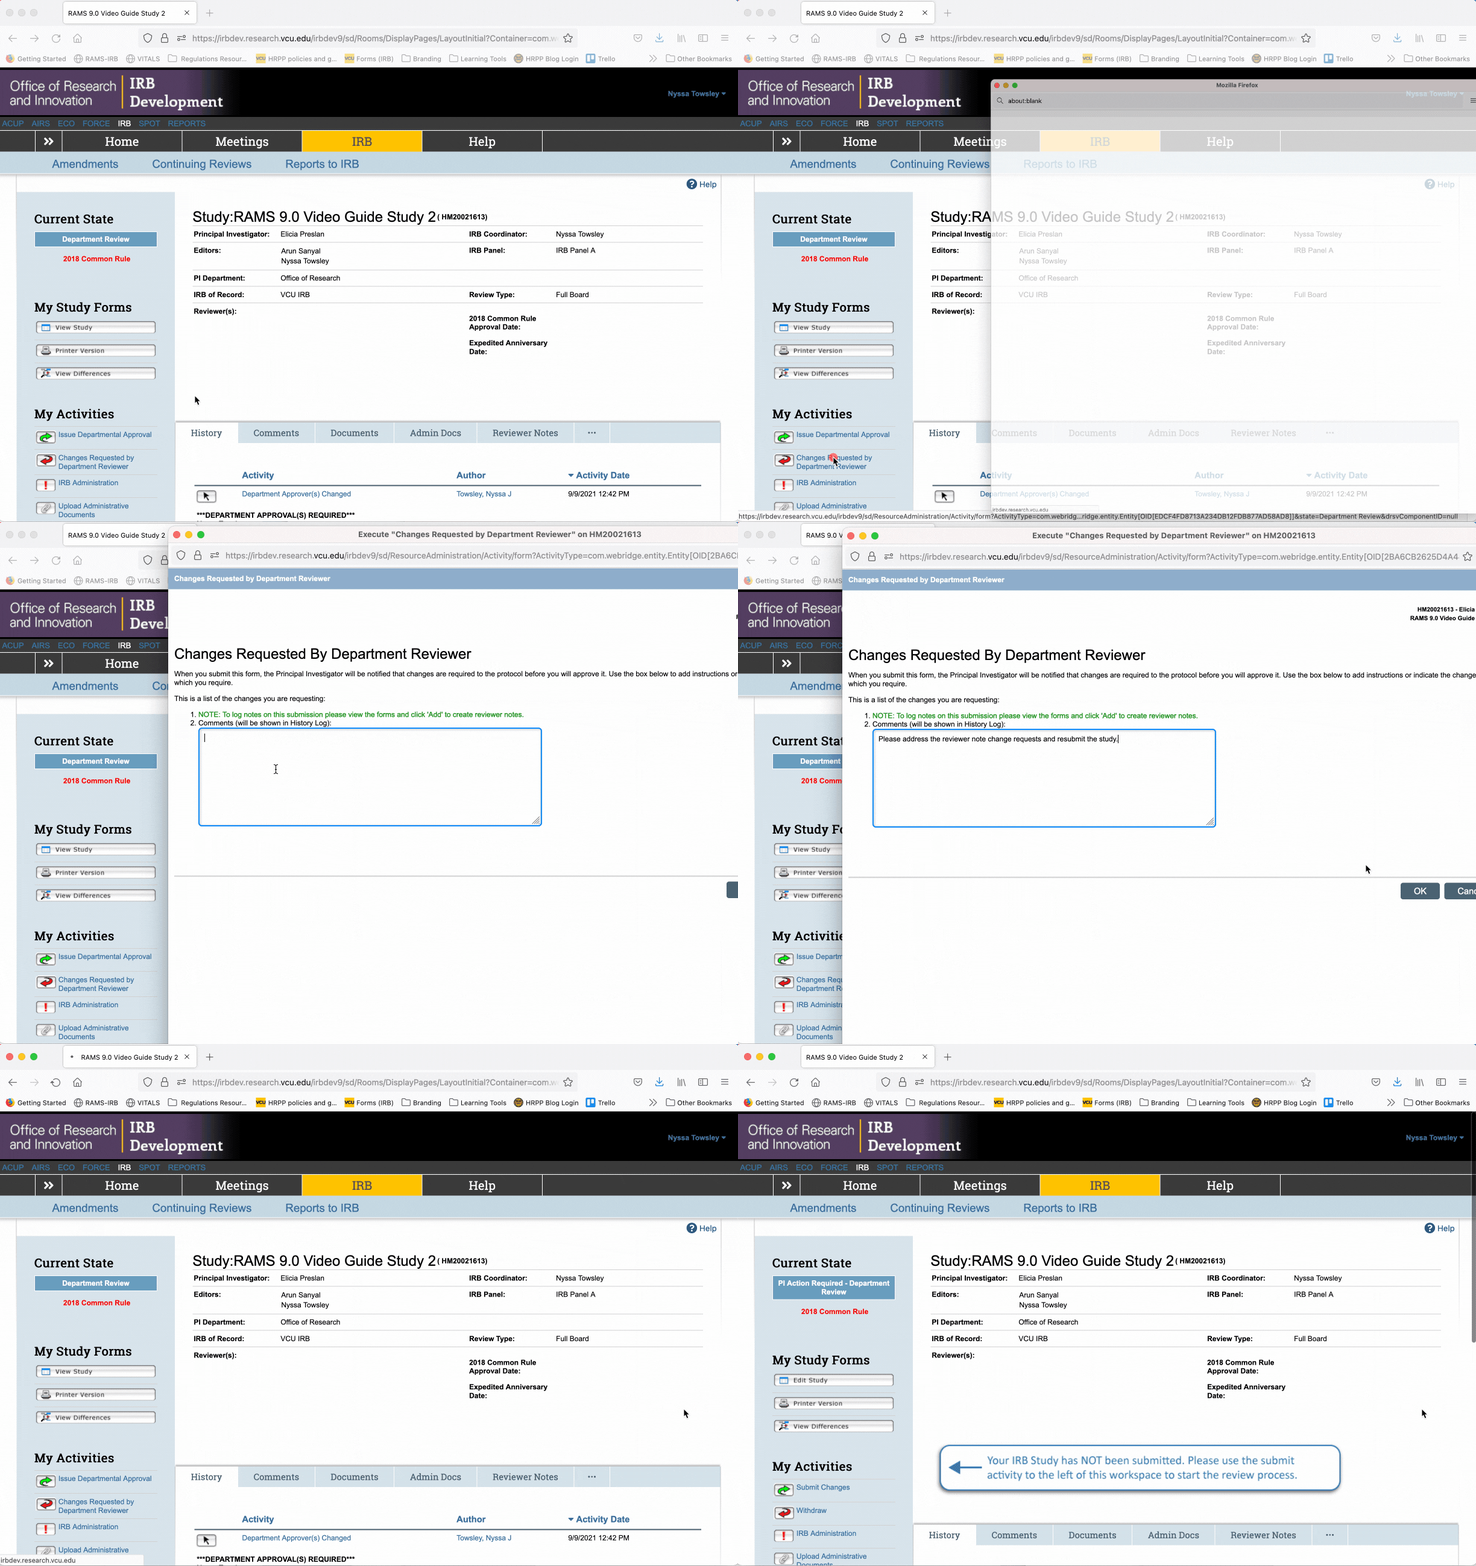
When you have finished reviewing and logging reviewer notes, return to the main study workspace. Click the “Changes Requested by Department Reviewer” button. In the pop-up window, enter any instructions or additional comments in the text box (not required), and click “OK.” This will send the study back to the PI for changes.
Viewing Changes
Once a study has been returned to you with changes, navigate to the main study workspace, and click “View Differences.” This will open a version of the SmartForm that denotes changes that have been made.
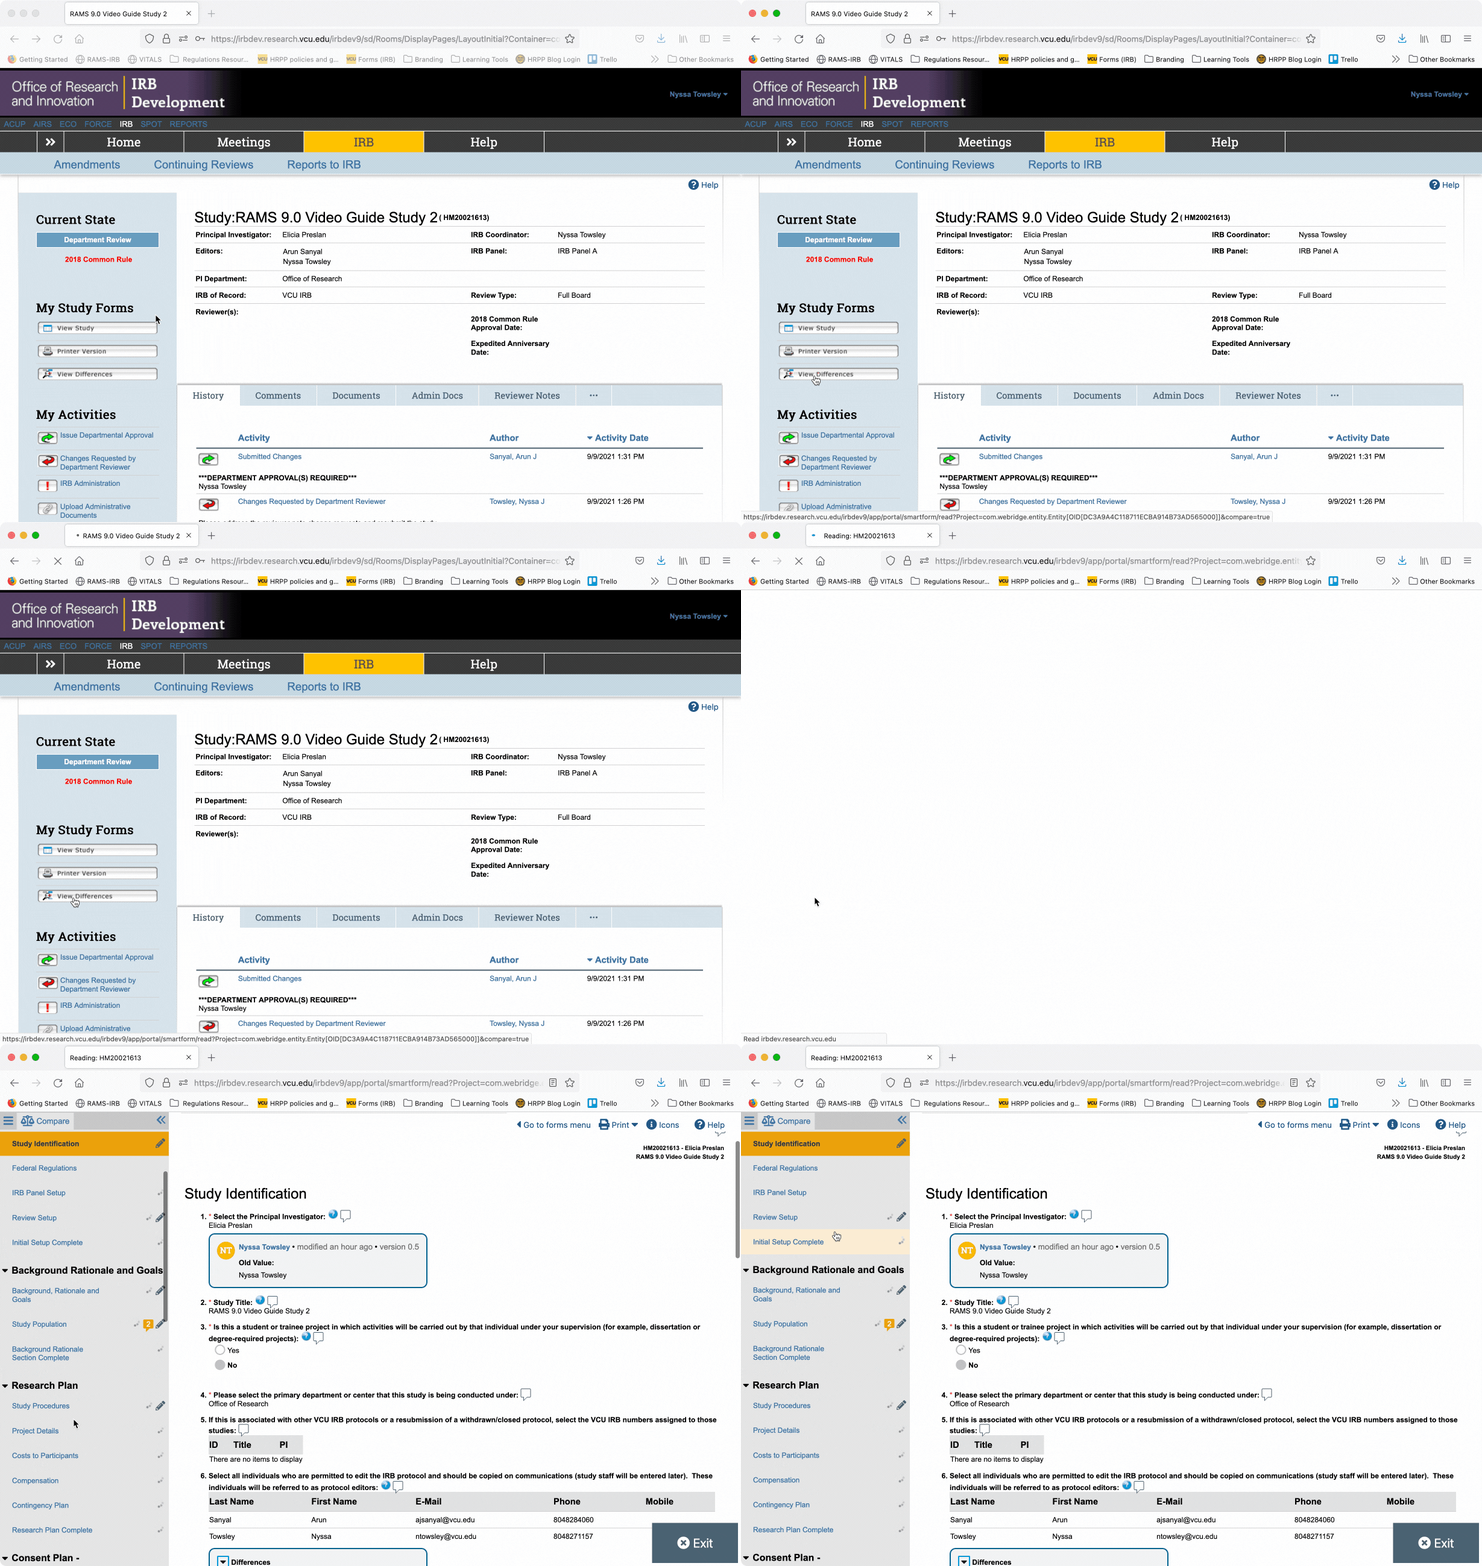
At the top of the navigation menu on the left side of the screen, the SmartForm will display first the most recent version of the SmartForm, and second will display the version of the SmartForm that is being compared against the most recent version (for example, to see changes made since the creation of the study, or to see changes made from earlier rounds of revisions). To change the compare version, click the carrot button to the left of the current compare version, then select the version you wish to compare with the most recent version from the drop-down menu.
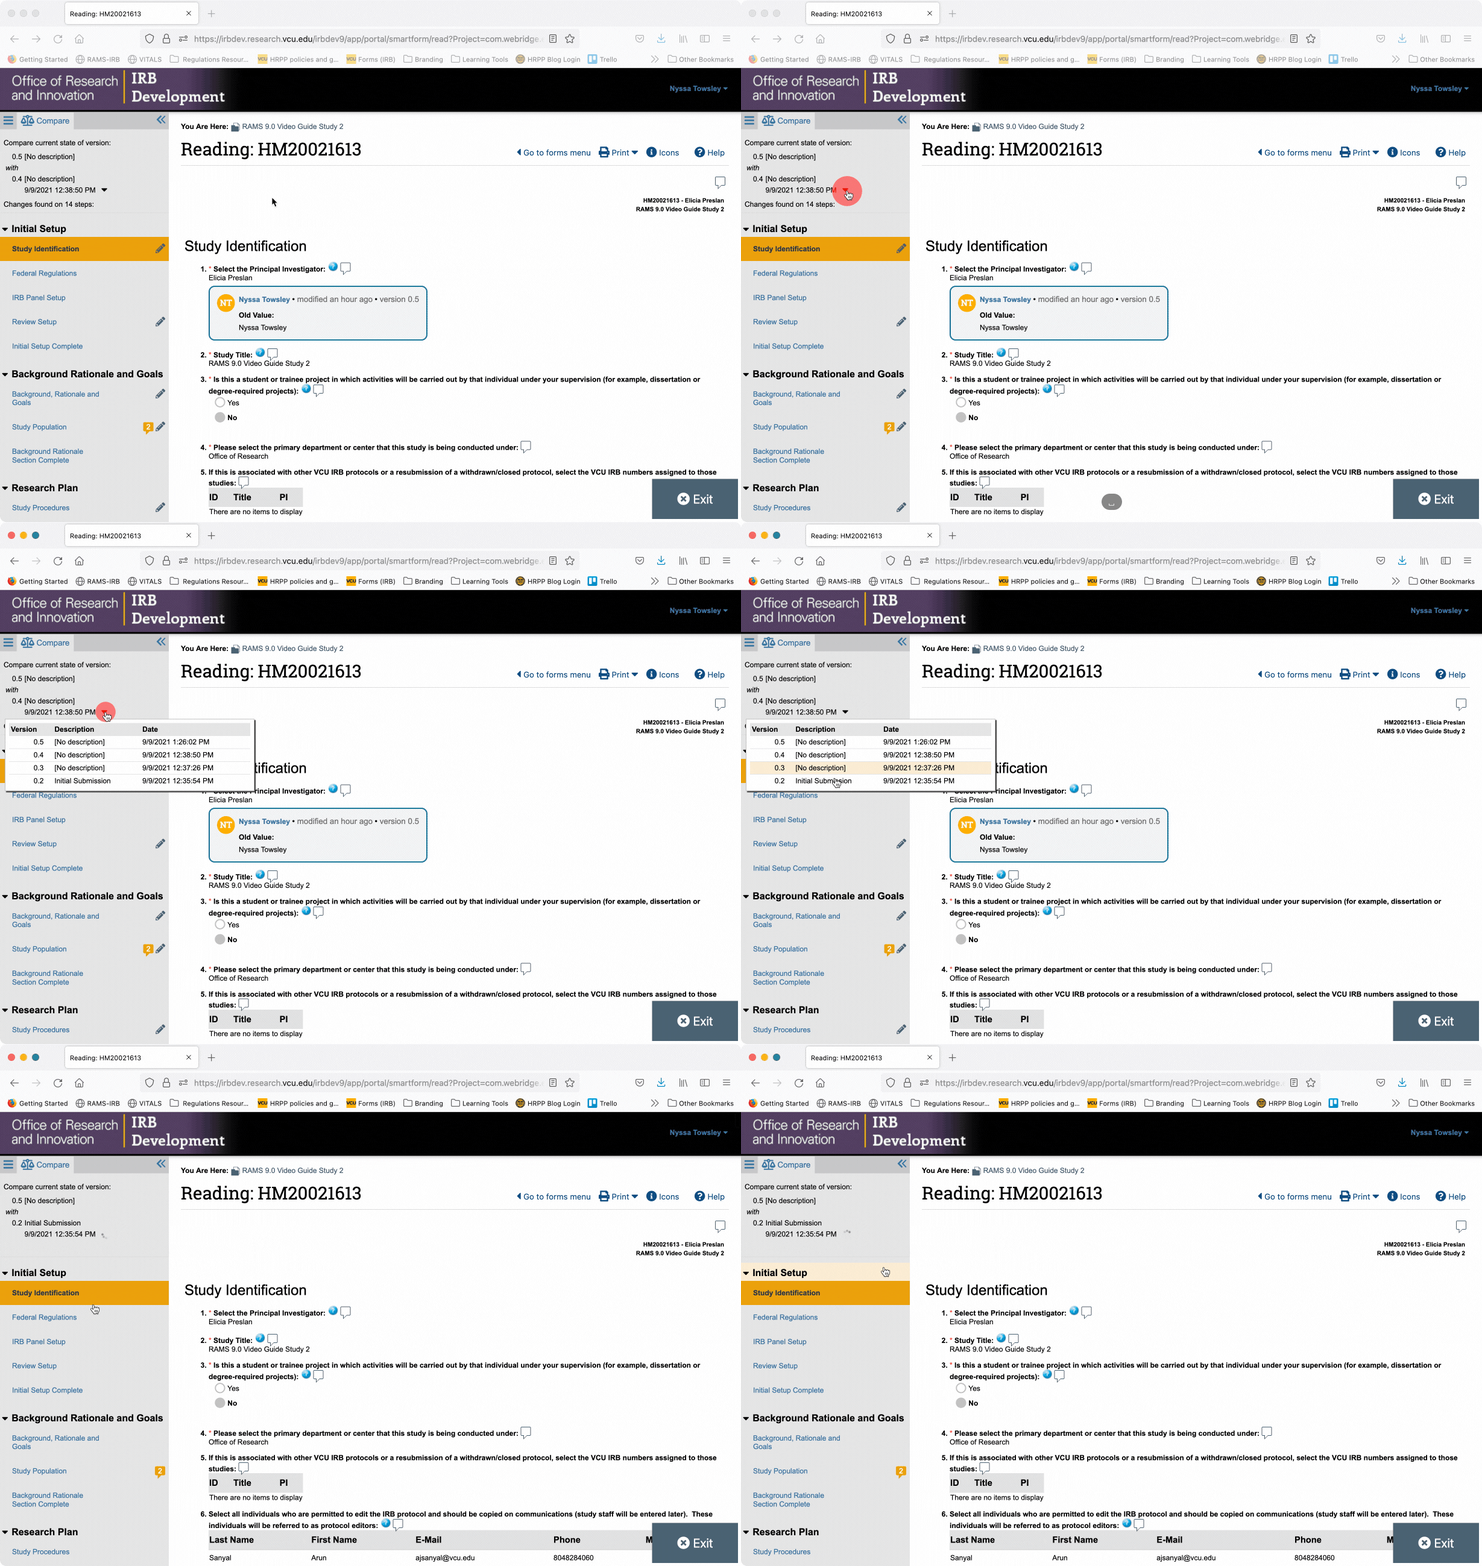
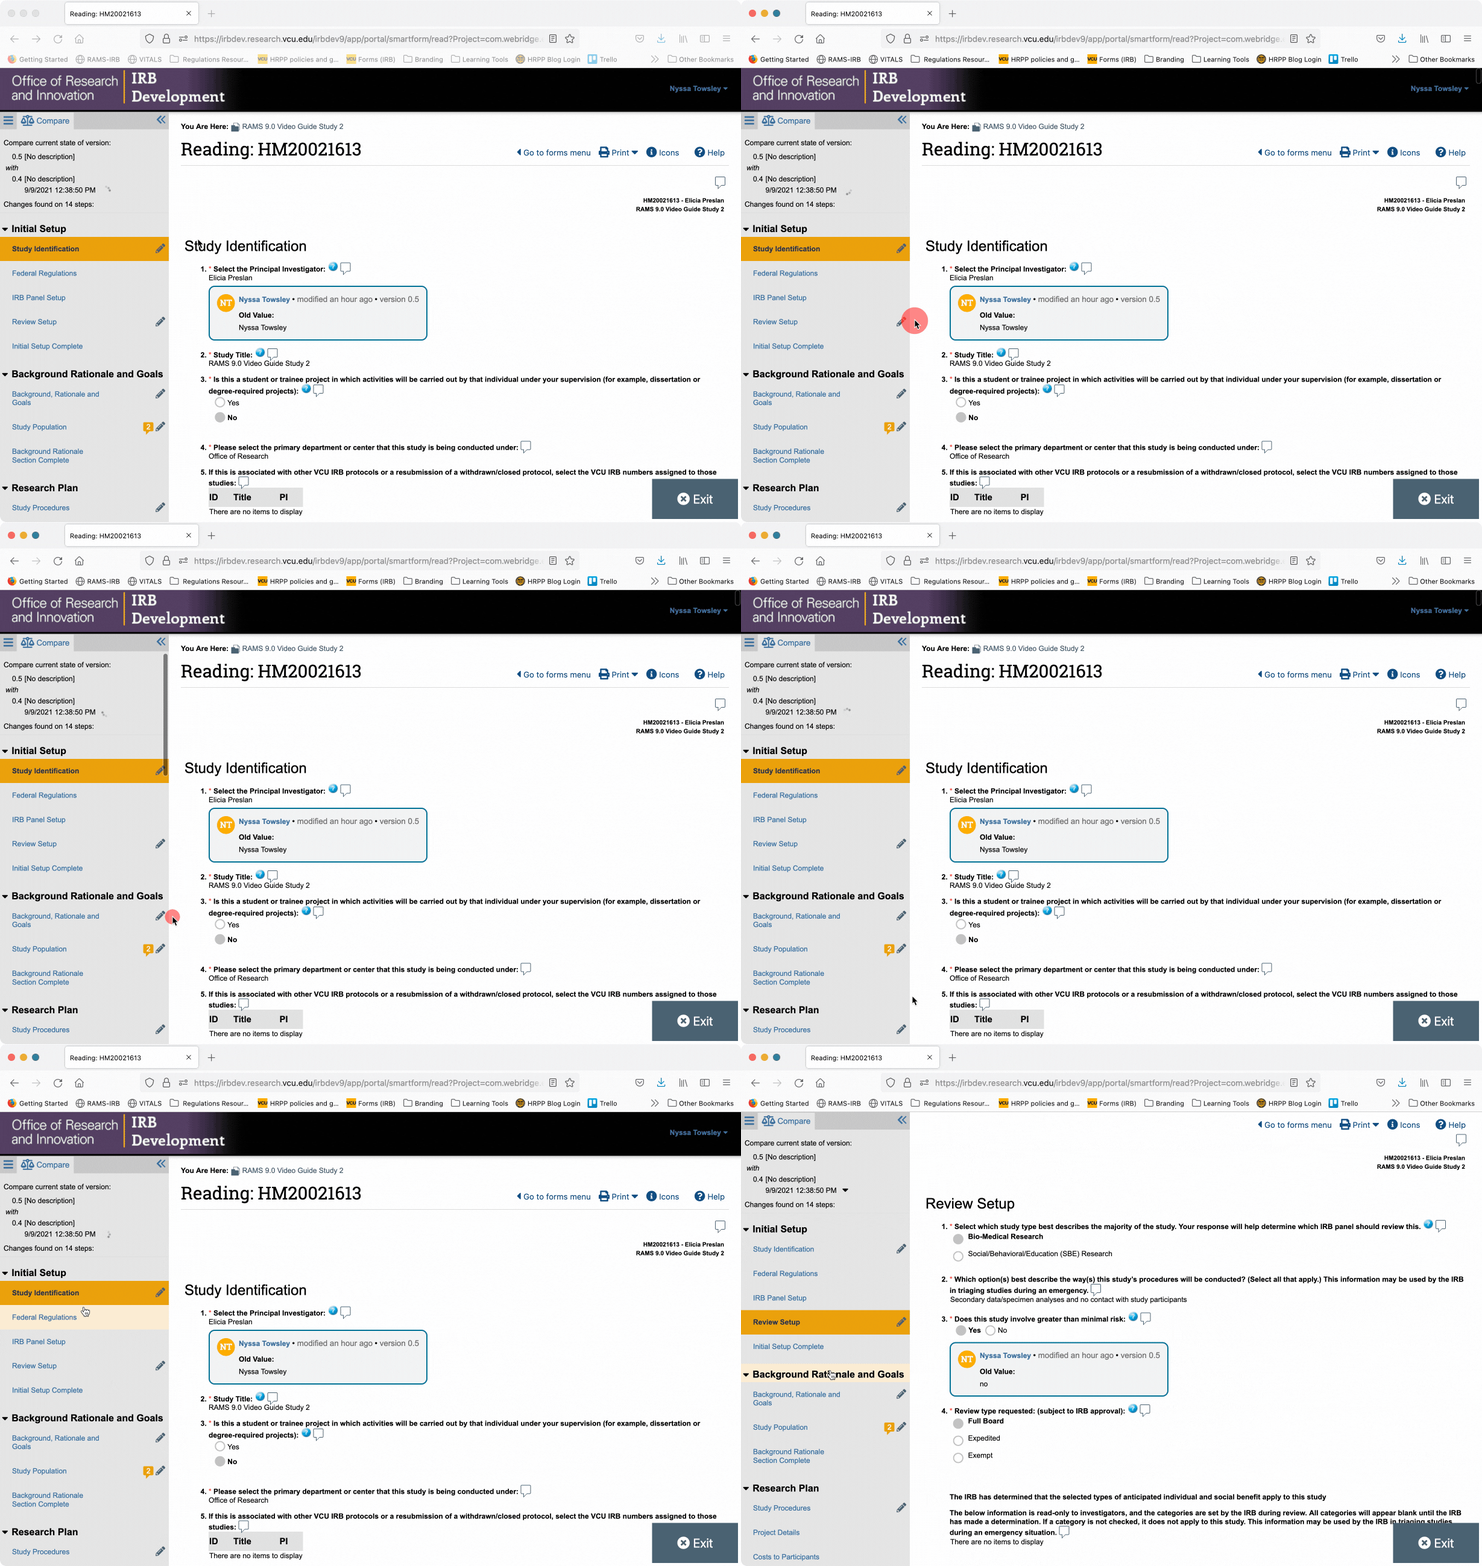
In View Differences mode, you will note that the navigation menu will display a pencil icon to the right of page names that contain changes on them. Click on those page names to be taken to the page with the change on it. You will also note that pages that contian reviewer notes also have the yellow speech bubble icon present, however, the red dot above the speech bubble icon is no longer present, indicating that the reviewer notes do not require action anymore.
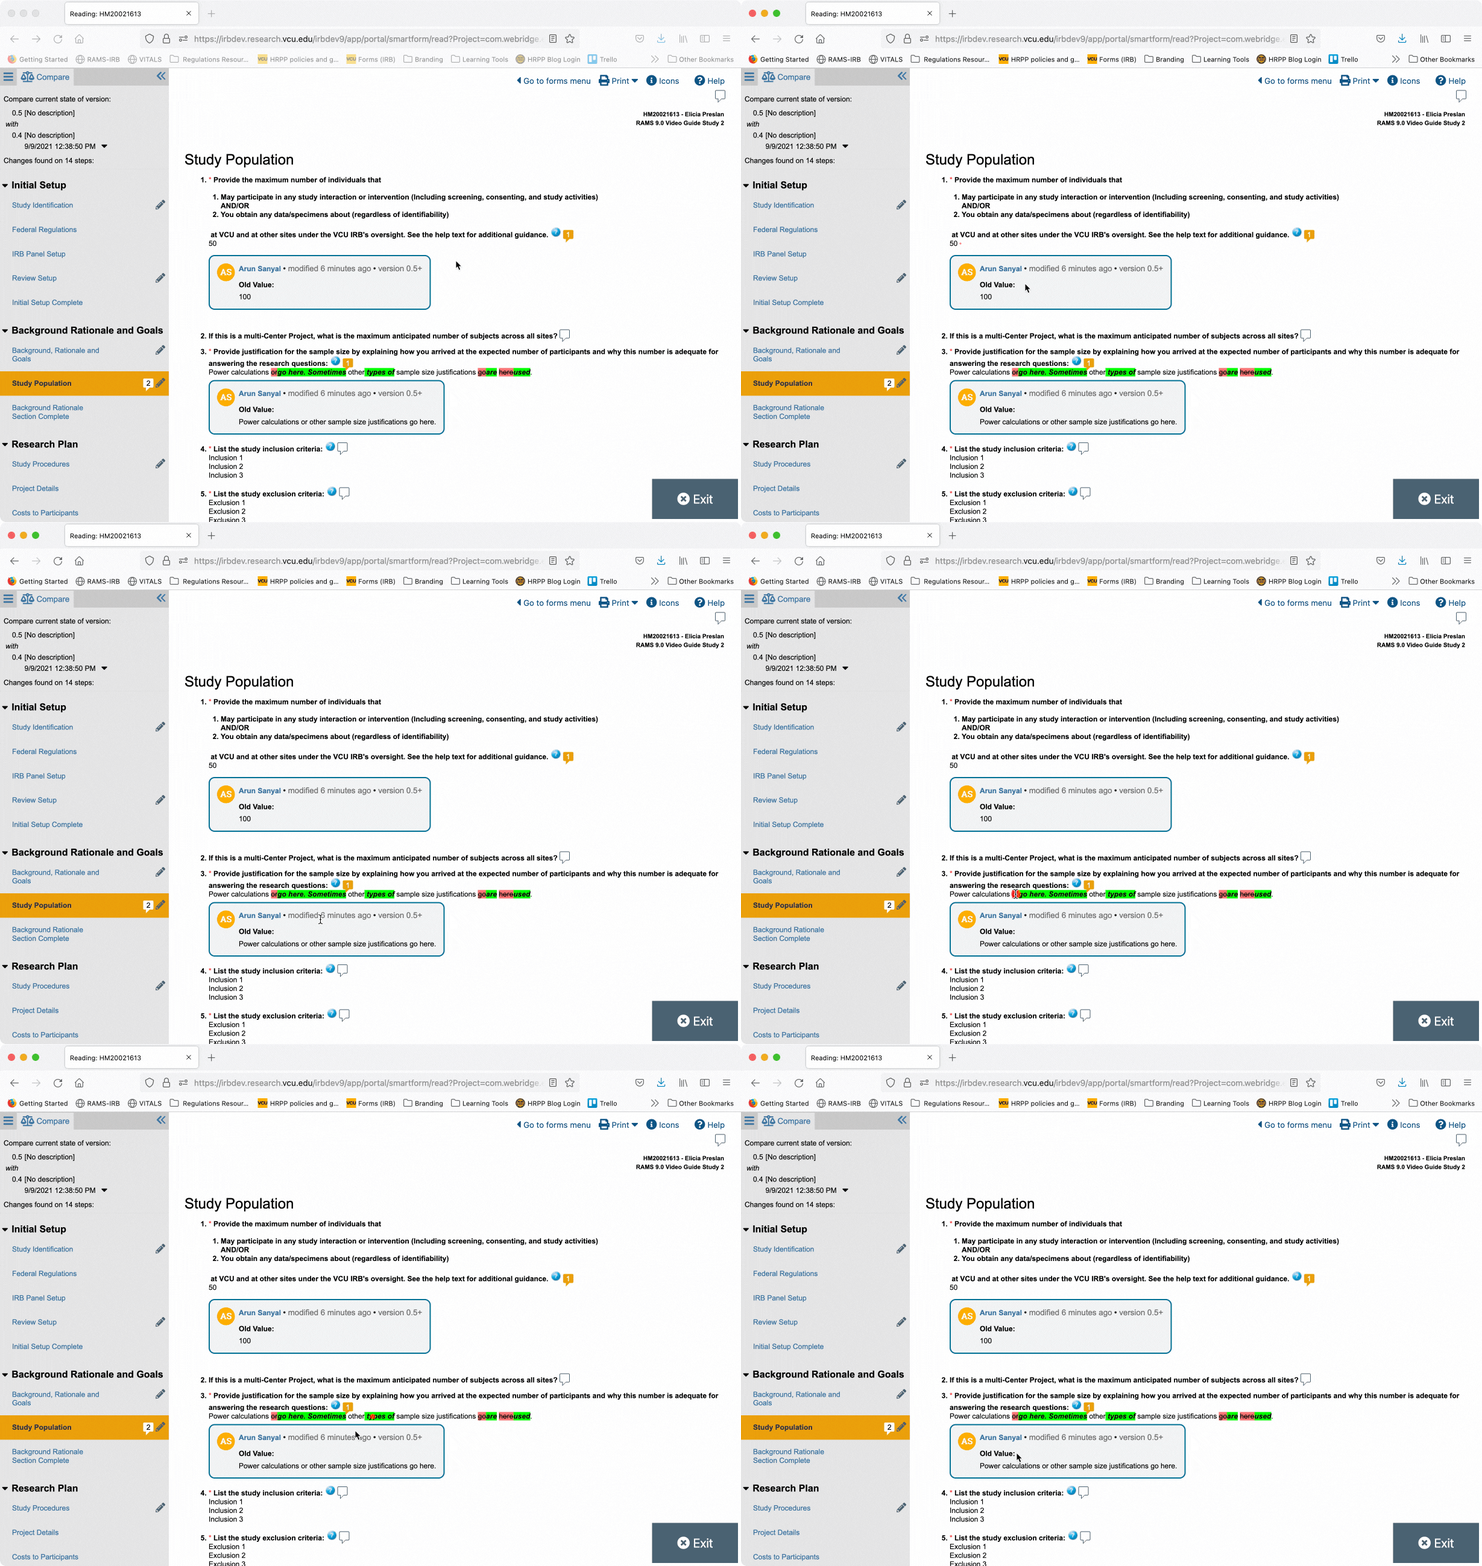
RAMS-IRB will highlight changes in text for you by providing the current response to a question and highlighting additions in green. The previous response to a question is shown immediately below, and text deletions are highlighted in red and have a strikethrough.
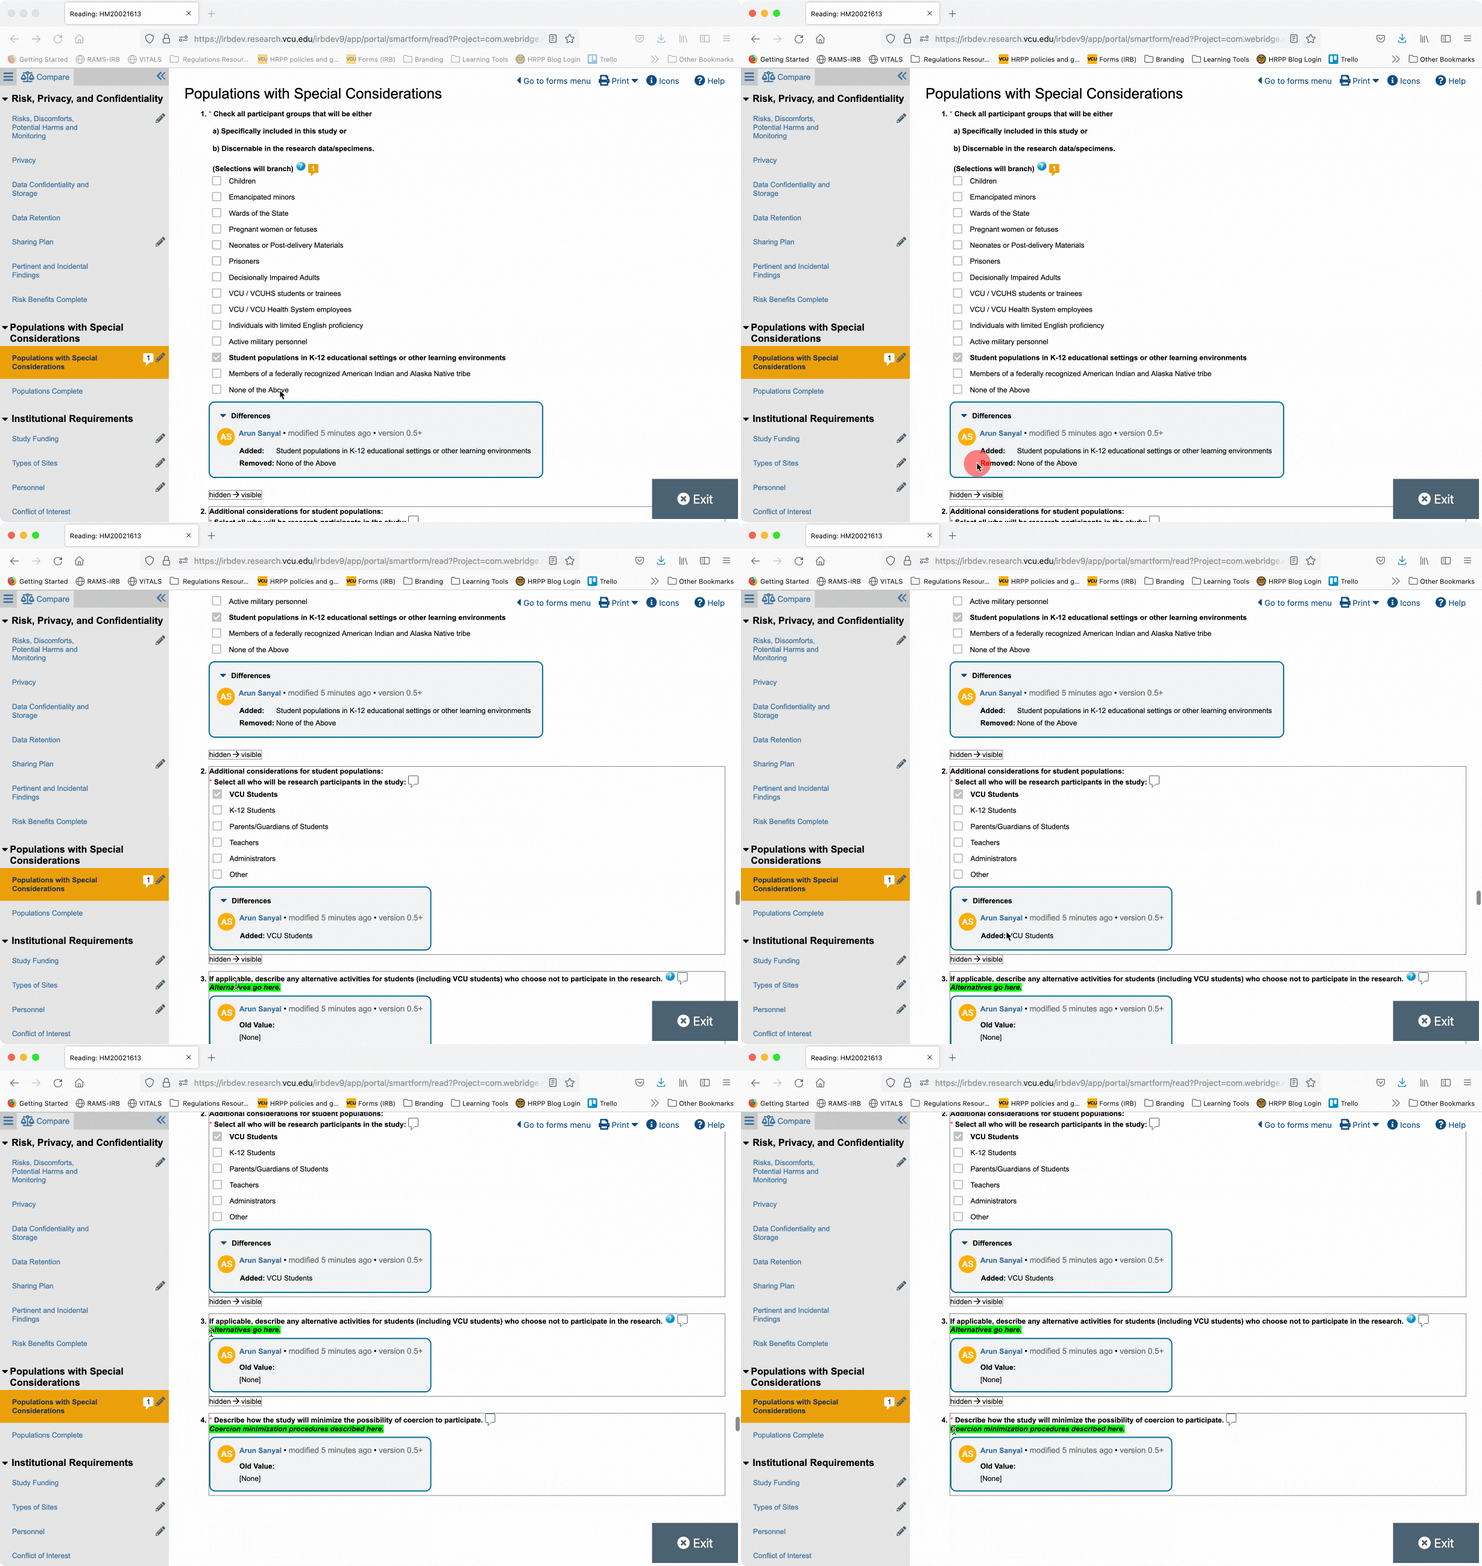
RAMS-IRB will highlight checkbox changes by indicating below the question response any checkboxes that were added, as well as any checkboxes that were removed. If checking any boxes cause previously hidden fields to appear, you will see the icon “hidden –> visible” above the questions that were made visible by branching logic. The new responses to those previously hidden questions will be highlighted in green.
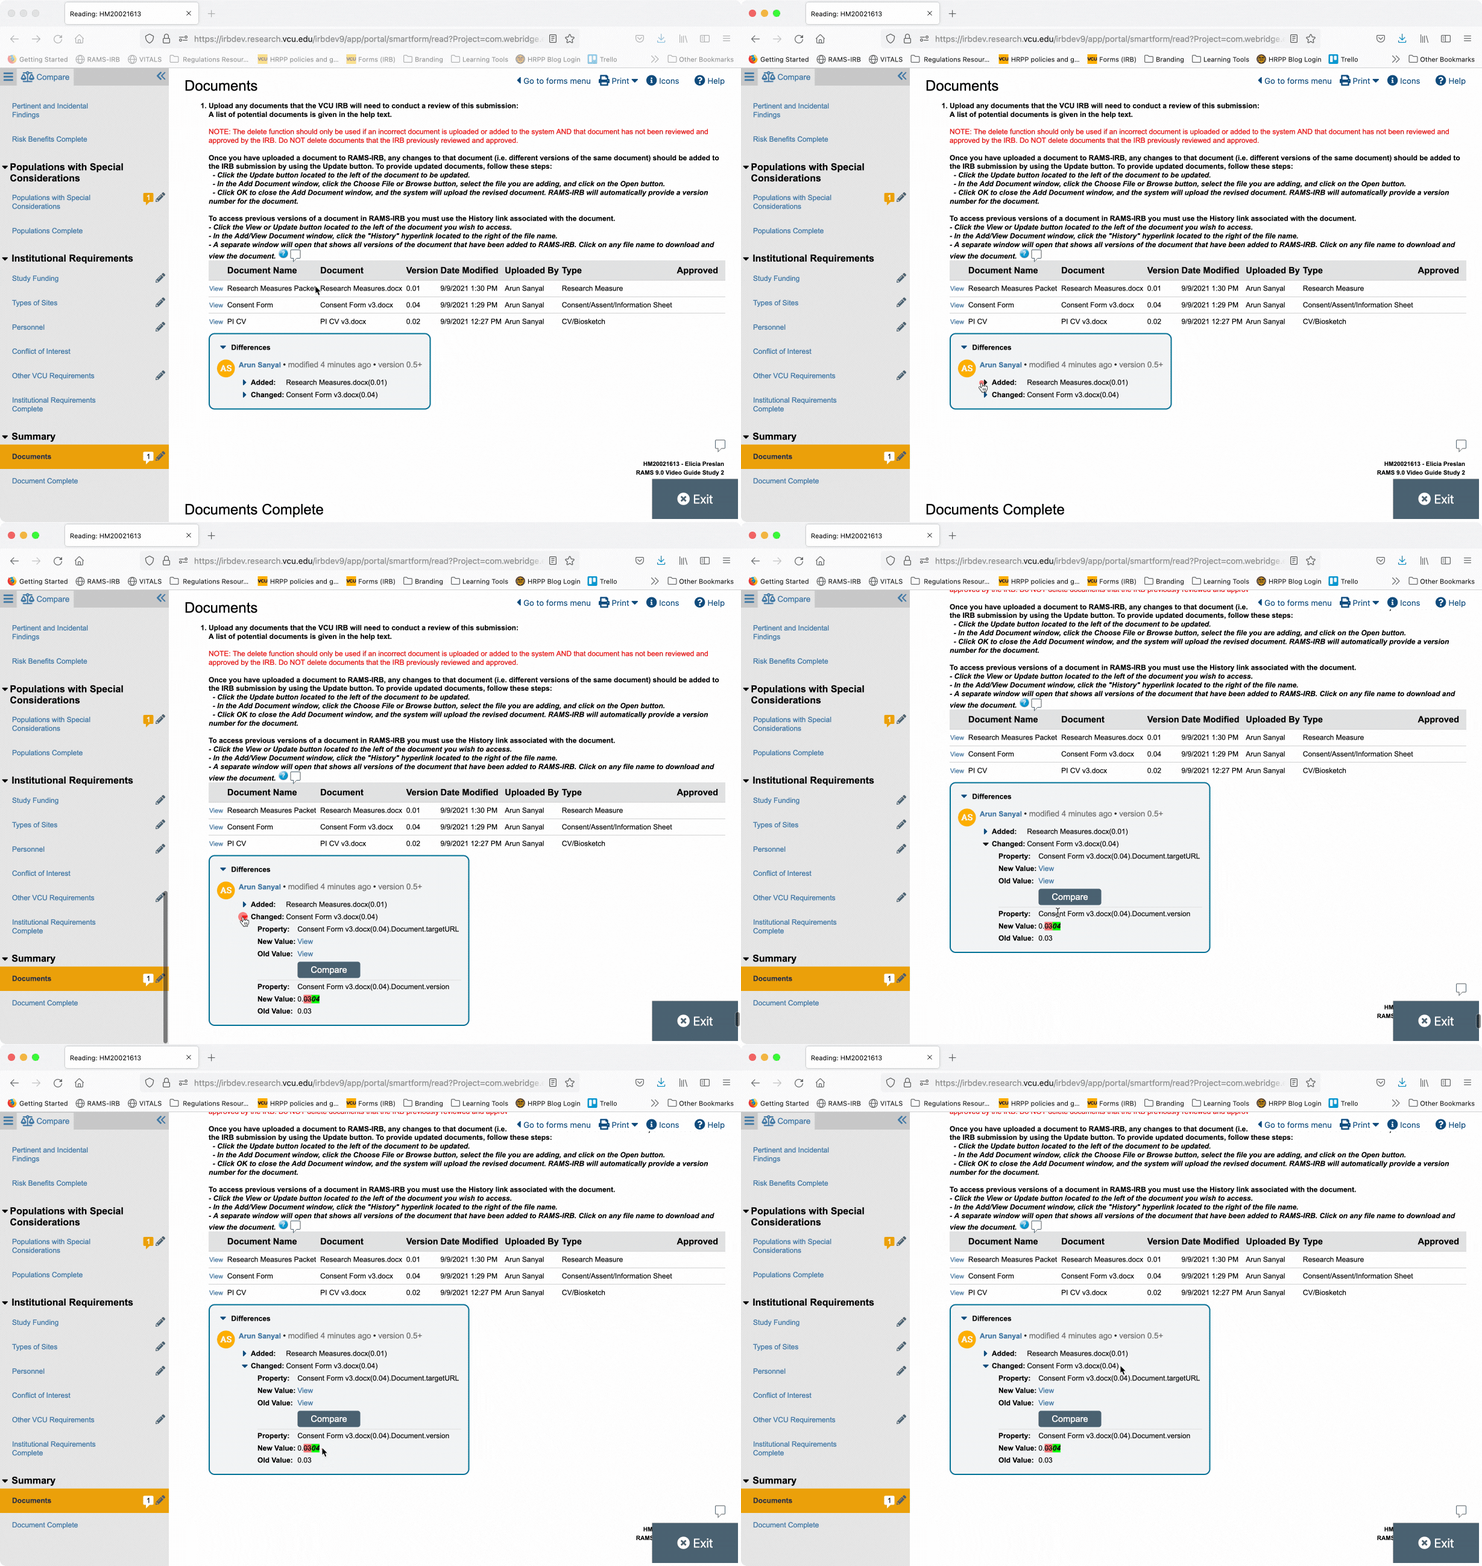
Document changes will appear on any page that has a document upload on it. Documents that were newly added will appear next to the text “Added.” Documents that were modified (had a new version(s) uploaded) will appear next to the text “Changed.” Click the carrot icon to the left of “Changed” to view more information about the changes made to that document.
Viewing Responses to Reviewer Notes
In addition to viewing changes made to the SmartForm, you will also want to view any responses the investigator made to you reviewer notes.
To view reviewer note responses, open the reviewer note dialogue by clicking on the speech bubble icon at the end of the question text where the reviewer note was logged. In the dialogue, click “Show Reply” underneath the reviewer note text, and any replies to the reviewer note from the investigator will appear as a thread beneath that reviewer note.
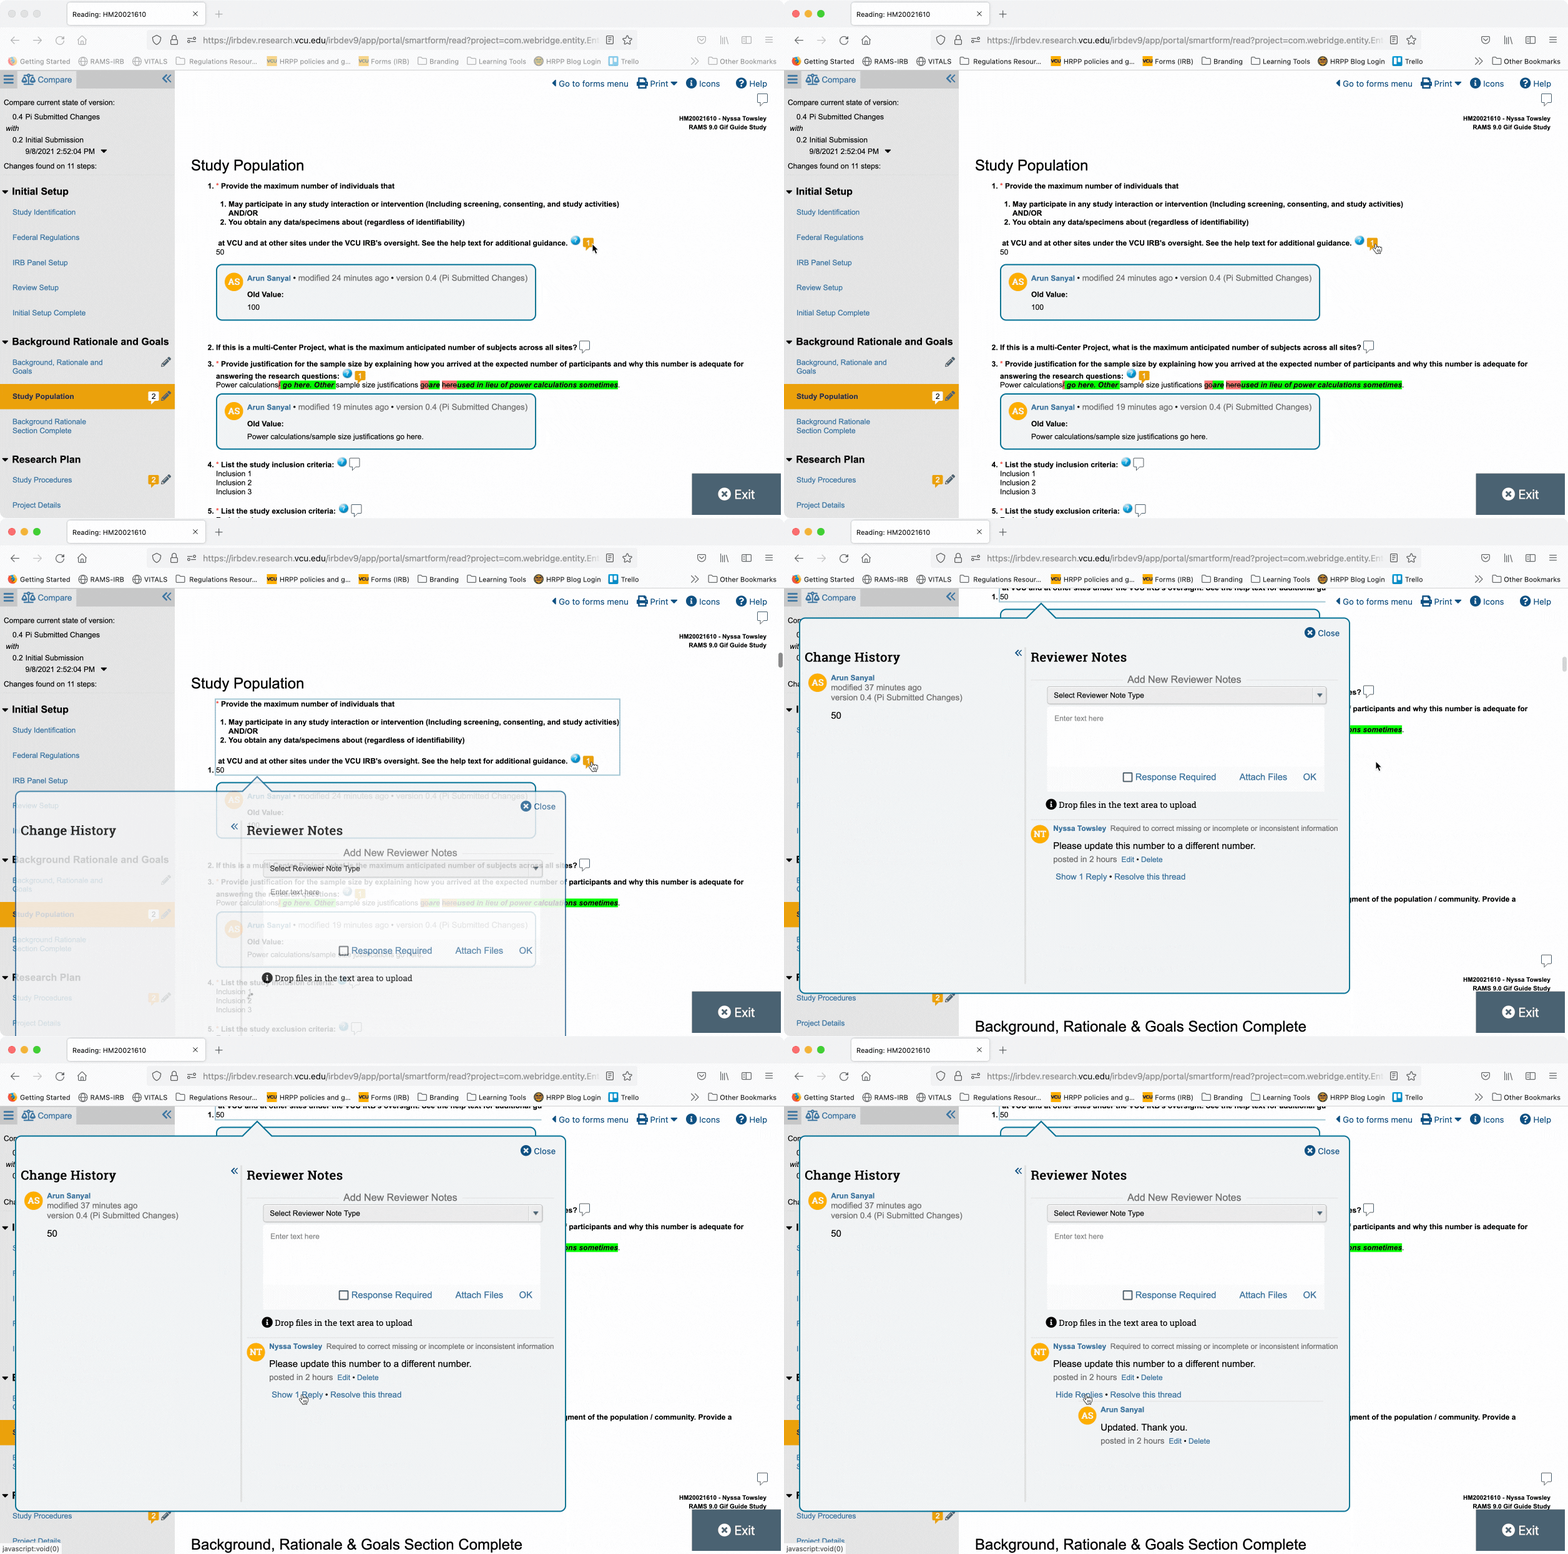
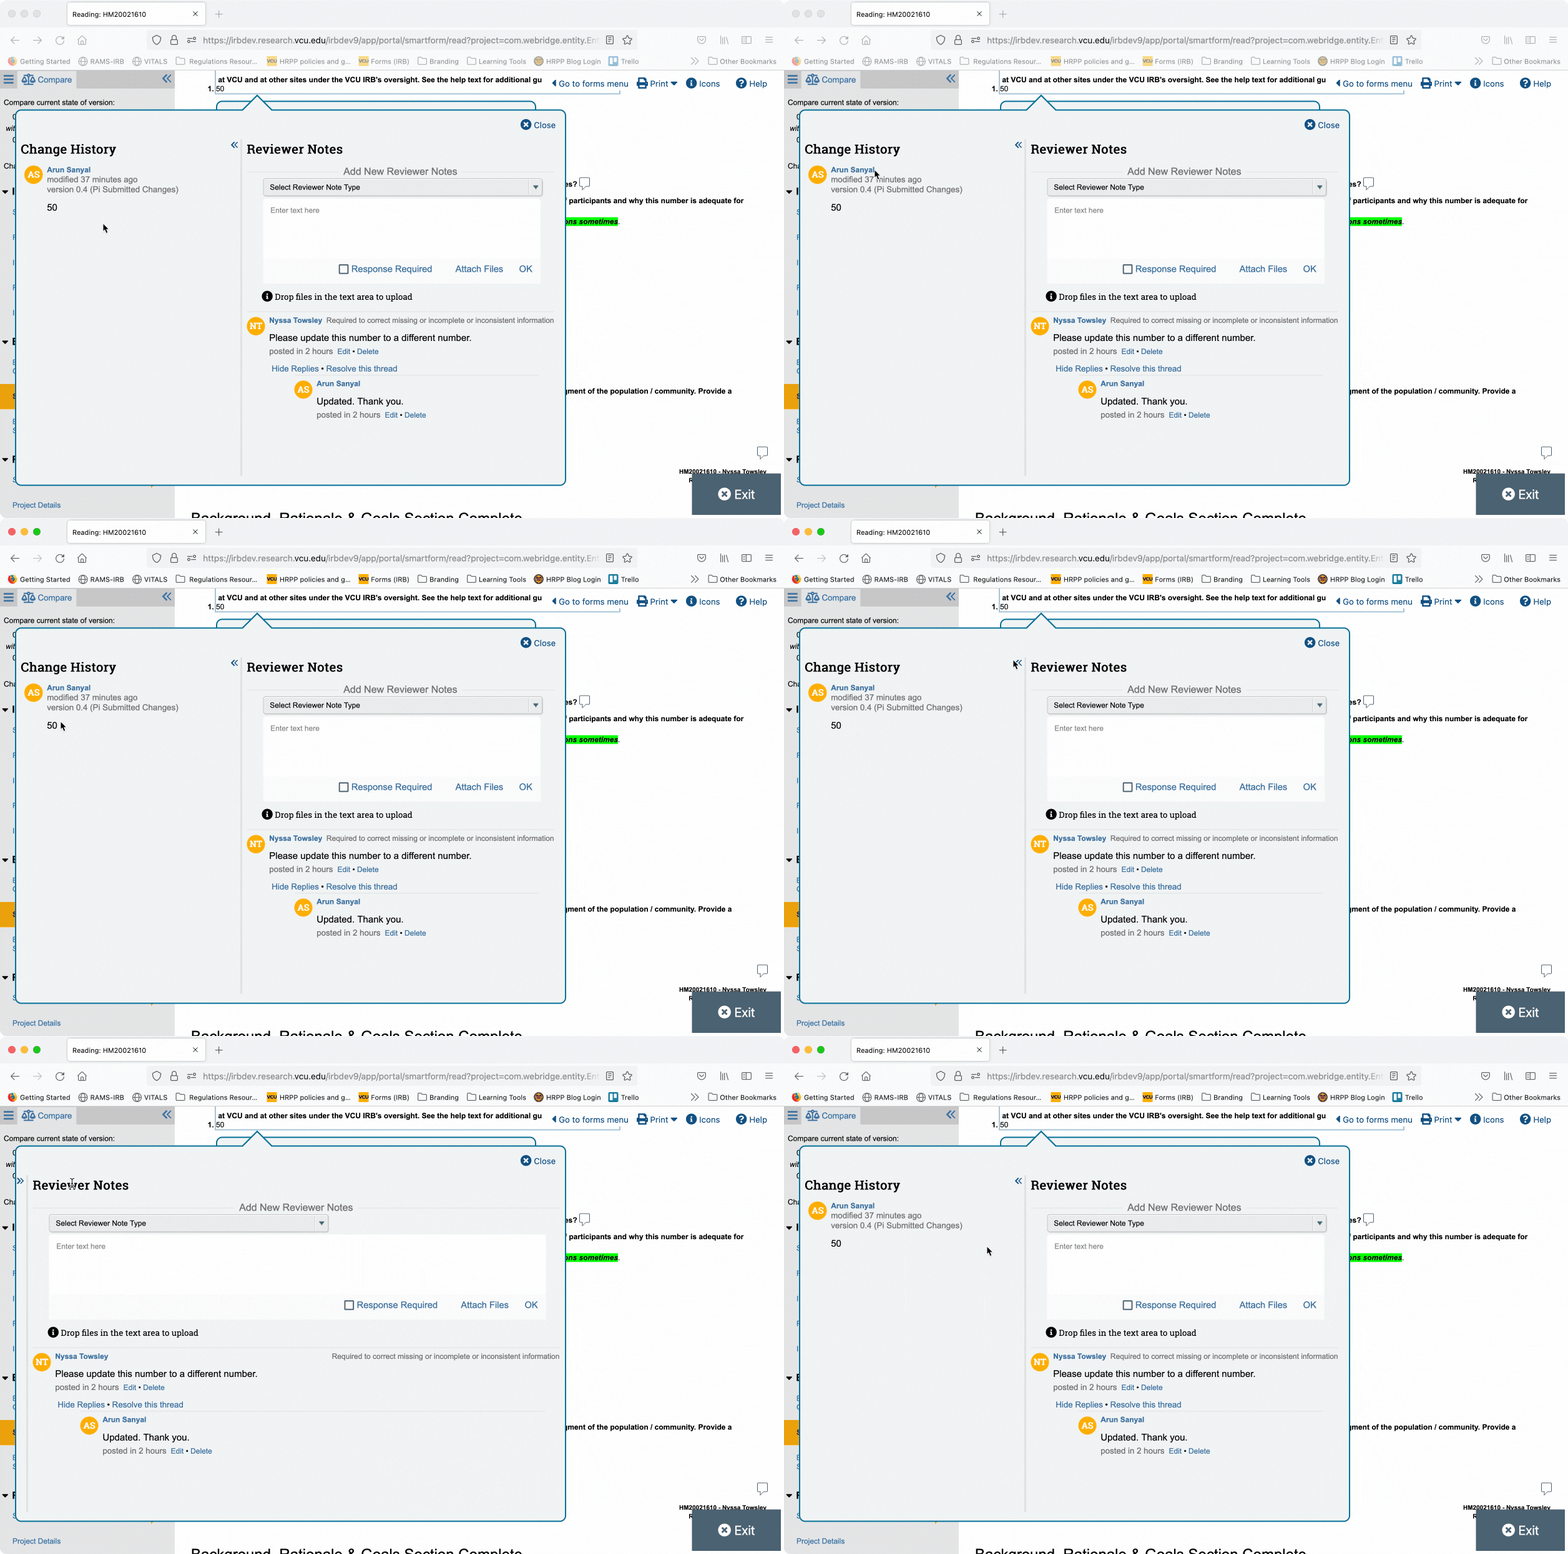
Within the reviewer note dialogue, you will note that to the left of the reviewer notes interface, is a section called “Change History.” Changes that were made to the question the reviewer note was logged on will appear here. You can hide the Change History section by clicking the “<<” button to the right of the “Change History” heading. You can re-expand the Change History section by clicking the “>>” button in the upper left corner of the reviewer note dialogue. This is another way to view changes made to a specific question.
To close the reviewer note dialogue, click the “close” button in the upper right corner of the dialogue.
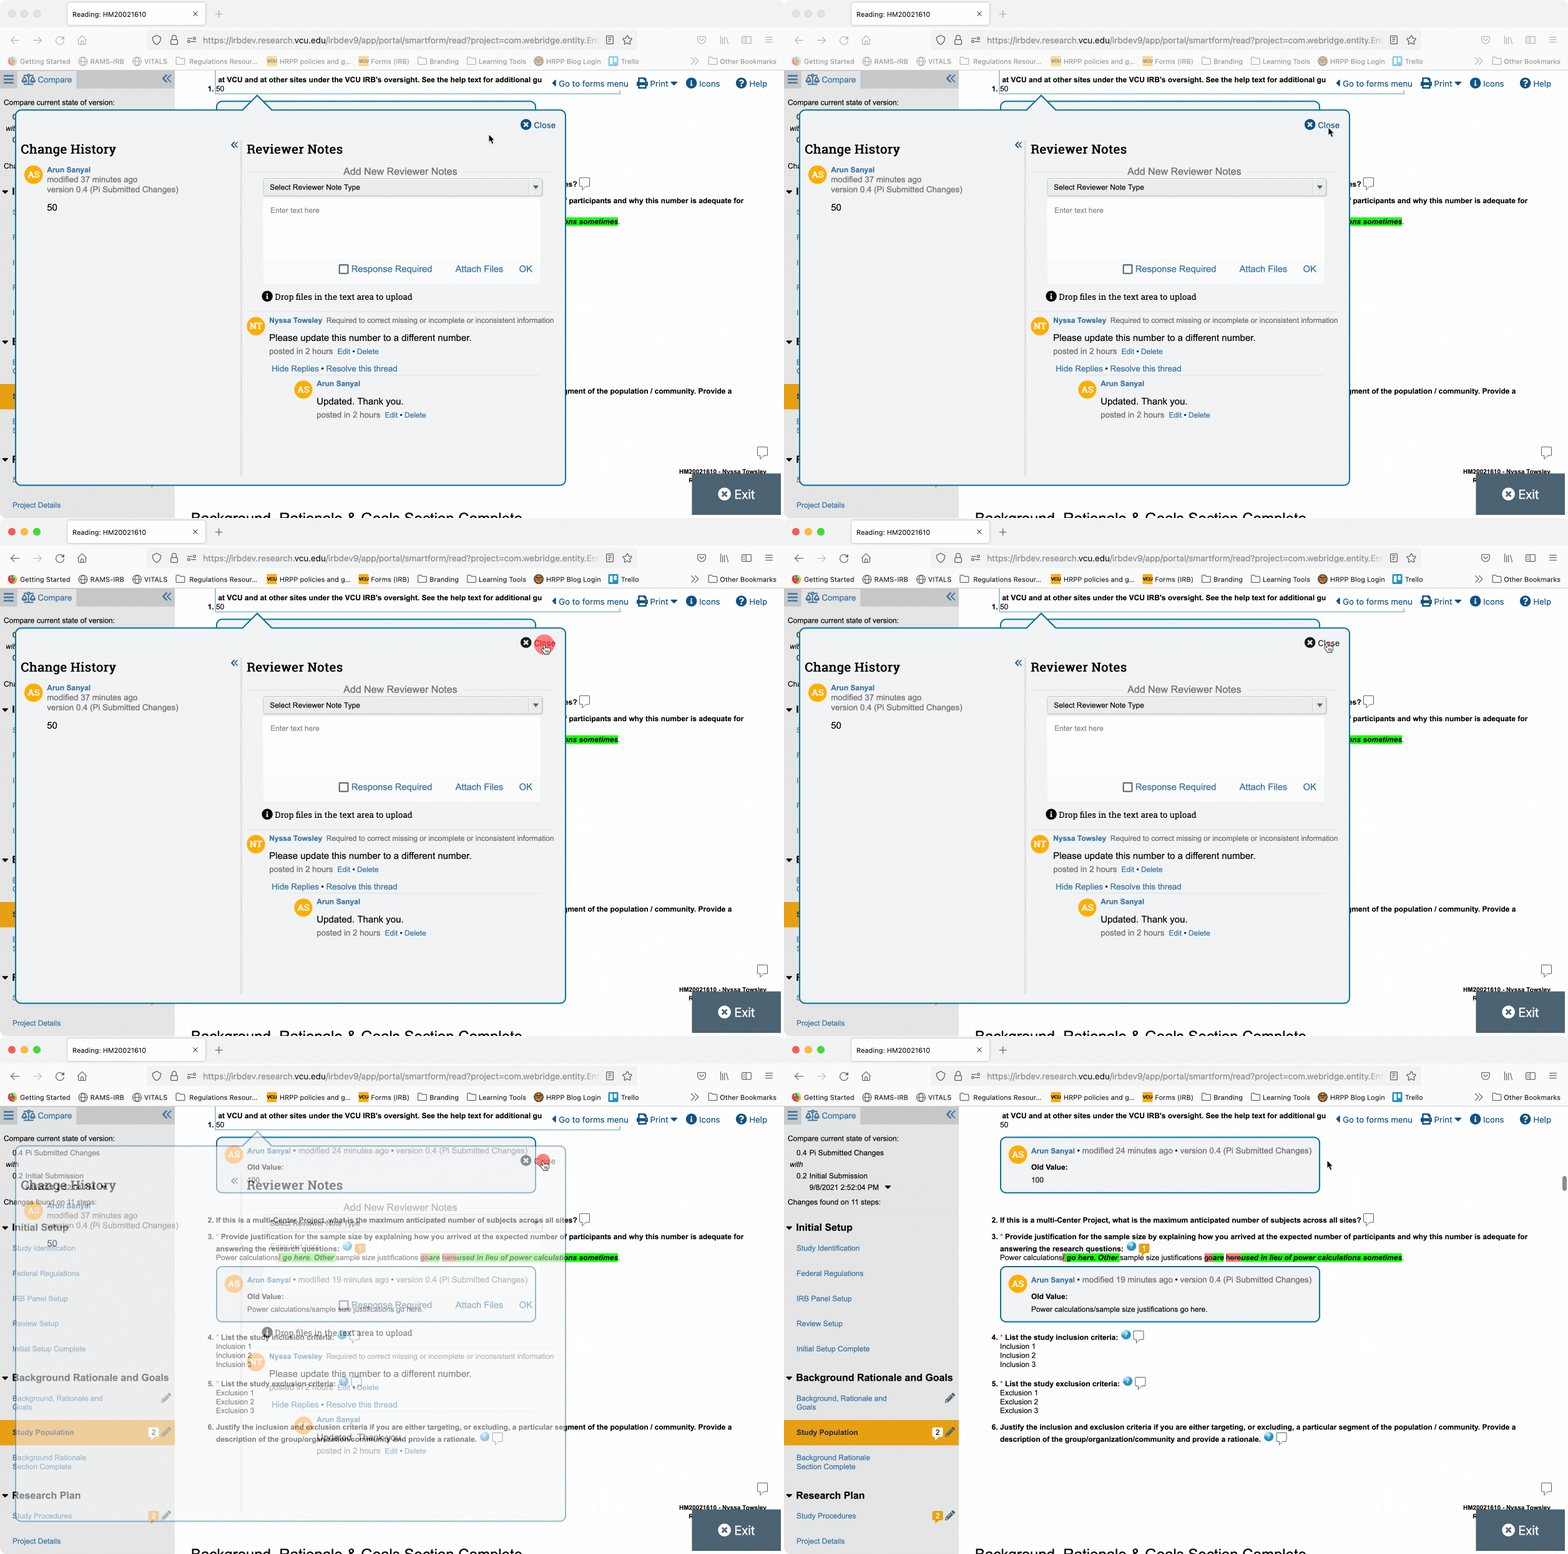
Viewing page-level reviewer notes is the same. Locate the speech bubble icon at the top of the relevant SmartForm page, and click on it to open the reviewer note dialogue. Viewing replies and closing the page-level reviewer note is the same as for question-level reviewer notes.
Resolving Reviewer Note Threads
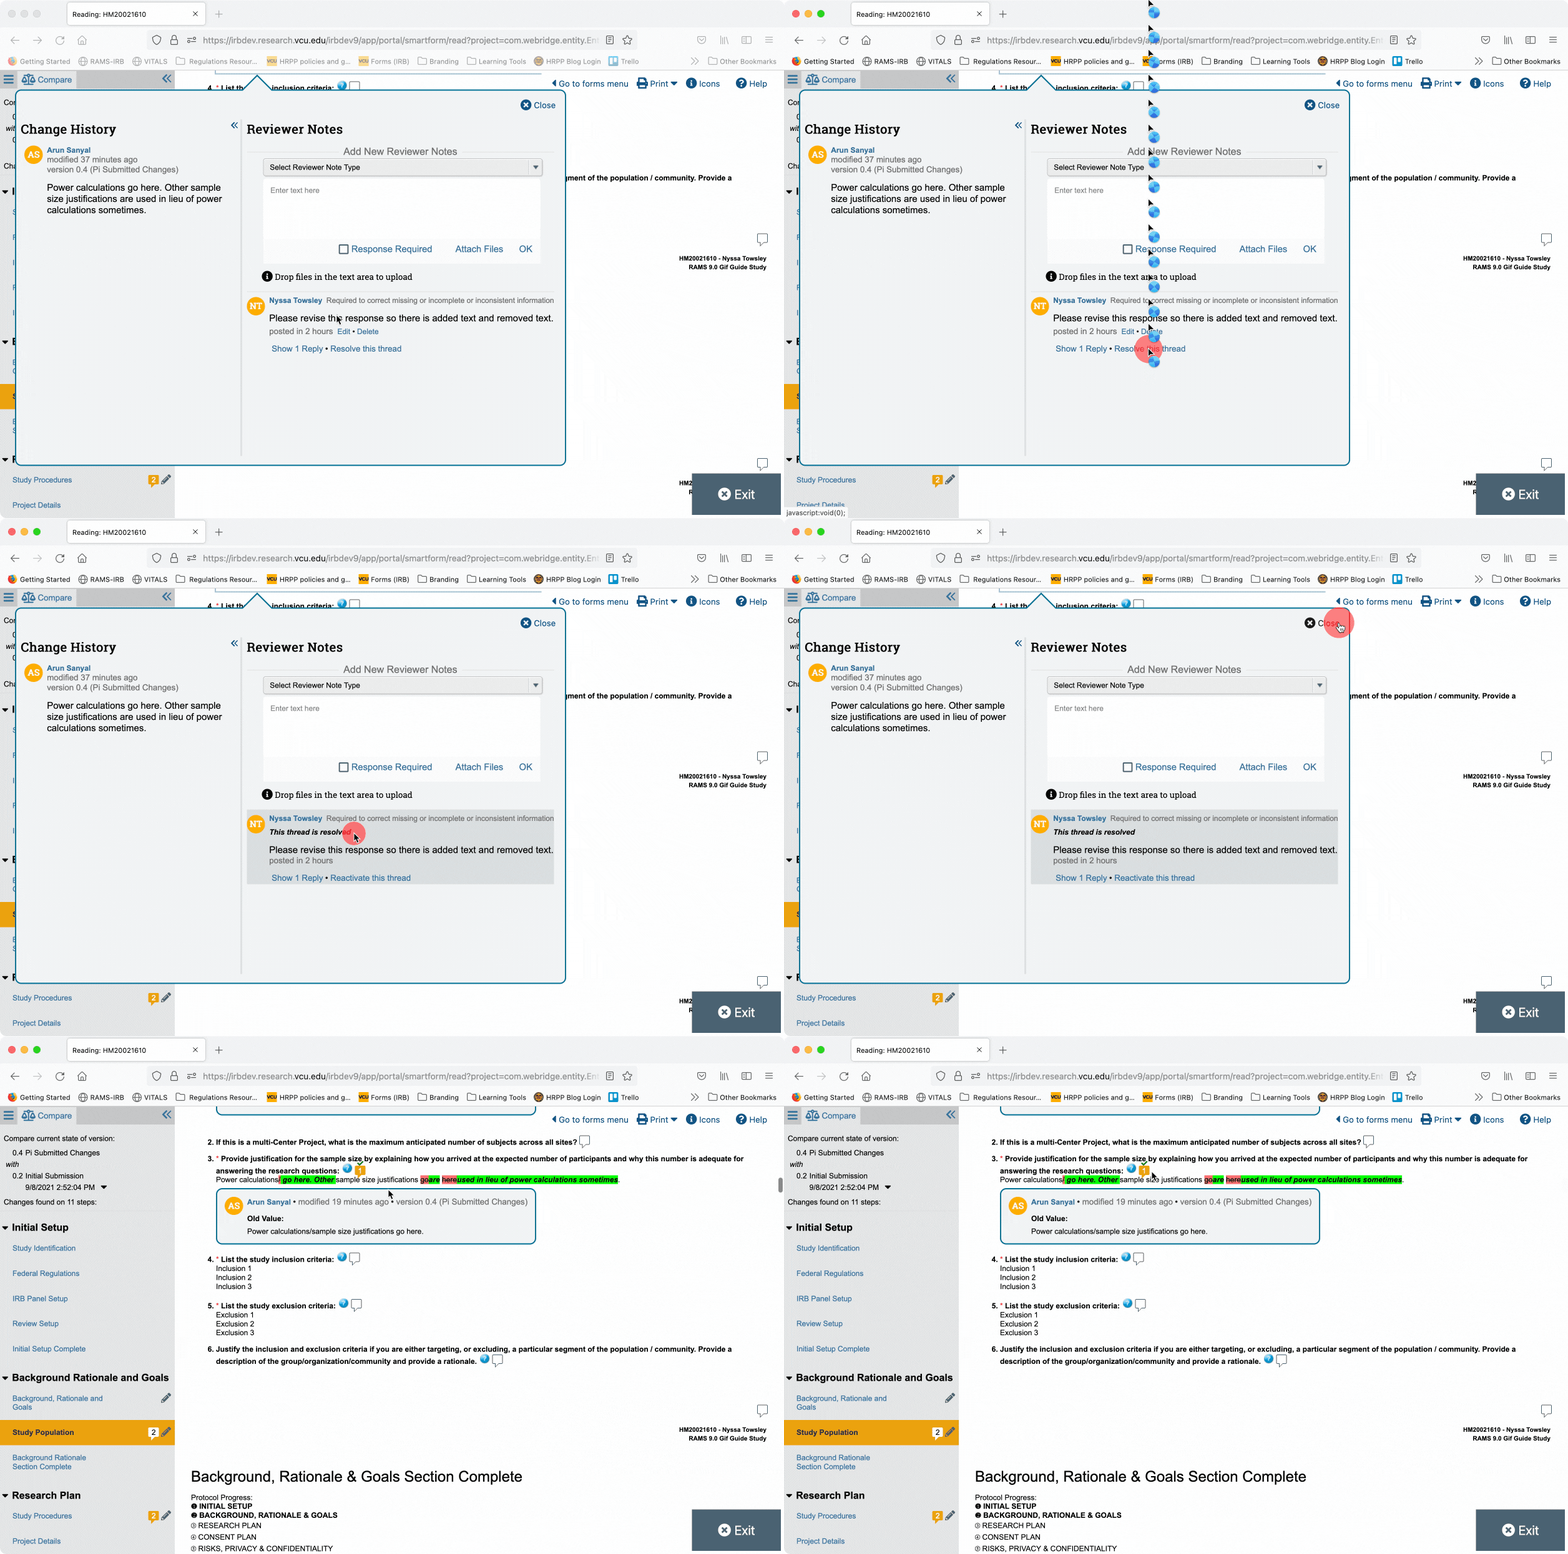
Once a reviewer note has been responded to, and the relevant changes were made and confirmed by you, the department reviewer has the option to “resolve” a reviewer note thread. Resolving a thread has two impacts: (1) it prevents investigators from editing current reviewer note responses and prevents them from adding new responses; and (2) it changes the speech bubble icon so that it has a green checkmark above it. This symbol indicates that all reviewer notes logged on that question/page have been resolved.
To resolve a reviewer note thread, navigate to that thread in the reviewer note dialogue, and click “Resolve this thread” below the reviewer note you wish to resolve. This will close replies, and the text “This thread is resolved” will appear within the reviewer note.
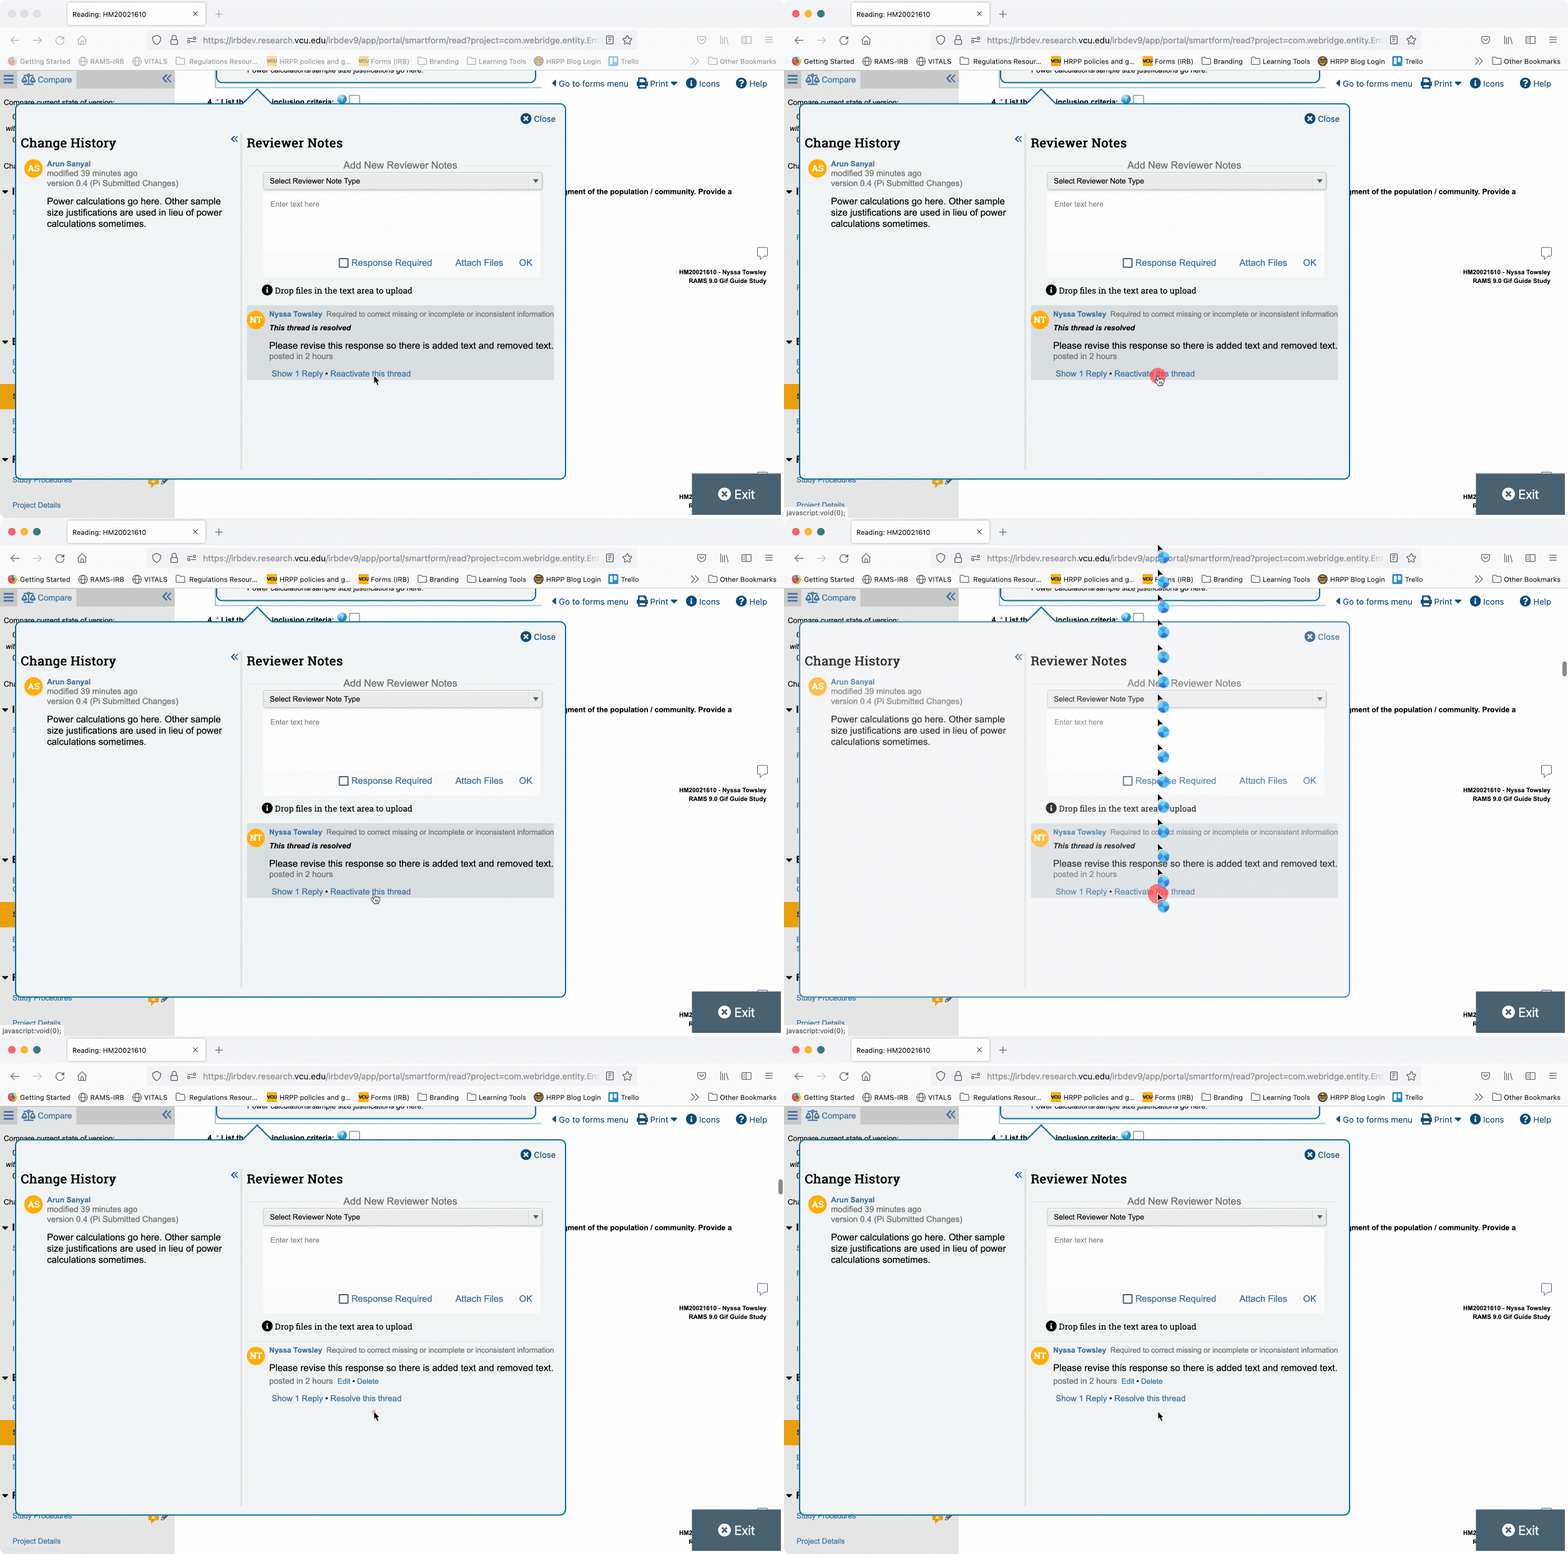
Reviewer note threads that have been resolved may be re-opened at any time by the reviewer. To re-open a reviewer note thread, open the reviewer note dialogue, and click “Reactivate this thread” beneath the reviewer note you wish to reactivate. This will re-open the reviewer note for further replies from the investigator, and the green checkmark above the speech bubble icon that corresponds to the reviewer note will disappear.
Issuing Department Approval
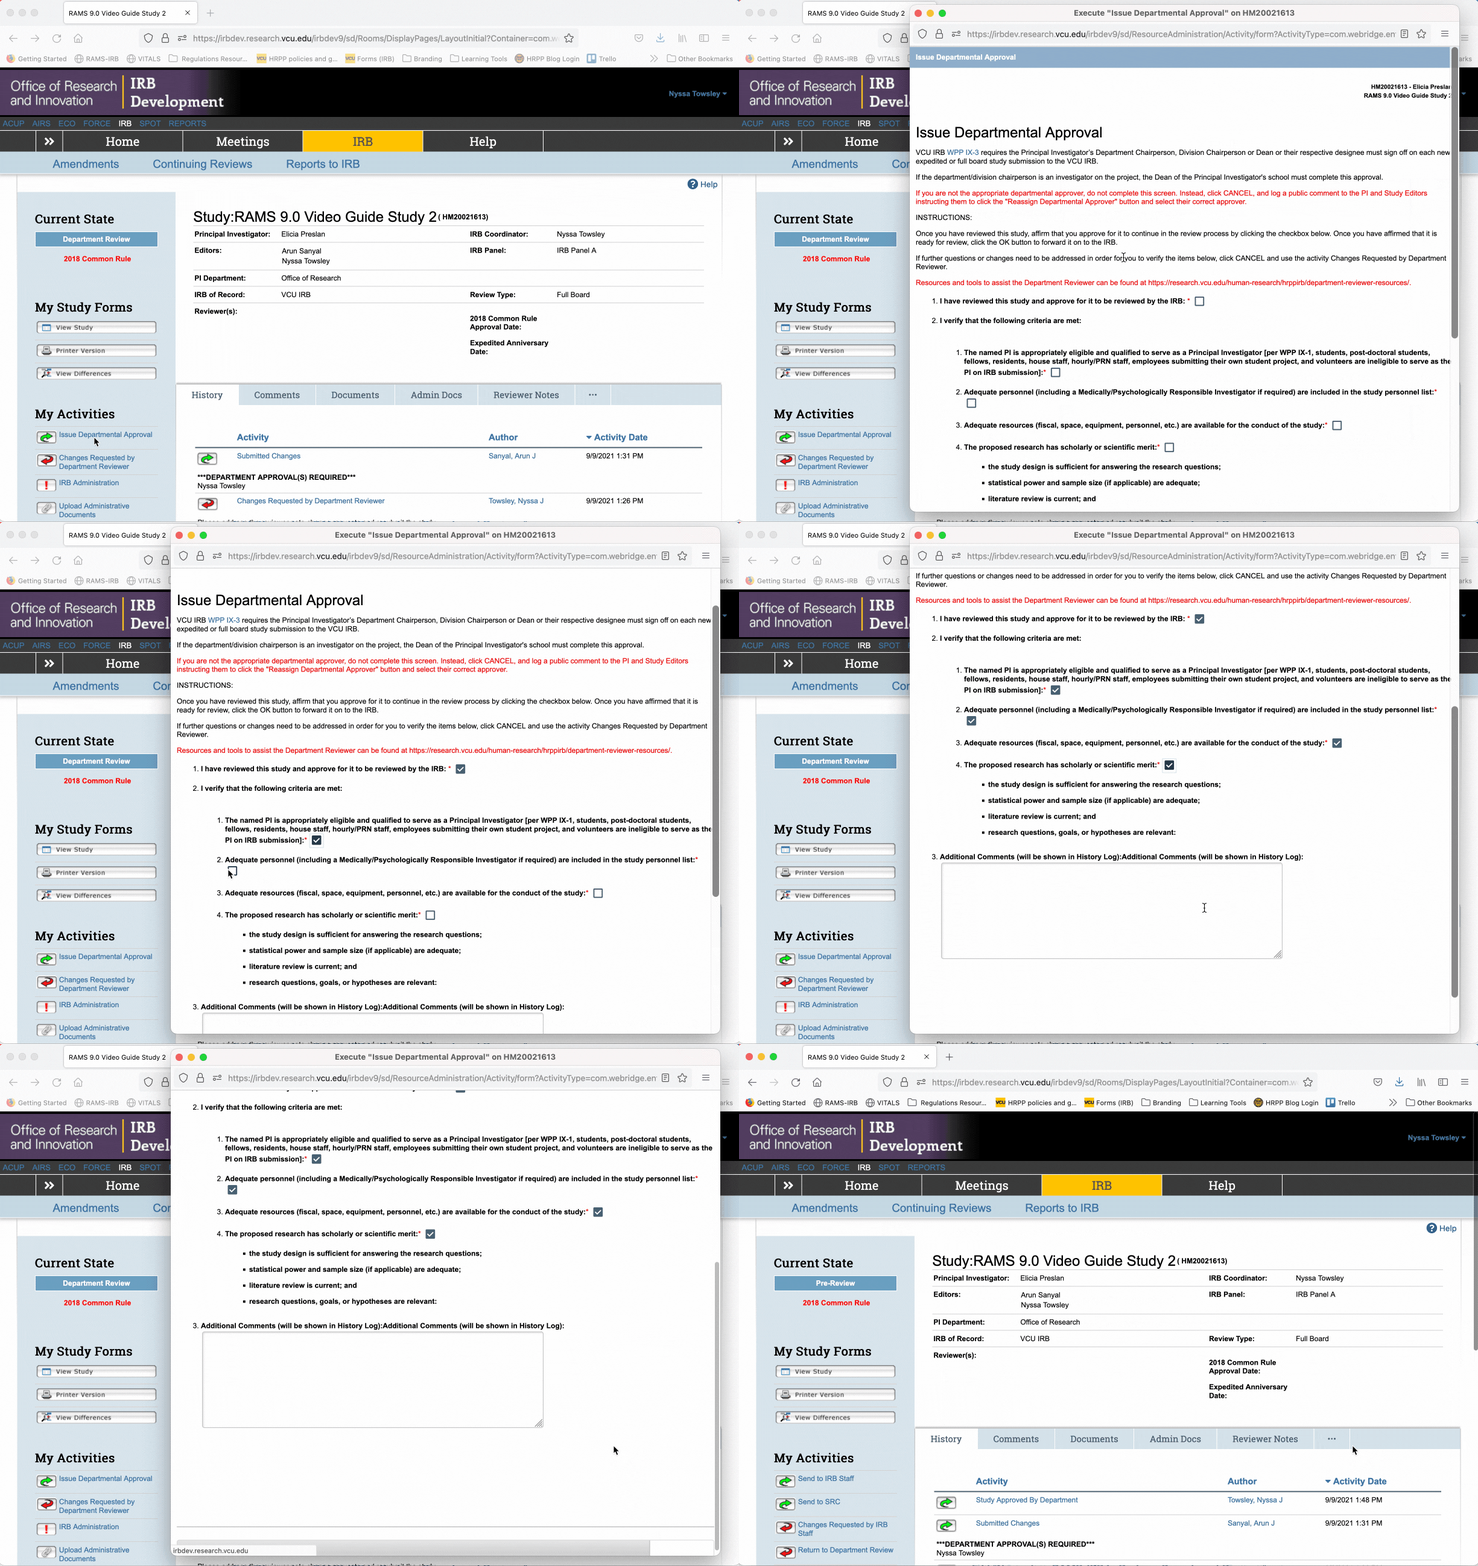
Once you have requested and reviewed all necessary changes, you may issue department approval. Navigate to the main study workspace and select “Issue Departmental Approval.” In the pop-up window, check all the required boxes to affirm that you reviewed the corresponding item. Enter any additional comments in the text box (not required), and click “OK.” Once “OK” is clicked, the study will have department approval, and will be routed to the IRB for review.
